最近一些日子在學(xué)習(xí)有關(guān)于虛擬機virtualbox,現(xiàn)在分享給大家參考一下。
一、虛擬機網(wǎng)絡(luò)配置
默認(rèn)只是設(shè)置了網(wǎng)卡1:方式nat(對應(yīng)ifcfg-eth0)
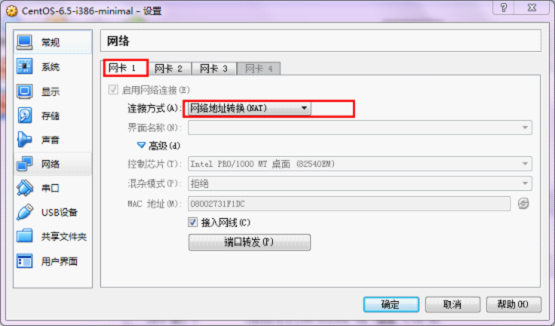
我們還可以設(shè)置網(wǎng)卡2,網(wǎng)卡3。可以在系統(tǒng)安裝完成后設(shè)置。
網(wǎng)卡2設(shè)置回環(huán)網(wǎng)卡,實現(xiàn)虛擬機與宿主機組成局域網(wǎng)(對應(yīng)ifcfg-eth1),這樣即使沒有路由器也可以組成局域網(wǎng),可以進行ssh連接。
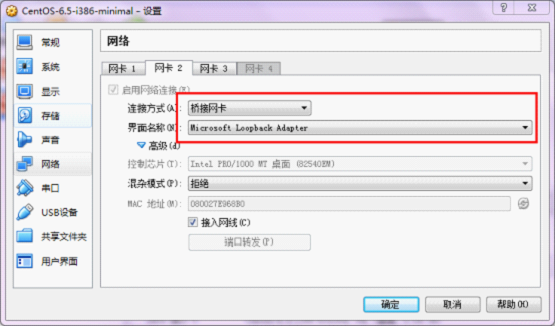
需要宿主機安裝microsoftloopbackadapter。參加附錄。
網(wǎng)卡3設(shè)置連接到互聯(lián)網(wǎng),并與宿主機組成局域網(wǎng)(對應(yīng)ifcfg-eth2)。需要依賴網(wǎng)絡(luò),且有真實路由器。
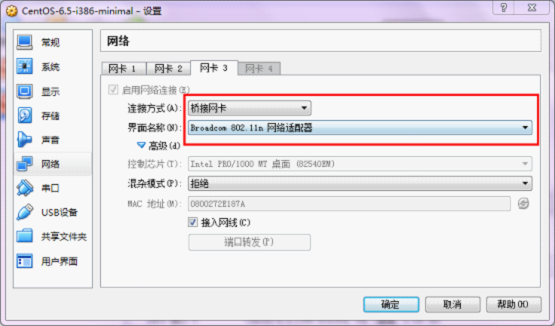
二、centos里eth設(shè)置
進入/etc/sysconfig/network-scripts目錄,默認(rèn)只有ifcfg-eth0。
復(fù)制ifcfg-eth0為ifcfg-eth1,修改為:
|
1
2
3
4
5
6
7
8
9
10
11
12
13
14
15
16
17
|
device=eth1#hwaddr=08:00:27:31:f1:dctype=ethernet#uuid=b8f8e76e-1f8b-4cf5-9261-493bfc6b04efonboot=yesnm_controlled=yesbootproto=staticipaddr="192.168.12.10"gateway="192.168.12.1" |
復(fù)制ifcfg-eth0為ifcfg-eth2,修改為:
|
1
2
3
4
5
6
7
8
9
10
11
12
13
|
device=eth2#hwaddr=08:00:27:31:f1:dctype=ethernet#uuid=b8f8e76e-1f8b-4cf5-9261-493bfc6b04efonboot=yesnm_controlled=yesbootproto=dhcp |
保存好后,使用命令:servicenetworkrestart重啟網(wǎng)絡(luò)服務(wù),如果ifcfg-eth1和ifcfg-eth2顯示為綠色,說明二者設(shè)置成功。
網(wǎng)卡文件內(nèi)容示例說明:
|
1
2
3
4
5
6
7
8
9
10
|
device=eth0 //指出設(shè)備名稱bootprot=static //啟動類型 dhcp|staticbroadcast=192.168.1.203 //廣播地址hwaddr=00:06:5b:fe:df:7c //硬件mac地址ipaddr=192.168.0.2 //ip地址netmask=255.255.255.0 //子網(wǎng)掩碼network=192.168.0.0 //網(wǎng)絡(luò)地址gateway=192.168.0.1 //網(wǎng)關(guān)地址onboot=yes //是否啟動應(yīng)用type=ethernet //網(wǎng)絡(luò)類型 |
為驗證結(jié)果,可以輸入ifconfig進行驗證:
|
1
2
3
4
5
6
7
8
9
10
11
12
13
14
15
16
17
18
19
20
21
22
23
24
25
26
27
28
29
30
31
32
33
34
35
36
37
38
39
40
41
42
43
44
45
46
47
48
49
50
51
52
53
|
[root@localhost network-scripts]# ifconfigeth1 link encap:ethernet hwaddr 08:00:27:e9:68:b0 inet addr:192.168.12.10 bcast:192.168.12.255 mask:255.255.255.0 inet6 addr: fe80::a00:27ff:fee9:68b0/64 scope:link up broadcast running multicast mtu:1500 metric:1 rx packets:1682 errors:0 dropped:0 overruns:0 frame:0 tx packets:775 errors:0 dropped:0 overruns:0 carrier:0 collisions:0 txqueuelen:1000 rx bytes:134511 (131.3 kib) tx bytes:109027 (106.4 kib) eth2 link encap:ethernet hwaddr 08:00:27:2e:18:7a inet addr:192.168.36.85 bcast:192.168.36.255 mask:255.255.255.0 inet6 addr: fe80::a00:27ff:fe2e:187a/64 scope:link up broadcast running multicast mtu:1500 metric:1 rx packets:885 errors:0 dropped:0 overruns:0 frame:0 tx packets:42 errors:0 dropped:0 overruns:0 carrier:0 collisions:0 txqueuelen:1000 rx bytes:72712 (71.0 kib) tx bytes:4156 (4.0 kib) lo link encap:local loopback inet addr:127.0.0.1 mask:255.0.0.0 inet6 addr: ::1/128 scope:host up loopback running mtu:16436 metric:1 rx packets:12 errors:0 dropped:0 overruns:0 frame:0 tx packets:12 errors:0 dropped:0 overruns:0 carrier:0 collisions:0 txqueuelen:0 rx bytes:1028 (1.0 kib) tx bytes:1028 (1.0 kib) |
能顯示出eth1和eth2說明成功了。
附錄:
windows7上安裝微軟microsoftloopbackadapter(回環(huán)網(wǎng)卡)的方法
1.單擊開始圖標(biāo),在搜索中輸入hdwwiz,在搜索結(jié)果中鼠標(biāo)右鍵單擊該程序,使用“以管理員身份運行”方式來啟動。
2.根據(jù)操作系統(tǒng)向?qū)Вx擇“安裝我手動從列表選擇的硬件(高級)”。
3.在硬件列表中,選擇“網(wǎng)絡(luò)適配器”。
4.選擇“microsoft”廠商,并在右邊網(wǎng)絡(luò)適配器列表中選中“microsoftloopbackadapter”,下一步按照向?qū)瓿砂惭b。

5.安裝完成后,查看硬件管理器,會多出一個新網(wǎng)卡,這就是虛擬網(wǎng)卡。

接下來,需要進行些配置:
打開網(wǎng)絡(luò)和共享中心->更改適配器設(shè)置,找到標(biāo)識有microsoftloopbackadapter的那個網(wǎng)絡(luò),右鍵屬性,選中internet協(xié)議版本4(tcp/ipv4),點擊下方屬性,編輯為:
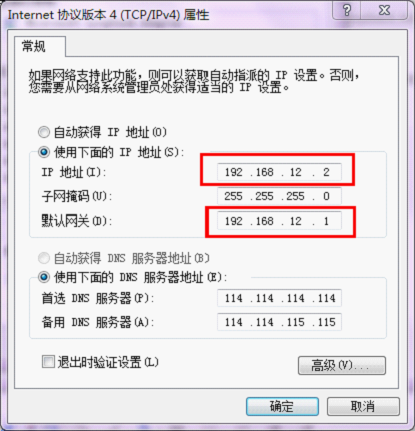
這里的網(wǎng)關(guān)是我自己定義的,為192.168.12.1,當(dāng)然可以改成其他的,比如192.168.13.1。這里宿主機的ip是192.168.12.2,虛擬機里就不能設(shè)置為這個了。這里與虛擬機eth1是對應(yīng)的,eth1的ip也源自這里。修改后保存即可。
注意回環(huán)網(wǎng)卡最好在設(shè)置虛擬機網(wǎng)絡(luò)之前就設(shè)置好。
以上就是本文的全部內(nèi)容,希望對大家的學(xué)習(xí)有所幫助,也希望大家多多支持服務(wù)器之家。


