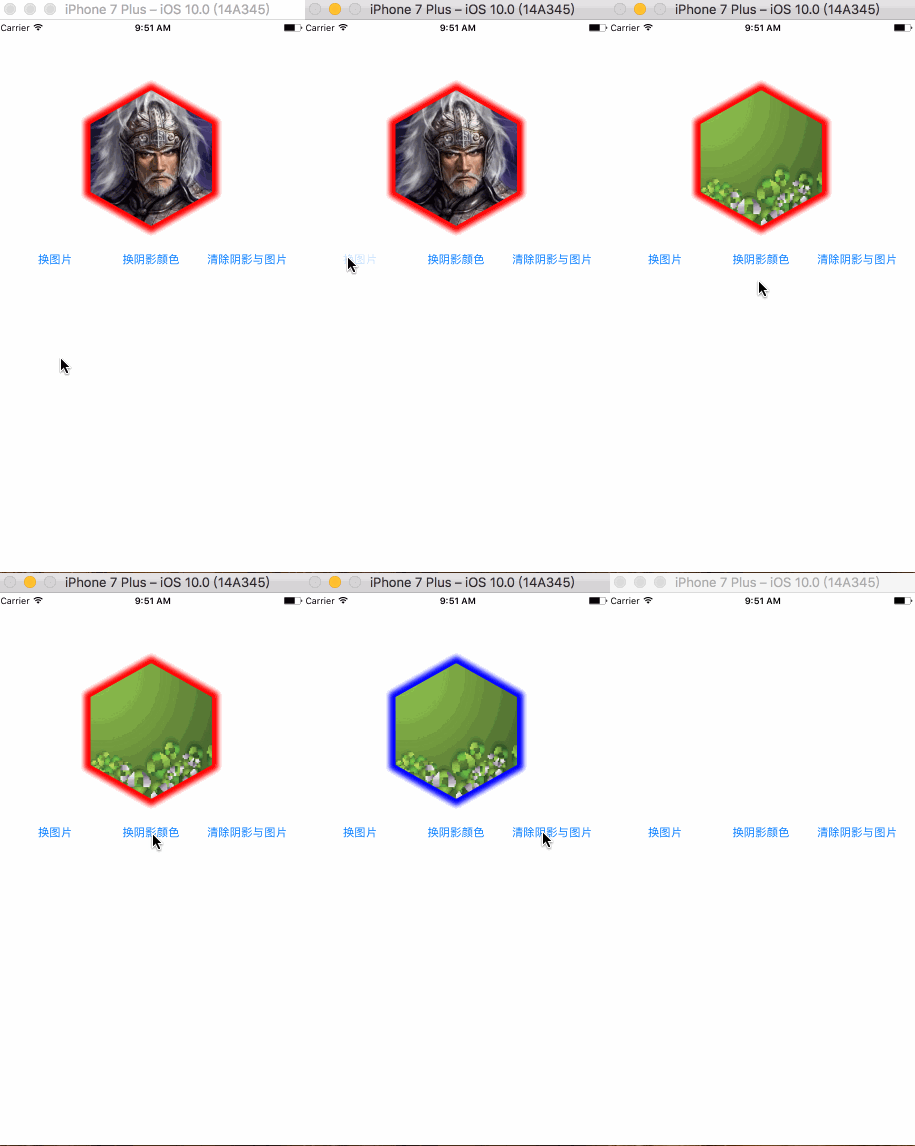
先來看看效果圖

這個效果寫起來挺簡單,主要運(yùn)用下面幾個知識點(diǎn)
layer 的mask : 圖層蒙版
layer 的shadowpath : 繪制自定義形狀陰影
uibezierpath :繪制六邊形路線
說完知識點(diǎn)下面上代碼了
繪制六邊形的路線
|
1
2
3
4
5
6
7
8
9
10
11
12
13
|
-(cgpathref)getcgpath:(cgfloat)viewwidth{ uibezierpath * path = [uibezierpath bezierpath]; path.linewidth = 2; [[uicolor whitecolor] setstroke]; [path movetopoint:cgpointmake((sin(m_1_pi / 180 * 60)) * (viewwidth / 2), (viewwidth / 4))]; [path addlinetopoint:cgpointmake((viewwidth / 2), 0)]; [path addlinetopoint:cgpointmake(viewwidth - ((sin(m_1_pi / 180 * 60)) * (viewwidth / 2)), (viewwidth / 4))]; [path addlinetopoint:cgpointmake(viewwidth - ((sin(m_1_pi / 180 * 60)) * (viewwidth / 2)), (viewwidth / 2) + (viewwidth / 4))]; [path addlinetopoint:cgpointmake((viewwidth / 2), viewwidth)]; [path addlinetopoint:cgpointmake((sin(m_1_pi / 180 * 60)) * (viewwidth / 2), (viewwidth / 2) + (viewwidth / 4))]; [path closepath]; return path.cgpath;} |
繪制一個六邊形的layer,并把image 賦值到contents 上
|
1
2
3
4
5
6
7
8
9
10
|
cgrect hexagnorect = self.bounds;//繪制一個六邊形的layer,并復(fù)制一個image給他的contentscalayer *hexagonlayer = [calayer layer];hexagonlayer.frame = hexagnorect;cashapelayer * shaplayer = [cashapelayer layer];shaplayer.linewidth = 1;shaplayer.strokecolor = [uicolor whitecolor].cgcolor;shaplayer.path = [self getcgpath:hexagnorect.size.width-20];hexagonlayer.mask = shaplayer;hexagonlayer.contents = (__bridge id _nullable)(self.image.cgimage); |
創(chuàng)建一個calayer,將六邊形layer 添加到calayer上,并繪制模糊陰影
|
1
2
3
4
5
6
7
8
9
|
calayer *completelayer = [calayer layer];completelayer.frame = cgrectmake(10, 10, self.bounds.size.width-10, self.bounds.size.height-10);[completelayer addsublayer:hexagonlayer];completelayer.shadowopacity = 1.0f;completelayer.shadowpath = [self getcgpath:hexagnorect.size.width];completelayer.shadowoffset = cgsizemake(-10, -10);completelayer.shadowcolor = self.hg_shadowcolor.cgcolor;[self.layer addsublayer:completelayer]; |
總結(jié)
好了,以上就是在ios中實(shí)現(xiàn)圖片六邊形的全部內(nèi)容了,希望本文能對大家開發(fā)ios有所幫助,如果有疑問大家可以留言交流。


