ios應用數據存儲的常用方式
- xml屬性列表(plist)歸檔
- preference(偏好設置)
- nskeyedarchiver歸檔(nscoding)
- sqlite3
- core data
1. xml屬性列表(plist)歸檔
每個ios應用都有自己的應用沙盒(應用沙盒就是文件系統目錄),與其他文件系統隔離。應用必須待在自己的沙盒里,其他應用不能訪問該沙盒。

應用沙盒結構分析:
應用程序包:包含了所有的資源文件和可執(zhí)行文件
documents:保存應用運行時生成的需要持久化的數據,itunes同步設備時會備份該目錄。例如,游戲應用可將游戲存檔保存在該目錄
tmp:保存應用運行時所需的臨時數據,使用完畢后再將相應的文件從該目錄刪除。應用沒有運行時,系統也可能會清除該目錄下的文件。itunes同步設備時不會備份該目錄
library/caches:保存應用運行時生成的需要持久化的數據,itunes同步設備時不會備份該目錄。一般存儲體積大、不需要備份的非重要數據
library/preference:保存應用的所有偏好設置,ios的settings(設置)應用會在該目錄中查找應用的設置信息。itunes同步設備時會備份該目錄
應用沙盒目錄的常見獲取方式
|
1
2
3
4
5
6
7
8
9
10
11
12
13
14
15
16
17
18
19
20
|
沙盒根目錄:nsstring *home = nshomedirectory();documents:(2種方式)1. 利用沙盒根目錄拼接”documents”字符串//不建議采用,因為新版本的操作系統可能會修改目錄名nsstring *home = nshomedirectory();nsstring *documents = [home stringbyappendingpathcomponent:@"documents"];2. 利用nssearchpathfordirectoriesindomains函數// nsuserdomainmask 代表從用戶文件夾下找// yes 代表展開路徑中的波浪字符“~”nsarray *array = nssearchpathfordirectoriesindomains(nsdocumentdirectory, nsuserdomainmask, no);// 在ios中,只有一個目錄跟傳入的參數匹配,所以這個集合里面只有一個元素nsstring *documents = [array objectatindex:0];tmp:nsstring *tmp = nstemporarydirectory();library/caches:跟documents類似的2種方法:1. 利用沙盒根目錄拼接”caches”字符串2. 利用nssearchpathfordirectoriesindomains函數(將函數的第2個參數改為:nscachesdirectory即可)library/preference:通過nsuserdefaults類存取該目錄下的設置信息 |
屬性列表
屬性列表是一種xml格式的文件,拓展名為plist
如果對象是nsstring、nsdictionary、nsarray、nsdata、nsnumber等類型,就可以使用writetofile:atomically:方法直接將對象寫到屬性列表文件中
如:將一個nsdictionary對象歸檔到一個plist屬性列表中
|
1
2
3
4
5
6
7
8
9
10
11
|
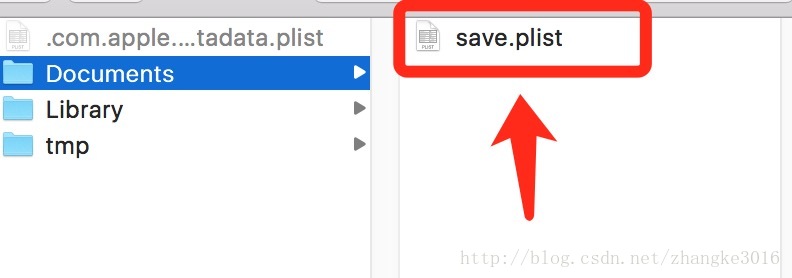
/ /獲取路徑nsstring *path = nssearchpathfordirectoriesindomains(nsdocumentdirectory, nsuserdomainmask, yes)[0];path = [path stringbyappendingpathcomponent:@"save.plist"];/ /將數據封裝成字典//不能存儲對象nsmutabledictionary *dict = [nsmutabledictionary dictionary];[dict setobject:@"小黃" forkey:@"name"];[dict setobject:@"12345678" forkey:@"phone"];[dict setobject:@"24" forkey:@"age"];// 將字典持久化到documents/save.plist文件中[dict writetofile:path atomically:yes]; |

恢復nsdictionary
|
1
2
3
4
5
6
|
讀取屬性列表,恢復nsdictionary對象// 讀取documents/save.plist的內容,實例化nsdictionarynsdictionary *dict = [nsdictionary dictionarywithcontentsoffile:path];nslog(@"name:%@", [dict objectforkey:@"name"]);nslog(@"phone:%@", [dict objectforkey:@"phone"]);nslog(@"age:%@", [dict objectforkey:@"age"]); |
**nsdictionary—(writetofile:atomically:)—-> save.plist
(屬性列表文件)**save.plist(屬性列表文件)—(dictionarywithcontentsoffile:)—> nsdictionary
2. preference(偏好設置)
很多ios應用都支持偏好設置,比如保存用戶名、密碼、字體大小等設置,ios提供了一套標準的解決方案來為應用加入偏好設置功能
每個應用都有個nsuserdefaults實例,通過它來存取偏好設置
|
1
2
3
4
5
|
//比如,保存用戶名、字體大小、是否自動登錄nsuserdefaults *defaults = [nsuserdefaults standarduserdefaults];[defaults setobject:@"mr.zk" forkey:@"username"];[defaults setfloat:18.0f forkey:@"text_size"];[defaults setbool:yes forkey:@"auto_login"]; |

|
1
2
3
4
5
|
//讀取上次保存的設置nsuserdefaults *defaults = [nsuserdefaults standarduserdefaults];nsstring *username = [defaults stringforkey:@"username"];float textsize = [defaults floatforkey:@"text_size"];bool autologin = [defaults boolforkey:@"auto_login"]; |
注意:userdefaults設置數據時,不是立即寫入,而是根據時間戳定時地把緩存中的數據寫入本地磁盤。所以調用了set方法之后數據有可能還沒有寫入磁盤應用程序就終止了。出現以上問題,可以通過調用synchornize方法強制寫入
[defaults synchornize];
3. nskeyedarchiver歸檔(nscoding)
nskeyedarchiver
如果對象是nsstring、nsdictionary、nsarray、nsdata、nsnumber等類型,可以直接用
nskeyedarchiver進行歸檔和恢復不是所有的對象都可以直接用這種方法進行歸檔,只有遵守了
nscoding協議的對象才可以
* nscoding協議有2個方法:*
encodewithcoder:
每次歸檔對象時,都會調用這個方法。一般在這個方法里面指定如何歸檔對象中的每個實例變量,可以使用encodeobject:forkey:方法歸檔實例變量
initwithcoder:
每次從文件中恢復(解碼)對象時,都會調用這個方法。一般在這個方法里面指定如何解碼文件中的數據為對象的實例變量,可以使用decodeobject:forkey方法解碼實例變量
歸檔一個nsarray對象到documents/array.data
|
1
2
3
4
|
nsstring *path = nssearchpathfordirectoriesindomains(nscachesdirectory, nsuserdomainmask, yes)[0];path = [path stringbyappendingpathcomponent:@"array.data"];nsarray *array = [nsarray arraywithobjects:@”a”,@”b”,nil];[nskeyedarchiver archiverootobject:array tofile:path]; |

恢復(解碼)nsarray對象
|
1
|
nsarray *array = [nskeyedunarchiver unarchiveobjectwithfile:path]; |
nsarray—(archiverootobject:tofile:)—-> array.data
array.data—(unarchiveobjectwithfile:)—> nsarray
|
1
2
3
4
5
6
|
nskeyedarchiver-歸檔person對象(person.h)@interface person : nsobject<nscoding>@property (nonatomic, strong) nsstring *name;@property (nonatomic, assign) int age;@property (nonatomic, assign) float height;@end |
|
1
2
3
4
5
6
7
8
9
10
11
12
13
|
@implementation person- (void)encodewithcoder:(nscoder *)encoder { [encoder encodeobject:self.name forkey:@"name"]; [encoder encodeint:self.age forkey:@"age"]; [encoder encodefloat:self.height forkey:@"height"];}- (id)initwithcoder:(nscoder *)decoder { self.name = [decoder decodeobjectforkey:@"name"]; self.age = [decoder decodeintforkey:@"age"]; self.height = [decoder decodefloatforkey:@"height"]; return self;}@end |
|
1
2
3
4
5
6
7
8
|
//歸檔(編碼)person *person = [[[person alloc] init] autorelease];person.name = @"zk";person.age = 24;person.height = 1.73f;[nskeyedarchiver archiverootobject:person tofile:path];//恢復(解碼)person *person = [nskeyedunarchiver unarchiveobjectwithfile:path]; |
如果父類也遵守了nscoding協議,請注意:
應該在encodewithcoder:方法中加上
[super encodewithcode:encode];
確保繼承的實例變量也能被編碼,
即也能被歸檔應該在initwithcoder:方法中加上
self = [super initwithcoder:decoder];
確保繼承的實例變量也能被解碼,即也能被恢復
nsdata
使用archiverootobject:tofile:方法可以將一個對象直接寫入到一個文件中,但有時候可能想將多個對象寫入到同一個文件中,那么就要使用nsdata來進行歸檔對象
nsdata可以為一些數據提供臨時存儲空間,以便隨后寫入文件,或者存放從磁盤讀取的文件內容。可以使用[nsmutabledata data]創(chuàng)建可變數據空間

|
1
2
3
4
5
6
7
8
9
10
11
12
|
//歸檔(編碼)// 新建一塊可變數據區(qū)nsmutabledata *data = [nsmutabledata data];// 將數據區(qū)連接到一個nskeyedarchiver對象nskeyedarchiver *archiver = [[[nskeyedarchiver alloc] initforwritingwithmutabledata:data] autorelease];// 開始存檔對象,存檔的數據都會存儲到nsmutabledata中[archiver encodeobject:person1 forkey:@"person1"];[archiver encodeobject:person2 forkey:@"person2"];// 存檔完畢(一定要調用這個方法)[archiver finishencoding];// 將存檔的數據寫入文件[data writetofile:path atomically:yes]; |
利用歸檔實現深復制
|
1
2
3
4
5
6
7
8
9
|
//恢復(解碼)// 從文件中讀取數據nsdata *data = [nsdata datawithcontentsoffile:path];// 根據數據,解析成一個nskeyedunarchiver對象nskeyedunarchiver *unarchiver = [[nskeyedunarchiver alloc] initforreadingwithdata:data];person *person1 = [unarchiver decodeobjectforkey:@"person1"];person *person2 = [unarchiver decodeobjectforkey:@"person2"];// 恢復完畢[unarchiver finishdecoding]; |
person1—(archiveddatawithrootobject:)—>nsdata—(unarchiveobjectwithdata:)—>person2
4. sqlite3(之后補充)
5. core data(之后補充)
感謝閱讀,希望能幫助到大家,謝謝大家對本站的支持!
原文鏈接:http://blog.csdn.net/zhangke3016/article/details/53574894


