本文介紹了spring boot整合cucumber(bdd)的方法,分享給大家,具體如下:
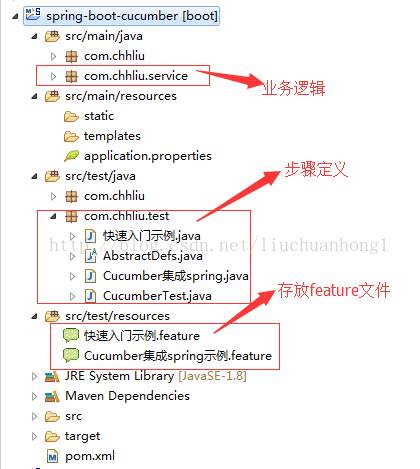
1、新建一個springboot工程工程結構如下:

2、添加pom依賴
|
1
2
3
4
5
6
7
8
9
10
11
12
13
14
15
16
17
18
19
20
21
22
23
24
25
26
27
28
29
30
31
32
33
34
35
36
37
38
39
40
41
42
43
44
45
46
47
48
49
50
51
52
53
54
55
56
57
58
59
60
61
62
63
64
65
66
67
68
69
70
71
72
73
74
75
76
77
78
79
80
81
82
83
84
85
86
87
88
89
90
91
92
93
94
95
96
97
98
99
100
101
102
103
104
105
106
107
|
<?xml version="1.0" encoding="utf-8"?> <project xmlns="http://maven.apache.org/pom/4.0.0" xmlns:xsi="http://www.w3.org/2001/xmlschema-instance" xsi:schemalocation="http://maven.apache.org/pom/4.0.0 http://maven.apache.org/xsd/maven-4.0.0.xsd"> <modelversion>4.0.0</modelversion> <groupid>com.chhliu</groupid> <artifactid>spring-boot-cucumber</artifactid> <version>0.0.1-snapshot</version> <packaging>jar</packaging> <name>spring-boot-cucumber</name> <description>demo project for spring boot and cucumber</description> <parent> <groupid>org.springframework.boot</groupid> <artifactid>spring-boot-starter-parent</artifactid> <version>1.5.6.release</version> <relativepath /> <!-- lookup parent from repository --> </parent> <properties> <cucumber.version>1.2.4</cucumber.version> <project.build.sourceencoding>utf-8</project.build.sourceencoding> <project.reporting.outputencoding>utf-8</project.reporting.outputencoding> <java.version>1.7</java.version> </properties> <dependencies> <dependency> <groupid>org.springframework.boot</groupid> <artifactid>spring-boot-starter-web</artifactid> </dependency> <dependency> <groupid>info.cukes</groupid> <artifactid>cucumber-java</artifactid> <version>${cucumber.version}</version> </dependency> <dependency> <groupid>info.cukes</groupid> <artifactid>cucumber-core</artifactid> <version>${cucumber.version}</version> </dependency> <dependency> <groupid>info.cukes</groupid> <artifactid>cucumber-spring</artifactid> <version>${cucumber.version}</version> </dependency> <dependency> <groupid>info.cukes</groupid> <artifactid>cucumber-junit</artifactid> <version>${cucumber.version}</version> <exclusions> <exclusion> <groupid>junit</groupid> <artifactid>junit</artifactid> </exclusion> </exclusions> </dependency> <dependency> <groupid>org.springframework.boot</groupid> <artifactid>spring-boot-starter-test</artifactid> <scope>test</scope> </dependency> </dependencies> <build> <plugins> <plugin> <groupid>org.springframework.boot</groupid> <artifactid>spring-boot-maven-plugin</artifactid> <configuration> <source>1.7</source> <target>1.7</target> </configuration> </plugin> <plugin> <groupid>org.codehaus.mojo</groupid> <artifactid>exec-maven-plugin</artifactid> <configuration> <source>1.7</source> <target>1.7</target> </configuration> <executions> <execution> <phase>integration-test</phase> <goals> <goal>java</goal> </goals> <configuration> <classpathscope>test</classpathscope> <mainclass>com.chhliu.test.cucumbertest.java</mainclass> <arguments> <argument>--plugin</argument> <argument>pretty</argument> <argument>--glue</argument> <argument>src/test/resources/</argument> </arguments> </configuration> </execution> </executions> </plugin> </plugins> </build> </project> |
2、編寫service接口及其實現類
|
1
2
3
4
5
6
7
8
9
10
|
package com.chhliu.service; /** * 模擬登錄 * @author chhliu * */public interface userinfoservicei { boolean login(string username, string password, string confirmpassword); } |
|
1
2
3
4
5
6
7
8
|
package com.chhliu.service; import org.springframework.stereotype.service; @service("userinfoservice") public class userinfoservice implements userinfoservicei{ public boolean login(string username, string password, string confirmpassword){ return (username.equals("chhliu") && password.equals("123456") && confirmpassword.equals("123456")); } } |
3、編寫feature文件
|
1
2
3
4
5
6
7
8
9
10
11
12
13
14
15
16
17
18
19
20
21
22
23
|
#language: zh-cn #"zh-cn": { # "but": "*|但是<", # "and": "*|而且<|并且<|同時<", # "then": "*|那么<", # "when": "*|當<", # "name": "chinese simplified", # "native": "簡體中文", # "feature": "功能", # "background": "背景", # "scenario": "場景|劇本", # "scenario_outline": "場景大綱|劇本大綱", # "examples": "例子", # "given": "*|假如<|假設<|假定<"# } @bank功能:假如我在銀行取錢的時候,如果我登錄成功并且輸入的密碼正確,那么會顯示我的銀行卡余額,假如余額為50萬 場景:銀行取錢 假如:我以"chhliu"登錄 并且:輸入的密碼為"123456" 當:確認密碼也為"123456"時 那么:顯示銀行卡余額為"500000" |
4、編寫測試類
|
1
2
3
4
5
6
7
8
9
10
11
12
13
14
15
16
17
18
19
20
21
22
23
24
|
package com.chhliu.test; import org.junit.runner.runwith; import cucumber.api.cucumberoptions; import cucumber.api.junit.cucumber; /** * @runwith(cucumber.class) 這是一個運行器 ,指用cucumber來運行測試 * @cucumberoptions中的features,用于指定我們項目中要運行的feature的目錄 * @cucumberoptions中的format,用于指定我們項目中要運行時生成的報告,并指定之后可以在target目錄中找到對應的測試報告 * @cucumberoptions中的glue,用于指定項目運行時查找實現step定義文件的目錄 * * 在實際項目中,隨著項目的進行,一個測試工程可能由多個feature文件組成,并且每個feature文件中可能也是由多個scenario組成。默認情況下, * 每次運行是運行所有feature中的所有scenario。這樣可能導致正常情況下運行一次測試腳本,需要非常長的時間來等待測試結果。 * 但是實際過程中,測試用例是有優先級等區分的。比如smoketest、regressiontest等。或者有時候會有特別小部分的用例,比如等級是critical, * 這些用例需要長時間運行來監測系統是否沒有白頁或者頁面404等現象。 * 所以我們必須區分開所有的scenario,可以使我們在啟動測試腳本時,可以根據我們需要來運行哪些模塊的scenaro。這時我們可以使用tags * 在cucumber里tag是直接在feature、scenari或scenario outline關鍵字前給feature或scenario添加任意數量的前綴為@的tags,多個tag用空格來分隔 * @author chhliu * */@runwith(cucumber.class) @cucumberoptions(plugin = {"json:target/cucumber.json", "pretty"}, features = "src/test/resources") public class cucumbertest { } |
5、運行測試類,并對測試輸出的未定義步驟進行完善
|
1
2
3
4
5
6
7
8
9
10
11
12
13
14
15
16
17
18
19
20
21
22
23
24
25
26
27
28
29
30
31
32
33
34
35
36
37
38
39
40
41
42
|
package com.chhliu.test; import javax.annotation.resource; import org.junit.assert; import com.chhliu.service.userinfoservicei; import cucumber.api.java.zh_cn.假如; import cucumber.api.java.zh_cn.當; import cucumber.api.java.zh_cn.那么; public class cucumber集成spring { @resource(name="userinfoservice") private userinfoservicei service; private string username; private string password; private string confirmpassword; @假如("^:我以\"([^\"]*)\"登錄$") public void 我以_登錄(string arg1) throws throwable { this.username = arg1; } @假如("^:輸入的密碼為\"([^\"]*)\"$") public void 輸入的密碼為(string arg1) throws throwable { this.password = arg1; } @當("^:確認密碼也為\"([^\"]*)\"時$") public void 確認密碼也為_時(string arg1) throws throwable { this.confirmpassword = arg1; } @那么("^:顯示銀行卡余額為\"([^\"]*)\"$") public void 顯示銀行卡余額為(string arg1) throws throwable { boolean islogin = service.login(username, password, confirmpassword); if(islogin){ system.out.println("登錄成功!查詢余額如下:"+arg1); assert.assertequals("500000", arg1); } } } |
6、在測試步驟上添加注解支持
|
1
2
3
4
5
|
@runwith(springjunit4classrunner.class) @contextconfiguration // 不加此注解,bean會注入不進去 @springboottest // 不加此注解會找不到bean public class cucumber集成spring{ } |
7、測試結果
2 scenarios (2 passed)
11 steps (11 passed)
0m0.091s
8、整合注意點
spring boot與cucumber整合的時候,有個地方需要注意,因為spring boot提倡去xml化,所以傳統方式下,cucumber會讀取classpath下的cucumber.xml配置文件來初始化bean的方式,和spring整合后,就不能用這種方式了,需要使用@contextconfiguration注解來實現類的加載,如果是需要加載配置文件的方式的話,可以如下使用:
|
1
|
@contextconfiguration(locations = { "classpath:applicationcontext.xml" }) |
如果使用注解的方式來整合的話,使用如下:
|
1
|
@contextconfiguration(classes=springbootcucumberapplication.class) |
或者直接
|
1
|
@contextconfiguration |
特別注意:@contextconfiguration注解必加,否則會出現bean注入失敗
下面,我們從源碼來看下為什么會造成這種情況。
該部分涉及的代碼都在cucumber-spring包下的springfactory類中,重點我們看下下面這個類:
|
1
2
3
4
5
6
7
8
9
10
11
12
13
14
15
16
17
|
public void start() {// cucumber測試啟動方法 if (stepclasswithspringcontext != null) {// 如果使用了@contextconfiguration注解的話,此處不為null testcontextmanager = new cucumbertestcontextmanager(stepclasswithspringcontext); } else {// 否則stepclasswithspringcontext就為null,會進入下面這個分支 if (beanfactory == null) { beanfactory = createfallbackcontext();// 這個方法是我們要跟的重點 } } notifycontextmanagerabouttestclassstarted(); if (beanfactory == null || isnewcontextcreated()) { beanfactory = testcontextmanager.getbeanfactory(); for (class<?> stepclass : stepclasses) { registerstepclassbeandefinition(beanfactory, stepclass); } } gluecodecontext.instance.start(); } |
我們在來跟下createfallbackcontext方法:
|
1
2
3
4
5
6
7
8
9
10
11
12
13
14
15
|
private configurablelistablebeanfactory createfallbackcontext() { configurableapplicationcontext applicationcontext; if (getclass().getclassloader().getresource("cucumber.xml") != null) {// 會先根據classpath下的cucumber.xml來初始化<span style="font-family:arial, helvetica, sans-serif;">configurableapplicationcontext</span> applicationcontext = new classpathxmlapplicationcontext("cucumber.xml"); } else {// 如果沒有配置cucumber.xml的話,會new genericapplicationcontext applicationcontext = new genericapplicationcontext(); } applicationcontext.registershutdownhook(); configurablelistablebeanfactory beanfactory = applicationcontext.getbeanfactory(); beanfactory.registerscope(gluecodescope.name, new gluecodescope()); for (class<?> stepclass : stepclasses) { registerstepclassbeandefinition(beanfactory, stepclass); } return beanfactory; } |
最后,來說下genericapplicationcontext這個類,該類會根據bean的type類型,然后newinstance實例,但是由于這個類中又注入了其他的類,而注入的類是無法通過new實例的方式來初始化的,所以最后就會注入失敗,報空指針了。
以上就是本文的全部內容,希望對大家的學習有所幫助,也希望大家多多支持服務器之家。
原文鏈接:https://blog.csdn.net/liuchuanhong1/article/details/77678620


