django 是一款基于 python 編寫并且采用 mvc 設(shè)計模式的開源的 web 應(yīng)用框架,早期是作為勞倫斯出版集團(tuán)新聞網(wǎng)站的 cms 內(nèi)容管理系統(tǒng)而開發(fā),后于 2005 年 7 月在 bsd 許可協(xié)議下開源,并于 2017 年 12 月 2 日 發(fā)布 2.0 正式版。

本文基于《django 官方 tutorials》以及《django rest framework 官方 tutorials》編寫,發(fā)稿時所使用的 django 版本為 2.1.4,python 版本為 3.6.6,文中涉及的代碼都已經(jīng)由筆者驗證運(yùn)行通過,最終形成了一個簡單項目并推送至筆者github上的jungle項目當(dāng)中,需要的朋友可以基于此來逐步步完善成為一個產(chǎn)品化的項目。
新建 django 項目
下面的命令行展示了在 windows 操作系統(tǒng)下,基于 venv 虛擬環(huán)境搭建一個 django 項目的步驟:
|
1
2
3
4
5
6
7
8
9
10
11
12
13
14
15
16
17
18
19
20
21
22
23
24
25
26
27
28
29
30
31
32
33
34
35
36
37
38
39
40
41
42
43
44
45
46
47
48
49
50
51
52
53
54
55
56
57
58
59
60
61
62
63
64
65
66
67
68
69
70
71
72
73
74
75
76
77
78
79
80
81
82
|
# 建立虛擬環(huán)境c:\workspace\djangoλ python -m venv venv# 激活虛擬環(huán)境c:\workspace\djangoλ .\venv\scripts\activate.bat(venv) λ# 安裝djangoc:\workspace\django(venv) λ pip install djangolooking in indexes: https://mirrors.aliyun.com/pypi/simple/collecting django using cached https://mirrors.aliyun.com/pypi/packages/fd/9a/0c028ea0fe4f5803dda1a7afabeed958d0c8b79b0fe762ffbf728db3b90d/django-2.1.4-py3-none-any.whlcollecting pytz (from django) using cached https://mirrors.aliyun.com/pypi/packages/f8/0e/2365ddc010afb3d79147f1dd544e5ee24bf4ece58ab99b16fbb465ce6dc0/pytz-2018.7-py2.py3-none-any.whlinstalling collected packages: pytz, djangosuccessfully installed django-2.1.4 pytz-2018.7# 進(jìn)入虛擬環(huán)境目錄,新建一個django項目c:\workspace\django(venv) λ django-admin startproject mysitec:\workspace\django(venv) λ lsmysite/ venv/# 進(jìn)入新建的django項目,建立一個應(yīng)用c:\workspace\django(venv) λ cd mysite\c:\workspace\django\mysite(venv) λ python manage.py startapp democ:\workspace\django\mysite(venv) λ lsdemo/ manage.py* mysite/# 同步數(shù)據(jù)庫c:\workspace\django\mysite(venv) λ python manage.py migrateoperations to perform: apply all migrations: admin, auth, contenttypes, sessionsrunning migrations: applying contenttypes.0001_initial... ok applying auth.0001_initial... ok applying admin.0001_initial... ok applying admin.0002_logentry_remove_auto_add... ok applying admin.0003_logentry_add_action_flag_choices... ok applying contenttypes.0002_remove_content_type_name... ok applying auth.0002_alter_permission_name_max_length... ok applying auth.0003_alter_user_email_max_length... ok applying auth.0004_alter_user_username_opts... ok applying auth.0005_alter_user_last_login_null... ok applying auth.0006_require_contenttypes_0002... ok applying auth.0007_alter_validators_add_error_messages... ok applying auth.0008_alter_user_username_max_length... ok applying auth.0009_alter_user_last_name_max_length... ok applying sessions.0001_initial... ok# 啟動開發(fā)服務(wù)(venv) λ python manage.py runserver 8080performing system checks...system check identified no issues (0 silenced).january 03, 2019 - 21:31:48django version 2.1.4, using settings 'mysite.settings'starting development server at http://127.0.0.1:8080/quit the server with ctrl-break.# 返回uinika虛擬環(huán)境目錄,并將當(dāng)前虛擬環(huán)境的依賴導(dǎo)入至requirements.txtc:\workspace\django\mysite(venv) λ cd ..c:\workspace\django(venv) λ pip freeze > requirements.txtc:\workspace\django(venv) λ lsmysite/ requirements.txt venv/ |
通過 django-admin startproject 命令創(chuàng)建的外部 mysite/ 目錄是 web 項目的容器,而 manage.py 文件是用于與 django 項目交互的命令行工具,更多的使用方式可以參閱 django-admin 文檔 。。
|
1
2
3
4
5
6
7
|
mysite/ manage.py mysite/ __init__.py settings.py urls.py wsgi.py |
內(nèi)部嵌套的 mysite/ 目錄是用于放置項目中具體的 python 包,它的名稱是您需要用來導(dǎo)入其中任何內(nèi)容的 python 包名稱,例如 mysite.urls 。
-
mysite/__init__.py: 空文件,用于提示系統(tǒng)將當(dāng)前目錄識別為一個 python 包。 -
mysite/settings.py: django 項目的配置文件,更多配置請查閱 django settings 。 -
mysite/urls.py: 當(dāng)前 django 項目的 url 聲明,更多內(nèi)容請參閱 url dispatcher 。 -
mysite/wsgi.py: 兼容 wsgi 規(guī)范的當(dāng)前項目入口點,更多細(xì)節(jié)可以閱讀 如果使用 wsgi 進(jìn)行部署 。
建立 mysite 項目之后,上面的命令行還通過了 py manage.py startapp 建立了一個 demo/ 應(yīng)用目錄,django 當(dāng)中一個項目( mysite )可以擁有多個應(yīng)用( demo ), demo/ 目錄下的文件結(jié)構(gòu)如下:
|
1
2
3
4
5
6
7
8
9
|
demo/ __init__.py admin.py apps.py migrations/ __init__.py models.py tests.py views.py |
請求與響應(yīng)
首先進(jìn)入 python 虛擬環(huán)境并進(jìn)入 mysite 目錄后,執(zhí)行如下命令:
|
1
2
|
c:\workspace\django\mysite (master -> origin)(venv) λ python manage.py startapp polls |
新建一個 polls 應(yīng)用之后,打開該目錄下的 polls/views.py 源碼文件,輸入以下代碼:
|
1
2
3
4
|
from django.http import httpresponsedef index(request): return httpresponse("你好,這是一個投票應(yīng)用!") |
接下來,我們需要將上面修改的視圖文件 views.py 映射到一個 url,先在 polls/ 目錄下新建一個 urls.py 文件,然后鍵入下面這段代碼:
|
1
2
3
4
5
6
7
|
from django.urls import pathfrom . import viewsurlpatterns = [ path('', views.index, name='index'),] |
最后,將上面定義的應(yīng)用的 url 聲明文件 polls/urls.py 包含至項目的 mysite/urls.py 當(dāng)中,
|
1
2
3
4
5
6
7
|
from django.contrib import adminfrom django.urls import include, pathurlpatterns = [ path('polls/', include('polls.urls')), path('admin/', admin.site.urls),] |
上面代碼中出現(xiàn)的 include() 函數(shù)主要用于引入其它 url 配置文件,這樣我們就可以通過 http://localhost:8080/polls/ 路徑訪問到如下信息了:

模型和管理頁面
mysite/settings.py 文件包含了項目的基本配置,該文件通過如下聲明默認(rèn)使用 django 內(nèi)置的 sqlite 作為項目數(shù)據(jù)庫。
|
1
2
3
4
5
6
|
databases = { 'default': { 'engine': 'django.db.backends.sqlite3', 'name': os.path.join(base_dir, 'db.sqlite3'), }} |
如果使用其它數(shù)據(jù)庫,則可以將配置書寫為下面的格式:
|
1
2
3
4
5
6
7
8
9
10
|
databases = { 'default': { 'engine': 'django.db.backends.mysql', # 數(shù)據(jù)庫引擎名稱 'name': 'db', # 數(shù)據(jù)庫連接名稱 'user': 'uinika', # 數(shù)據(jù)庫連接用戶名 'password': 'test', # 數(shù)據(jù)庫連接密碼 'host': 'localhost', # 數(shù)據(jù)庫主機(jī)地址 'port': '3306', # 數(shù)據(jù)庫端口 }} |
其中 engine 屬性可以根據(jù)項目所使用數(shù)據(jù)庫的不同而選擇如下值:
- sqlite:django.db.backends.sqlite3
- mysql:django.db.backends.mysql
- postgresql:django.db.backends.postgresql
- oracle:django.db.backends.oracle
接下來繼續(xù)修改 mysite/settings.py ,設(shè)置 time_zone 屬性為項目使用國家的時區(qū)。
|
1
2
|
language_code = 'zh-hans'time_zone = 'asia/chongqing' |
mysite/settings.py 文件頭部的 installed_apps 屬性定義了當(dāng)前項目使用的應(yīng)用程序。
|
1
2
3
4
5
6
7
8
|
installed_apps = [ 'django.contrib.admin', # 管理員站點 'django.contrib.auth', # 認(rèn)證授權(quán)系統(tǒng) 'django.contrib.contenttypes', # 內(nèi)容類型框架 'django.contrib.sessions', # 會話框架 'django.contrib.messages', # 消息框架 'django.contrib.staticfiles', # 靜態(tài)文件管理] |
在前面命令行中執(zhí)行的 python manage.py migrate 命令會檢查 installed_apps 屬性的設(shè)置,并為其中的每個應(yīng)用創(chuàng)建所需的數(shù)據(jù)表,實際上 migrate 命令只會為對 installed_apps 里聲明了的應(yīng)用進(jìn)行數(shù)據(jù)庫遷移 。
了解項目配置文件的一些設(shè)置之后,現(xiàn)在來編輯 polls/models.py 文件新建 question(問題) 和 choice(選項) 兩個數(shù)據(jù)模型:
|
1
2
3
4
5
6
7
8
9
10
|
from django.db import modelsclass question(models.model): question_text = models.charfield(max_length=200) pub_date = models.datetimefield('date published')class choice(models.model): question = models.foreignkey(question, on_delete=models.cascade) choice_text = models.charfield(max_length=200) votes = models.integerfield(default=0) |
每個自定義模型都是 django.db.models.model 的子類,模型里的類變量都表示一個數(shù)據(jù)庫字段,每個字段實質(zhì)都是 field 類的實例。注意在 choice 使用了 foreignkey 屬性定義了一個與 question 的外鍵關(guān)聯(lián)關(guān)系,django 支持所有常用的多對一、多對多和一對一數(shù)據(jù)庫關(guān)系。
數(shù)據(jù)庫模型建立完成之后,由于 pollsconfig 類位于 polls/apps.py 文件當(dāng)中,所以其對應(yīng)的點式路徑為 polls.apps.pollsconfig ,現(xiàn)在我們需要將該路徑添加至 mysite/settings.py 文件的 installed_apps 屬性:
|
1
2
3
4
5
6
7
8
9
|
installed_apps = [ 'polls.apps.pollsconfig', # 添加pollsconfig 'django.contrib.admin', 'django.contrib.auth', 'django.contrib.contenttypes', 'django.contrib.sessions', 'django.contrib.messages', 'django.contrib.staticfiles',] |
通過 manage.py 提供的 makemigrations 命令,將模型的修改遷移到 sqlite 數(shù)據(jù)庫當(dāng)中。
|
1
2
3
4
5
6
7
|
c:\workspace\django\mysite (master -> origin)(venv) λ python manage.py makemigrations pollsmigrations for 'polls': polls\migrations\0001_initial.py - create model choice - create model question - add field question to choice |
我們還可以通過 manage.py 提供的 sqlmigrate 命令,查看數(shù)據(jù)遷移過程中執(zhí)行了哪些 sql 語句,該命令并不會實質(zhì)性執(zhí)行 django 模型到數(shù)據(jù)庫的遷移任務(wù)。
|
1
2
3
4
5
6
7
8
9
10
11
12
13
14
15
16
17
18
19
20
21
22
23
24
25
|
c:\workspace\django\mysite (master -> origin)(venv) λ python manage.py sqlmigrate polls 0001begin;---- create model choice--create table "polls_choice" ("id" integer not null primary key autoincrement, "choice_text" varchar(200) not null, "votes" integer not null);---- create model question--create table "polls_question" ("id" integer not null primary key autoincrement, "question_text" varchar(200) not null, "pub_date" datetime not null);---- add field question to choice--alter table "polls_choice" rename to "polls_choice__old";create table "polls_choice" ("id" integer not null primary key autoincrement, "choice_text" varchar(200) not null, "votes" integer not null, "question_id" integer not null references "polls_question" ("id") deferrable initially deferred);insert into "polls_choice" ("id", "choice_text", "votes", "question_id") select "id", "choice_text", "votes", null from "polls_choice__old";drop table "polls_choice__old";create index "polls_choice_question_id_c5b4b260" on "polls_choice" ("question_id");commit; |
django 模型的數(shù)據(jù)庫主鍵 id 會被自動創(chuàng)建, 并會在外鍵字段名稱后追加 _id 字符串作為后綴。
接下來運(yùn)行 manage.py 提供的 migrate 命令,在根據(jù)新定義的模型創(chuàng)建相應(yīng)的數(shù)據(jù)庫表。
|
1
2
3
4
5
6
|
c:\workspace\django\mysite (master -> origin)(venv) λ python manage.py migrateoperations to perform: apply all migrations: admin, auth, contenttypes, polls, sessionsrunning migrations: applying polls.0001_initial... ok |
為了便于在版本管理系統(tǒng)提交遷移數(shù)據(jù),django 將模型的修改分別獨(dú)立為 生成 和 應(yīng)用 兩個命令,因此修改 django 模型會涉及如下 3 個步驟:
- 編輯models.py文件修改模型。
- 運(yùn)行python manage.py makemigrations為模型的改變生成遷移文件。
- 運(yùn)行python manage.py migrate來應(yīng)用數(shù)據(jù)庫遷移。
完成上述 django 模型與數(shù)據(jù)庫的同步之后,接下來可以通過 manage.py 提供的 shell 命令,在命令行工具內(nèi)運(yùn)行 django 提供的交互式 api。
|
1
2
3
4
5
6
7
8
9
10
11
12
13
14
15
16
17
18
19
20
21
|
c:\workspace\django\mysite (master -> origin)(venv) λ python manage.py shellpython 3.6.6 (v3.6.6:4cf1f54eb7, jun 27 2018, 03:37:03) [msc v.1900 64 bit (amd64)] on win32type "help", "copyright", "credits" or "license" for more information.(interactiveconsole)>>> from polls.models import choice, question>>> question.objects.all()<queryset []>>>> from django.utils import timezone>>> q = question(question_text="what's new?", pub_date=timezone.now())>>> q.save()>>> q.id1>>> q.question_text"what's new?">>> q.pub_datedatetime.datetime(2019, 1, 4, 9, 10, 1, 955820, tzinfo=<utc>)>>> q.question_text = "what's up?">>> q.save()>>> question.objects.all()<queryset [<question: question object (1)>]> |
上面命令行執(zhí)行結(jié)果中的 <question: question object (1)> 對于實際開發(fā)沒有意義,因此可以考慮為上面建立的 django 模型增加 __str__() 方法直接打印模型對象的屬性數(shù)據(jù)。為了便于進(jìn)一步測試,這里還為 question 類添加一個自定義的 was_published_recently() 方法:
|
1
2
3
4
5
6
7
8
9
10
11
12
13
14
15
16
17
18
19
20
21
|
import datetimefrom django.db import modelsfrom django.utils import timezoneclass question(models.model): question_text = models.charfield(max_length=200) pub_date = models.datetimefield('date published') # 自定義was_published_recently()方法 def was_published_recently(self): return self.pub_date >= timezone.now() - datetime.timedelta(days=1) # 添加__str__()方法 def __str__(self): return self.question_textclass choice(models.model): question = models.foreignkey(question, on_delete=models.cascade) choice_text = models.charfield(max_length=200) votes = models.integerfield(default=0) # 添加__str__()方法 def __str__(self): return self.choice_text |
完成修改工作之后,再一次運(yùn)行 python manage.py shell 命令:
|
1
2
3
4
5
6
7
8
9
10
11
12
13
14
15
16
17
18
19
20
21
22
23
24
25
26
27
28
29
30
31
32
33
34
35
36
37
38
39
40
41
42
43
44
45
46
47
48
|
c:\workspace\django\mysite (master -> origin)(venv) λ python manage.py shellpython 3.6.6 (v3.6.6:4cf1f54eb7, jun 27 2018, 03:37:03) [msc v.1900 64 bit (amd64)] on win32type "help", "copyright", "credits" or "license" for more information.(interactiveconsole)>>> from polls.models import choice, question>>> question.objects.all()<queryset [<question: what's up?>]>>>> question.objects.filter(id=1)<queryset [<question: what's up?>]>>>> question.objects.filter(question_text__startswith='what')<queryset [<question: what's up?>]>>>> from django.utils import timezone>>> current_year = timezone.now().year>>> question.objects.get(pub_date__year=current_year)<question: what's up?>>>> question.objects.get(id=2)traceback (most recent call last): file "<console>", line 1, in <module> file "c:\workspace\django\venv\lib\site-packages\django\db\models\manager.py", line 82, in manager_method return getattr(self.get_queryset(), name)(*args, **kwargs) file "c:\workspace\django\venv\lib\site-packages\django\db\models\query.py", line 399, in get self.model._meta.object_namepolls.models.question.doesnotexist: question matching query does not exist.>>> question.objects.get(pk=1)<question: what's up?>>>> q = question.objects.get(pk=1)>>> q.was_published_recently()true>>> q = question.objects.get(pk=1)>>> q.choice_set.all()<queryset []>>>> q.choice_set.create(choice_text='not much', votes=0)<choice: not much>>>> q.choice_set.create(choice_text='the sky', votes=0)<choice: the sky>>>> c = q.choice_set.create(choice_text='just hacking again', votes=0)>>> c.question<question: what's up?>>>> q.choice_set.all()<queryset [<choice: not much>, <choice: the sky>, <choice: just hacking again>]>>>> q.choice_set.count()3>>> choice.objects.filter(question__pub_date__year=current_year)<queryset [<choice: not much>, <choice: the sky>, <choice: just hacking again>]>>>> c = q.choice_set.filter(choice_text__startswith='just hacking')>>> c.delete()(1, {'polls.choice': 1}) |
管理站點
django 能夠根據(jù)模型自動創(chuàng)建后臺管理界面, 這里我們執(zhí)行 manage.py 提供的 createsuperuser 命令創(chuàng)建一個管理用戶:
|
1
2
3
4
5
6
7
|
c:\workspace\django\mysite (master -> origin)(venv) λ python manage.py createsuperuserusername (leave blank to use 'zhenghang'): hankemail address: [email protected]password: ********password (again): ********superuser created successfully. |
啟動 django 服務(wù)之后,就可以通過 url 地址 http://localhost:8080/admin/login 并使用上面新建的用戶名和密碼進(jìn)行登陸管理操作:

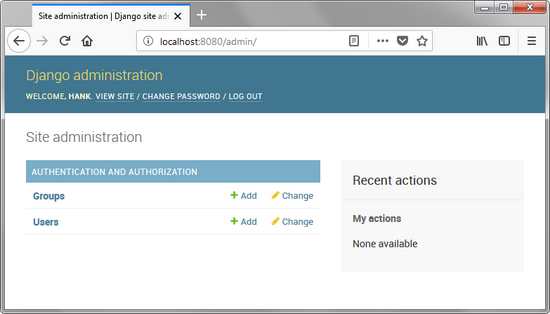
登陸后默認(rèn)只能對權(quán)限相關(guān)的 user 和 group 進(jìn)行管理,如果我們需要將 question 數(shù)據(jù)模型納入管理,那么必須要在 polls/admin.py 文件對其進(jìn)行注冊。
|
1
2
3
4
|
from django.contrib import adminfrom .models import questionadmin.site.register(question) |
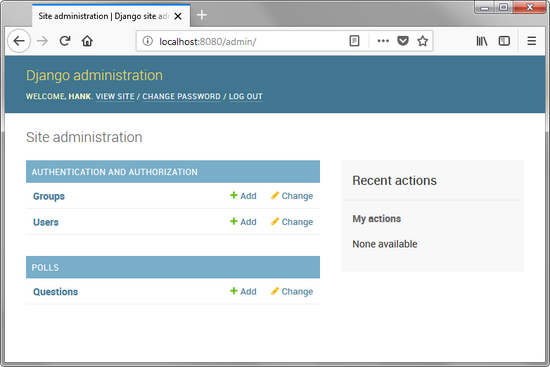
完成注冊之后,刷新管理站點頁面即可查看到 question 管理選項:

視圖與模板
django 使用 urlconfs 配置將 url 與視圖關(guān)聯(lián),即將 url 映射至視圖,下面我們將向 polls/views.py 文件添加一些能夠接收參數(shù)的視圖:
|
1
2
3
4
5
6
7
8
9
10
11
12
13
14
|
from django.http import httpresponsedef index(request): return httpresponse("你好,這是一個投票應(yīng)用!")def detail(request, question_id): return httpresponse("你正在查看問題 %s 。" % question_id)def results(request, question_id): response = "你看到的是問題 %s 的結(jié)果。" return httpresponse(response % question_id)def vote(request, question_id): return httpresponse("你正在對問題 %s 進(jìn)行投票。" % question_id) |
然后將這些新的視圖添加至 polls.urls 模塊:
|
1
2
3
4
5
6
7
8
9
10
11
12
13
|
from django.urls import pathfrom . import viewsurlpatterns = [ # 訪問 http://localhost:8080/polls/ path('', views.index, name='index'), # 訪問 http://localhost:8080/polls/5/ path('<int:question_id>/', views.detail, name='detail'), # 訪問 http://localhost:8080/polls/5/results/ path('<int:question_id>/results/', views.results, name='results'), # 訪問 http://localhost:8080/polls/5/vote/ path('<int:question_id>/vote/', views.vote, name='vote'),] |
django 的每個視圖只會完成兩個任務(wù):第 1 是返回一個包含被請求頁面內(nèi)容的 httpresponse 對象,或者拋出一個 http404 這樣的異常。這里為了展示數(shù)據(jù)庫里按照發(fā)布日期排序的最近五個投票問題,我們再向 polls/views.py 代碼文件的 index() 函數(shù)添加如下內(nèi)容:
|
1
2
3
4
5
6
|
from .models import questiondef index(request): latest_question_list = question.objects.order_by('-pub_date')[:5] output = ', '.join([q.question_text for q in latest_question_list]) return httpresponse(output) |
這樣直接將數(shù)據(jù)庫查詢結(jié)果輸出到頁面的方式并不優(yōu)雅,實際開發(fā)環(huán)境當(dāng)中我們通常會使用模板頁面來展示數(shù)據(jù),首先在 polls 應(yīng)用目錄下創(chuàng)建一個用來存放模板文件的 templates 目錄。由于站點配置文件 mysite/settings.py 里 templates 屬性的默認(rèn)設(shè)置,能夠讓 django 在每個 installed_apps 文件夾中自動尋找 templates 子目錄,從而正確定位出模板的位置。
|
1
2
3
4
5
6
7
8
9
10
11
12
13
14
15
|
templates = [ { 'backend': 'django.template.backends.django.djangotemplates', 'dirs': [], 'app_dirs': true, 'options': { 'context_processors': [ 'django.template.context_processors.debug', 'django.template.context_processors.request', 'django.contrib.auth.context_processors.auth', 'django.contrib.messages.context_processors.messages', ], }, },] |
接下來繼續(xù)在 templates 下面新建一個 polls 目錄,然后在里邊放置一個 index.html 文件,此時通過 url 地址 http://localhost:8080/polls/ 就可以訪問到這個模板文件,模板文件會將按照發(fā)布日期排序了的 question 列表 latest_question_list 放置到 httpresponse 上下文,并在 polls/index.html 模板當(dāng)中完成數(shù)據(jù)綁定。
|
1
2
3
4
5
6
7
8
9
10
11
|
from django.http import httpresponsefrom django.template import loaderfrom .models import questiondef index(request): latest_question_list = question.objects.order_by('-pub_date')[:5] template = loader.get_template('polls/index.html') context = { 'latest_question_list': latest_question_list, } return httpresponse(template.render(context, request)) |
事實上,通過使用 render() 方法,django 能夠以更加簡化的方式完成載入模板、填充上下文、返回 httpresponse 對象這一系列步驟:
|
1
2
3
4
5
6
7
|
from django.shortcuts import renderfrom .models import questiondef index(request): latest_question_list = question.objects.order_by('-pub_date')[:5] context = {'latest_question_list': latest_question_list} return render(request, 'polls/index.html', context) |
接下來處理投票詳情頁面,這里會有一個新原則,即如果指定 id 所對應(yīng)的 question 不存在,那么視圖就會拋出一個 http404 異常。在 polls/views.py 添加如下代碼,
|
1
2
3
4
5
6
7
8
9
10
|
from django.http import http404from django.shortcuts import renderfrom .models import questiondef detail(request, question_id): try: question = question.objects.get(pk=question_id) except question.doesnotexist: raise http404("問題不存在!") return render(request, 'polls/detail.html', {'question': qu |
然后暫時向 polls/templates/polls/detail.html 添加一行簡單的 代碼便于測試上面的代碼。
django 提供了諸如 get_object_or_404() 、 get_list_or_404() 這樣的快捷函數(shù)語法糖來解決 http404 判斷的問題,因而上一步的代碼依然可以進(jìn)一步簡化為下面這樣:
|
1
2
3
4
5
6
|
from django.shortcuts import get_object_or_404, renderfrom .models import questiondef detail(request, question_id): question = get_object_or_404(question, pk=question_id) return render(request, 'polls/detail.html', {'question': question}) |
讓我們進(jìn)一步完善polls/templates/polls/detail.html,填充完整的視圖代碼:
|
1
2
3
4
5
6
|
<h1>{{ question.question_text }}</h1><ul>{% for choice in question.choice_set.all %}<li>{{ choice.choice_text }}</li>{% endfor %}</ul> |
通過在模板代碼中使用.符號來訪問變量屬性,例如對于上面代碼中的, django 首先會嘗試對question對象使用字典查找(既obj.get(str)),如果失敗再嘗試屬性查找(既obj.str),如果依然失敗就會嘗試列表查找(即obj[int])。另外循環(huán)for中的question.choice_set.all語句會被解析為question.choice_set.all()的 python 的函數(shù)調(diào)用,完成后將返回一個可迭代的choice對象,該對象僅限于for循環(huán)標(biāo)簽內(nèi)部使用。
在polls/templates/polls/index.html編寫的投票鏈接里使用了諸如<a href="/polls//" rel="external nofollow" ></a>這樣的硬編碼,但是這樣容易造成視圖與后端業(yè)務(wù)的耦合,因此 django 提供了url標(biāo)簽來解決這個問題。
|
1
|
<a href="{% url 'detail' question.id %}" rel="external nofollow" >{{ question.question_text }}</a> |
實際上在mysite/polls/urls.py內(nèi)的函數(shù)調(diào)用path('<int:question_id>/', views.detail, name='detail')當(dāng)中,path()的name屬性就是作用于url標(biāo)簽中的這個特性的。
為了避免項目當(dāng)中各種應(yīng)用的 url 重名,避免url標(biāo)簽被使用時產(chǎn)生歧義,需要在polls/urls.py上添加應(yīng)用的命名空間作為區(qū)分。
|
1
2
3
4
5
6
7
8
9
10
|
from django.urls import pathfrom . import viewsapp_name = 'polls'urlpatterns = [path('', views.index, name='index'),path('<int:question_id>/', views.detail, name='detail'),path('<int:question_id>/results/', views.results, name='results'),path('<int:question_id>/vote/', views.vote, name='vote'),] |
然后編輯polls/templates/polls/index.html文件,為每個url標(biāo)簽添加上面聲明的polls:命名空間。
|
1
|
<li><a href="{% url 'polls:detail' question.id %}" rel="external nofollow" >{{ question.question_text }}</a></li> |
以上就是本文的全部內(nèi)容,希望對大家的學(xué)習(xí)有所幫助,也希望大家多多支持服務(wù)器之家。
原文鏈接:https://uinika.github.io/web/server/django.html


