本文實(shí)例講述了Smarty模板類內(nèi)部原理。分享給大家供大家參考,具體如下:
之前在學(xué)習(xí)ThinkPHP的時(shí)候,有接觸到Smarty模板類,但是一直不知道其內(nèi)部實(shí)現(xiàn)的原理,博主今天終于知道了其內(nèi)部原理,其實(shí)也挺簡(jiǎn)單的,然后寫了一個(gè)迷你版的Smarty模板類,對(duì)理解其內(nèi)部原理有了很大的幫助。
1、迷你版Smarty類
首先上代碼,最后再進(jìn)行講解。
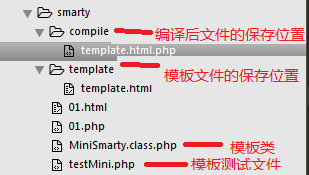
項(xiàng)目結(jié)構(gòu)圖

MiniSmarty類代碼(MiniSmarty.class.php)
|
1
2
3
4
5
6
7
8
9
10
11
12
13
14
15
16
17
18
19
20
21
22
23
24
25
26
27
28
29
30
31
32
33
34
35
36
37
38
39
40
41
42
43
44
45
46
47
48
49
50
51
|
<?php/** * 迷你模板類 */class MiniSmarty{ public $template_dir = '';//模板文件放置的目錄 public $compile_dir = '';//編譯后文件放置的目錄 public $tpl_var = array();//模板賦值的變量 /** * 給模板進(jìn)行賦值 * @param str $key 鍵 * @param mixed $value 值 * @return void */ public function assign($key,$value){ $this->tpl_var[$key] = $value; } /** * 編譯模板,并引入編譯后的文件 * @param str $template 模板文件 * @return void */ public function display($template){ $compile_file = $this->compile($template); include($compile_file); } /** * 將模板文件編譯成php文件 * @param str $template 模板文件名 * @return str 編譯文件名 */ private function compile($template){ $template_file = $this->template_dir.'/'.$template; //讀取模板文件中的內(nèi)容 $source = file_get_contents($template_file); //判斷是否需要再次生產(chǎn)編譯文件 $compile_file = $this->compile_dir.'/'.$template.'.php'; //如果存在編譯文件且編譯文件的修改時(shí)間比模板文件大,則不用再次編譯,直接返回文件路徑 if(file_exists($compile_file) && filemtime($compile_file) > filemtime($template_file)){ return $compile_file; } //解析{$}為<?php echo 等操作 $source = str_replace('{$', '<?php echo $this->tpl_var[\'', $source); $source = str_replace('}', '\'];?>', $source); //生成編譯文件 file_put_contents($compile_file, $source); //返回編譯后的文件路徑 return $compile_file; }}?> |
測(cè)試模板類代碼(testSmarty.php)
|
1
2
3
4
5
6
7
8
9
10
11
12
13
14
15
|
<?php//1、引入并創(chuàng)建模板實(shí)例include ('./MiniSmarty.class.php');$Smarty = new MiniSmarty();$Smarty->template_dir = './template';$Smarty->compile_dir = './compile';//2、給模板對(duì)象賦值$title = '兩會(huì)召開';$content = '好奶粉,好會(huì)議,好新聞';$Smarty->assign('title',$title);$Smarty->assign('content',$content);//3、顯示模板$template = 'template.html';$Smarty->display($template);?> |
模板文件(template.html)
|
1
2
3
4
5
6
7
8
9
10
11
12
|
<!DOCTYPE html><html><head> <meta charset="utf-8"> <meta http-equiv="X-UA-Compatible" content="IE=edge"> <title>{$title}</title> <link rel="stylesheet" href=""></head><body> <h3>{$content}</h3></body></html> |
編譯后的文件(template.html.php)
|
1
2
3
4
5
6
7
8
9
10
11
12
|
<!DOCTYPE html><html><head> <meta charset="utf-8"> <meta http-equiv="X-UA-Compatible" content="IE=edge"> <title><?php echo $this->tpl_var['title'];?></title> <link rel="stylesheet" href=""></head><body> <h3><?php echo $this->tpl_var['content'];?></h3></body></html> |
代碼都貼完了,最后解釋一下。在測(cè)試模板類(testSmarty.php)文件中,首先是引入模板類文件,實(shí)例化模板對(duì)象,然后給模板對(duì)象賦值,最后顯示模板。在模板類(MiniSmarty.class.php)文件中,有3個(gè)屬性和3個(gè)方法,屬性分別是template_dir 、compile_dir‘和tpl_var,含義分別是模板文件的路徑、編譯后文件的路徑、模板對(duì)象的變量。3個(gè)方法分別是assign、display和compile,assign方法是給模板對(duì)象賦值,display方法是編譯模板文件,并引入(顯示)編譯后的文件,compile方法是編譯模板文件。編譯模板文件的過程主要是將模板文件中的{$標(biāo)簽}解析成<?php echo $var?> 等php代碼。
2、Smarty原理分析
工作流程
(1)把需要顯示的全局變量,賦值,塞到對(duì)象的內(nèi)部屬性中的一個(gè)數(shù)組里
(2)然后編譯模板,將{$標(biāo)簽}解析成相應(yīng)的php echo 代碼
(3)引入編譯后的php文件
使用步驟
(1)Smarty是一個(gè)類,要使用的話,必須引入在進(jìn)行實(shí)例化
(2)使用assign給模板賦值
(3)使用display方法【從編譯到輸出】
Smarty的缺點(diǎn)
(1)編譯模板,浪費(fèi)時(shí)間
(2)要把變量再重新賦值到對(duì)象的屬性中,增大了開銷
希望本文所述對(duì)大家基于smarty模板的PHP程序設(shè)計(jì)有所幫助。
原文鏈接:https://blog.csdn.net/baochao95/article/details/52248207


