SpringSecurity 應用
簡介
Spring Security是一個能夠為基于Spring的企業應用系統提供聲明式的安全訪問控制解決方案的安全框架。它提供了一組可以在Spring應用上下文中配置的Bean,充分利用了Spring IoC,DI(控制反轉Inversion of Control ,DI:Dependency Injection 依賴注入)和AOP(面向切面編程)功能,為應用系統提供聲明式的安全訪問控制功能,減少了為企業系統安全控制編寫大量重復代碼的工作。
認證授權分析
用戶在進行資源訪問時,要求系統要對用戶進行權限控制,其具體流程如圖-1所示:
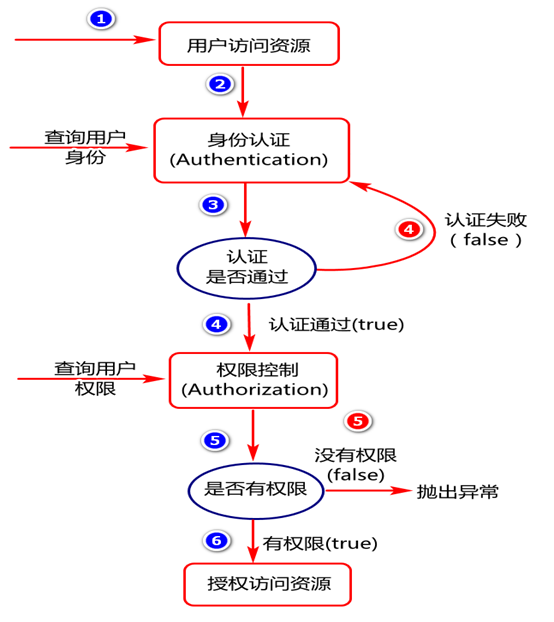
SpringSecurity 架構設計
鳥瞰SpringSecurity 基本技術架構,例如:
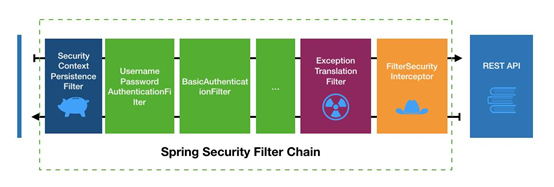
綠色部分是認證過濾器,需要我們自己配置,可以配置多個認證過濾器。認證過濾器可以使用 Spring Security 提供的認證過濾器,也可以自定義過濾器(例如:短信驗證)。認證過濾器要在 configure(HttpSecurity http)方法中配置,沒有配置不生效。下面會重點介紹以下三個過濾器:
UsernamePasswordAuthenticationFilter 過濾器:該過濾器會攔截前端提交的 POST 方式的登錄表單請求,并進行身份認證。
BasicAuthenticationFilter:檢測和處理 http basic 認證。
ExceptionTranslationFilter 過濾器:該過濾器不需要我們配置,對于前端提交的請求會直接放行,捕獲后續拋出的異常并進行處理(例如:權限訪問限制)。
FilterSecurityInterceptor 過濾器:該過濾器是過濾器鏈的最后一個過濾器,根據資源權限配置來判斷當前請求是否有權限訪問對應的資源。如果訪問受限會拋出相關異常,并由 ExceptionTranslationFilter 過濾器進行捕獲和處理。
快速入門實踐
創建項目
創建security項目,其pom.xml文件內容如下:
<?xml version="1.0" encoding="UTF-8"?>
<project xmlns="http://maven.apache.org/POM/4.0.0"
         xmlns:xsi="http://www.w3.org/2001/XMLSchema-instance"
         xsi:schemaLocation="http://maven.apache.org/POM/4.0.0 http://maven.apache.org/xsd/maven-4.0.0.xsd">
    <modelVersion>4.0.0</modelVersion>

    <parent>
        <artifactId>spring-boot-starter-parent</artifactId>
        <groupId>org.springframework.boot</groupId>
        <version>2.3.2.RELEASE</version>
    </parent>
    <groupId>com.cy</groupId>
    <artifactId>05-security</artifactId>
    <version>1.0-SNAPSHOT</version>

    <properties>
        <maven.compiler.source>8</maven.compiler.source>
        <maven.compiler.target>8</maven.compiler.target>
    </properties>
</project>
添加項目依賴
第一步:創建項目,其pom.xml文件核心依賴如下:
<dependencies>

<dependency>
    <groupId>org.springframework.boot</groupId>
    <artifactId>spring-boot-starter-web</artifactId>
  </dependency>

    <dependency>
        <groupId>org.springframework.boot</groupId>
        <artifactId>spring-boot-starter-security</artifactId>
    </dependency>
</dependencies>
第二步:啟動服務(依賴添加以后會默認添加一個tomcat,端口8080)
服務啟動之后,你會發現,控制臺會出現一個隨機的密碼,用于訪問當前系統,默認用戶名是user,密碼就是控制臺上的密碼,如圖所示:

啟動服務訪問測試
服務啟動后,打開瀏覽器進行訪問,如圖所示:
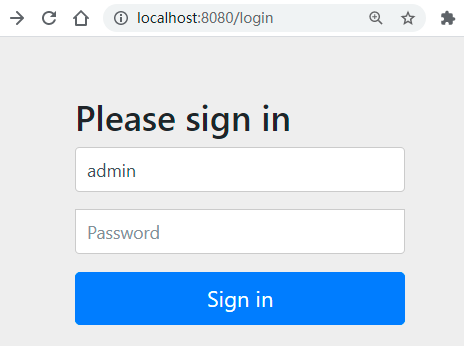
輸入賬號(默認用戶名為user)和密碼登陸成功默認為如下頁面.
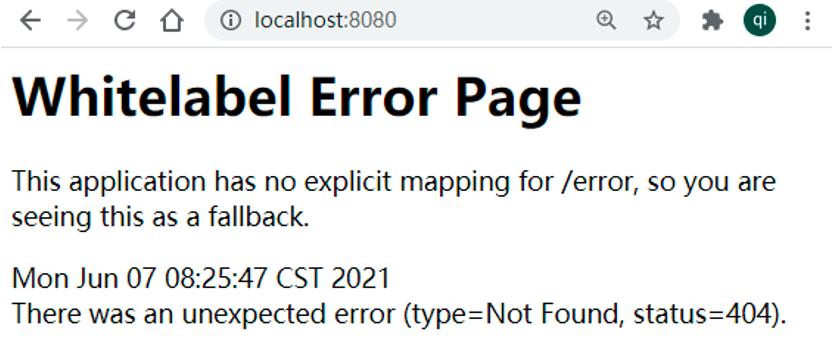
其中,出現這個頁面表示還沒有配置登陸成功頁面,這個資源頁面現在還不存在,可以在項目的resources目錄下創建static目錄(假如沒有此目錄),然后在此目錄下創建index.html頁面,內容如下:
<!DOCTYPE html>
  <html lang="en">
  <head>
    <meta charset="UTF-8">
    <title>Title</title>
  </head>
  <body>
     <div>
       <h1>The Index Page</h1>
     </div>
   </body>
 </html>
此時,再次啟動服務進行登陸,呈現登陸成功的效果,如圖所示:

自定義認證邏輯
認證流程分析

定義security配置類
定義配置類,基于此類配置認證和授權邏輯,例如:
package com.cy.security.config;
import org.springframework.context.annotation.Bean;
import org.springframework.context.annotation.Configuration;
import org.springframework.security.config.annotation.method.configuration.EnableGlobalMethodSecurity;
import org.springframework.security.config.annotation.web.builders.HttpSecurity;
import org.springframework.security.config.annotation.web.configuration.EnableWebSecurity;
import org.springframework.security.config.annotation.web.configuration.WebSecurityConfigurerAdapter;
import org.springframework.security.crypto.bcrypt.BCryptPasswordEncoder;

@Configuration
public class SecurityConfig extends WebSecurityConfigurerAdapter {
    /**
     * 認證授權管理器對用戶輸入的密碼與數據庫中存儲的密碼進行比對時,
     * 需要對這個密碼加密,加密算法需要我們自己指定
     * @return
     */
    @Bean
    public BCryptPasswordEncoder passwordEncoder(){
        return new BCryptPasswordEncoder();
    }

    @Override
    protected void configure(HttpSecurity http) throws Exception {
        //super.configure(http);
        //關閉跨域攻擊
        http.csrf().disable();
        //自定義登陸表單
        http.formLogin().loginPage("/login.html").loginProcessingUrl("/login");
        //請求資源的認證配置
        http.authorizeRequests()
                .antMatchers("/login","/login.html")
                .permitAll()
                .anyRequest().authenticated();
    }
}
定義數據訪問層對象
定義數據訪問層對象,基于此對象實現用戶及用戶權限信息的獲取,例如:
package com.cy.security.dao;
import com.cy.security.domain.SysUser;
import org.apache.ibatis.annotations.Mapper;
import org.apache.ibatis.annotations.Select;
import java.util.List;

@Mapper
public interface UserMapper {
     /**
     * 基于用戶名獲取用戶信息
     * @param username
     * @return
     */
    @Select("select id,username,password,status " +
            "from tb_users " +
            "where username=#{username}")
     SysUser selectUserByUsername(String username);

    /**
     * 基于用戶id查詢用戶權限
     * @param userId 用戶id
     * @return 用戶的權限
     * 涉及到的表:tb_user_roles,tb_role_menus,tb_menus
     */
    @Select("select distinct m.permission " +
            "from tb_user_roles ur join tb_role_menus rm on ur.role_id=rm.role_id" +
            "     join tb_menus m on rm.menu_id=m.id " +
            "where ur.user_id=#{userId} and m.permission is not null")
    List<String> selectUserPermissions(Long userId);
}
定義UserDetailService接口實現類
Spring Security 提供了一個UserDetailService接口,我們可以基于此接口實現類,實現用戶信息的獲取和封裝,例如:
@Service
public class UserDetailServiceImpl implements UserDetailsService {

    @Autowired
    private UserMapper userMapper;
    /**
     * 客戶端點擊登陸時,添加些用戶信息會傳給此方法
     * @param username
     * @return
     * @throws UsernameNotFoundException
     */
    @Override
    public UserDetails loadUserByUsername(String username) throws UsernameNotFoundException {
        //1.基于用戶名查詢用戶信息
        SysUser user=userMapper.selectUserByUsername(username);
        //...判斷自己寫...
        System.out.println(user);
        //2.查詢用戶登陸用戶權限
        List<String> permissions=userMapper.selectUserPermissions(user.getId());
        System.out.println(permissions);
        //3.封裝用戶信息并返回,將用戶信息交給認證管理器,認證授權管理器負責對用戶輸入的信息進行認證和授權
        List<GrantedAuthority> authorityList =
                AuthorityUtils.createAuthorityList(permissions.toArray(new String[]{}));
        return new User(username, user.getPassword(),authorityList);
    }
}
自定義登陸頁面
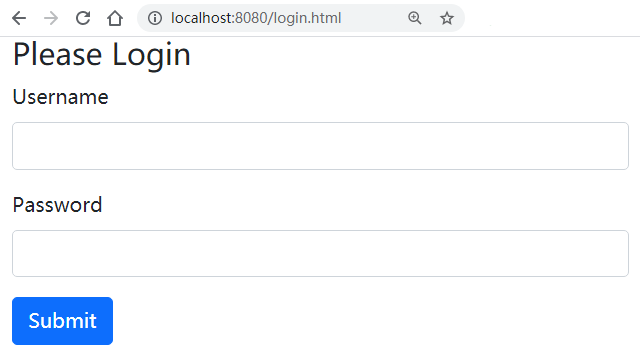
在resources的static目錄下創建login.html頁面,例如:
<!doctype html>
<html lang="en">
<head>
    <!-- Required meta tags -->
    <meta charset="utf-8">
    <meta name="viewport" content="width=device-width, initial-scale=1">
    <!-- Bootstrap CSS -->
    <link href="https://cdn.jsdelivr.net/npm/[email protected]/dist/css/bootstrap.min.css" rel="external nofollow"  rel="stylesheet"
          integrity="sha384-EVSTQN3/azprG1Anm3QDgpJLIm9Nao0Yz1ztcQTwFspd3yD65VohhpuuCOmLASjC" crossorigin="anonymous">
    <title>login</title>
</head>
<body>
<div class="container"id="app">
    <h3>Please Login</h3>
    <form>
        <div class="mb-3">
            <label for="usernameId" class="form-label">Username</label>
            <input type="text" v-model="username" class="form-control" id="usernameId" aria-describedby="emailHelp">
        </div>
        <div class="mb-3">
            <label for="passwordId" class="form-label">Password</label>
            <input type="password" v-model="password" class="form-control" id="passwordId">
        </div>
        <button type="button" @click="doLogin()" class="btn btn-primary">Submit</button>
    </form>
</div>
<script src="https://cdn.jsdelivr.net/npm/[email protected]/dist/js/bootstrap.bundle.min.js" integrity="sha384-MrcW6ZMFYlzcLA8Nl+NtUVF0sA7MsXsP1UyJoMp4YLEuNSfAP+JcXn/tWtIaxVXM" crossorigin="anonymous"></script>
<script src="https://cdn.jsdelivr.net/npm/vue/dist/vue.js"></script>
<script src="https://unpkg.com/axios/dist/axios.min.js"></script>

<script>
    var vm=new Vue({
        el:"#app",//定義監控點,vue底層會基于此監控點在內存中構建dom樹
        data:{ //此對象中定義頁面上要操作的數據
            username:"",
            password:""
        },
        methods: {//此位置定義所有業務事件處理函數
            doLogin() {
                //1.定義url
                let url = "http://localhost:8080/login"
                //2.定義參數
                let params = new URLSearchParams()
                params.append("username",this.username);
                params.append("password",this.password);
                debugger
                //3.發送異步請求
                axios.post(url, params).then((response) => {
                        alert("login ok");
                        location.href="/index.html" rel="external nofollow"
                })
            }
        }
    });
</script>
</body>
</html>
啟動服務進行訪問測試
授權邏輯設計及實現
修改授權配置類
在權限配置類上添加啟用全局方法訪問控制注解,例如
package com.cy.auth.config;

//這個配置類是配置Spring-Security的,
//prePostEnabled= true表示啟動權限管理功能
@EnableGlobalMethodSecurity(prePostEnabled = true)
@Configuration
public class SpringSecurityConfigurer extends WebSecurityConfigurerAdapter {

    ……
}
定義資源訪問對象
package com.cy.res.controller;

@RequestMapping("/res")
@RestController
public class ResourceController {
    @PreAuthorize("hasAuthority("sys:res:view")")
    @RequestMapping("/retrieve")
    public String doRetrieve(){
        return "select resource ok";
    }
    @PreAuthorize("hasAuthority("sys:res:create")")
    @RequestMapping("/create")
    public String doCreate(){
        return "create resource";
    }
}
其中,@PreAuthorize注解描述方法時,用于告訴系統訪問此方法時需要進行權限檢測。需要具備指定權限才可以訪問。例如:
啟動服務實現訪問測試
打開瀏覽器分別輸入http://localhost:8080/res/create和http://localhost:8080/res/select進行測試分析。
總結(Summary)
本章節主要是對spring security 在springboot平臺下是如何使用的。
到此這篇關于SpringBoot工程中Spring Security應用實踐的文章就介紹到這了,更多相關Spring Security應用實踐內容請搜索服務器之家以前的文章或繼續瀏覽下面的相關文章希望大家以后多多支持服務器之家!
原文鏈接:https://blog.csdn.net/maitian_2008/article/details/120191729


