這一節我們來講講在MVC中如何進行文件的上傳,我們逐步深入,一起來看看。
Upload File(一)
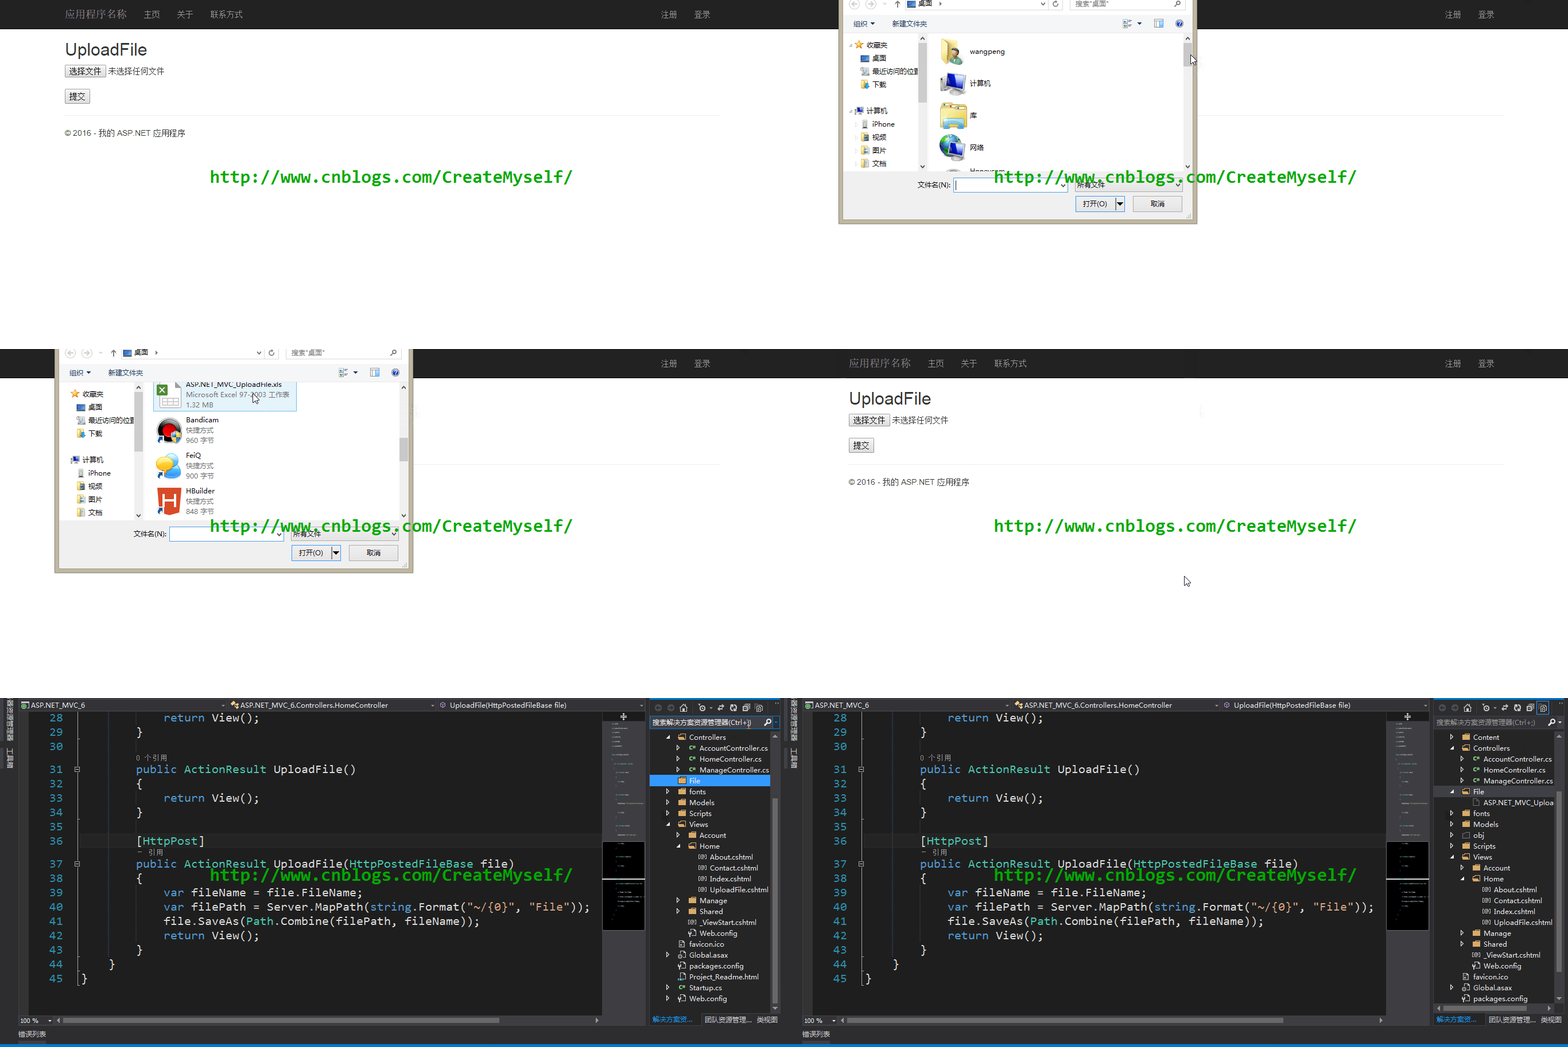
我們在默認創建的項目中的Home控制器下添加如下:
|
1
2
3
4
5
6
7
8
9
10
11
12
13
|
public ActionResult UploadFile(){ return View();}[HttpPost]public ActionResult UploadFile(HttpPostedFileBase file){ var fileName = file.FileName; var filePath = Server.MapPath(string.Format("~/{0}", "File")); file.SaveAs(Path.Combine(filePath, fileName)); return View();} |
在 UploadFile 視圖中添加上如下:
|
1
2
3
4
|
<form action="/Home/UploadFile" method="post" enctype="multipart/form-data"> <input type="file" name="file" /><br /> <input type="submit" value="提交" /></form> |
有關視圖中我們就不必多說,只需明白如下兩點:
(1)在后臺利用HttpPostedFileBase來接收上傳文件,該類為一個抽象類,但在ASP.NET Web Form卻沒有此類,此類的出現是為了更好的進行單元測試。
(2)在視圖中文件類型的name要和后臺接收文件的參數一致。
接下來我們進行演示看看結果:

上述我們簡單的上傳了一個Excel文件,下面我們通過強類型視圖以及模型驗證來強化上傳。
Upload File(二)
我們創建如下BlogModel類:
|
1
2
3
4
5
6
7
8
9
10
11
12
13
14
15
|
public class BlogModel{ [Display(Name = "博客名稱")] [Required(ErrorMessage = "請輸入你的博客名稱!")] public string BlogName { get; set; } [Display(Name = "博客地址")] [Required(ErrorMessage = "請輸入你的博客地址!")] public string BlogAddress { get; set; } [Display(Name = "博客圖片")] [Required(ErrorMessage = "請上傳你的博客圖片!")] [ValidateFile] public HttpPostedFileBase BlogPhoto { get; set; }} |
上述未有驗證文件的特性,只能自定義文件特性,如下:
|
1
2
3
4
5
6
7
8
9
10
11
12
13
14
15
16
17
18
19
20
21
22
23
24
25
|
public class ValidateFileAttribute : ValidationAttribute{ public override bool IsValid(object value) { int MaxContentLength = 1024 * 1024 * 4; string[] AllowedFileExtensions = new string[] { ".jpg", ".gif", ".png", ".pdf" }; var file = value as HttpPostedFileBase; if (file == null) return false; else if (!AllowedFileExtensions.Contains(file.FileName.Substring(file.FileName.LastIndexOf('.')))) { ErrorMessage = "請上傳你的博客圖片類型: " + string.Join(", ", AllowedFileExtensions); return false; } else if (file.ContentLength > MaxContentLength) { ErrorMessage = "上傳圖片過大,不能超過4兆 : " + (MaxContentLength / 1024).ToString() + "MB"; return false; } else return true; }} |
我們可以任意設置上傳的文件大小,我們設置為40兆,在配置文件中我們知道 maxRequestLength = 4096 默認是4兆,當然我們可以改變其默認設置。
<httpRuntime targetFramework="4.5" executionTimeout="1100" maxRequestLength="40960" />
此時我們接著在控制器中修改上述上傳的方法:
|
1
2
3
4
5
6
7
8
9
10
11
12
|
[HttpPost]public ActionResult UploadFile(BlogModel bModel){ if (ModelState.IsValid) { var fileName = bModel.BlogPhoto.FileName; var filePath = Server.MapPath(string.Format("~/{0}", "File")); bModel.BlogPhoto.SaveAs(Path.Combine(filePath, fileName)); ModelState.Clear(); } return View();} |
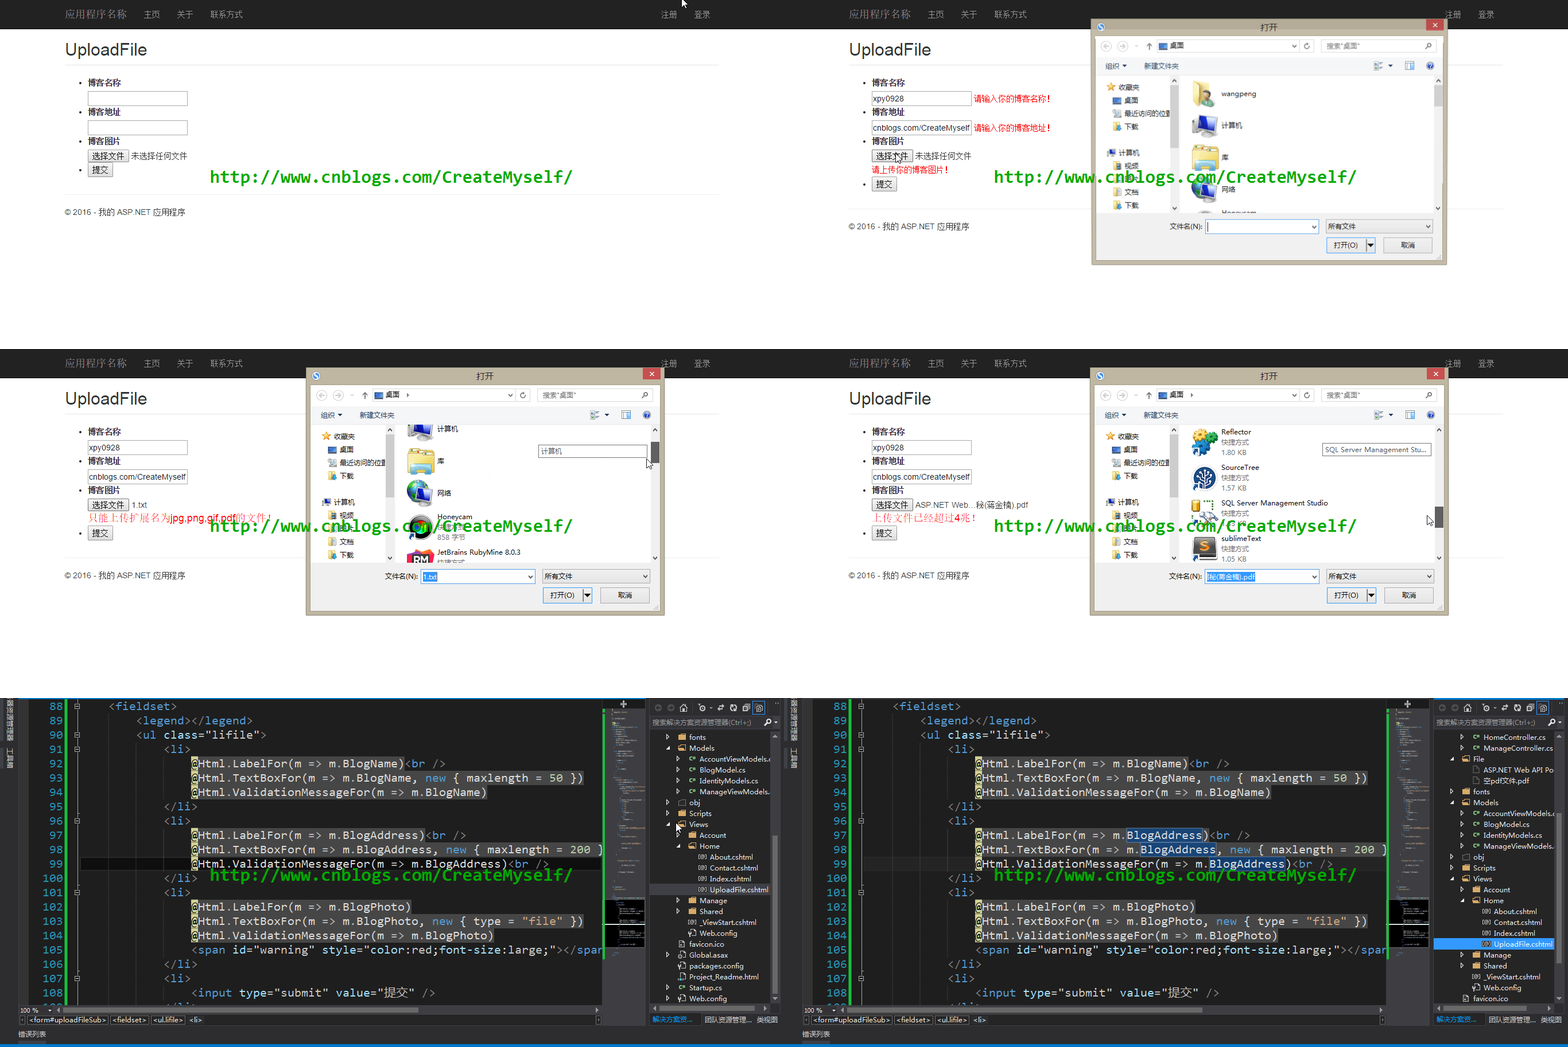
我們接下來看看效果:

咋回事,出狀況了看來是我們的文件過大的原因,看了下該文件有接近45兆,而我們卻設置的是40兆,于是乎繼續在配置文件中去修改文件大小,但是結果還是一樣。我們繼續仔細看看該結果的提示,根據提示去找到配置文件下的節點再試試,我們在 syste.webServer 節點下設置為2G:
|
1
2
3
4
5
6
|
<security> <requestFiltering> <requestLimits maxAllowedContentLength="2147483647"> </requestLimits> </requestFiltering></security> |
結果就好使了,查了查也有遇到類似問題的人,貌似只有給個結果,卻沒有給解釋,為什么在 httpRuntime 中設置不行,但是有些這樣設置是正確的,這是什么原因?最終找到了答案:
(1)在IIS 5和IIS 6中,默認文件上傳的最大為4兆,當上傳的文件大小超過4兆時,則會得到錯誤信息,但是我們通過如下來設置文件大小。
|
1
2
3
|
<system.web> <httpRuntime maxRequestLength="2147483647" executionTimeout="100000" /></system.web> |
(2)在IIS 7中,默認文件上傳的最大為28.6兆,當超過其默認設置大小,同樣會得到錯誤信息,但是我們卻可以通過如下來設置文件上傳大小。
|
1
2
3
4
5
6
7
|
<system.webServer> <security> <requestFiltering> <requestLimits maxAllowedContentLength="2147483647" /> </requestFiltering> </security></system.webServer> |
【類推的話,個人覺得可能是在IIS 7+以上都是通過如上述IIS 7來設置文件上傳大小】
雖然我們在服務器端對其進行驗證,但是我們覺得這樣還是不能保險,我們繼續在客戶端對其上傳的圖片類型和大小進行驗證。
(1)利用強類型視圖給出視圖代碼:
|
1
2
3
4
5
6
7
8
9
10
11
12
13
14
15
16
17
18
19
20
21
22
23
24
25
26
27
28
29
30
31
32
|
<style type="text/css"> .field-validation-error { color: red; }</style><form id="uploadFileSub" action="/Home/UploadFile" method="post" enctype="multipart/form-data"> <fieldset> <legend></legend> <ul class="lifile"> <li> @Html.LabelFor(m => m.BlogName)<br /> @Html.TextBoxFor(m => m.BlogName, new { maxlength = 50 }) @Html.ValidationMessageFor(m => m.BlogName) </li> <li> @Html.LabelFor(m => m.BlogAddress)<br /> @Html.TextBoxFor(m => m.BlogAddress, new { maxlength = 200 }) @Html.ValidationMessageFor(m => m.BlogAddress)<br /> </li> <li> @Html.LabelFor(m => m.BlogPhoto) @Html.TextBoxFor(m => m.BlogPhoto, new { type = "file" }) @Html.ValidationMessageFor(m => m.BlogPhoto) <span id="warning" style="color:red;font-size:large;"></span> </li> <li> <input type="submit" value="提交" /> </li> </ul> </fieldset></form> |
(2)利用腳本獲取上傳文件大小:
|
1
2
3
4
5
6
|
function GetFileSize(fileid) { var fileSize = 0; fileSize = $("#" + fileid)[0].files[0].size; fileSize = fileSize / 1048576; return fileSize;} |
(3)根據上傳的路徑獲取文件名稱:
|
1
2
3
4
5
6
7
8
9
10
11
|
function getNameFromPath(strFilepath) { var objRE = new RegExp(/([^\/\\]+)$/); var strName = objRE.exec(strFilepath); if (strName == null) { return null; } else { return strName[0]; }} |
(4)當更換文件時觸發Change事件對其文件類型和文件大小進行驗證:
|
1
2
3
4
5
6
7
8
9
10
11
12
13
14
15
16
17
18
19
20
21
22
23
24
25
26
27
28
29
30
31
32
33
34
35
|
$("#BlogPhoto").change(function () { var file = getNameFromPath($(this).val()); if (file != null) { var errors = $(document).find(".field-validation-error"); $.each(errors, function (k, v) { if ($(v).attr("data-valmsg-for") === "BlogPhoto") { $(v).hide(); } }); var extension = file.substr((file.lastIndexOf('.') + 1)); switch (extension) { case 'jpg': case 'png': case 'gif': case 'pdf': fileTypeBool = false; break; default: fileTypeBool = true; } } if (fileTypeBool) { $("#warning").html("只能上傳擴展名為jpg,png,gif,pdf的文件!"); return false; } else { var size = GetFileSize('BlogPhoto'); if (size > 4) { fileSizeBool = true; $("#warning").html("上傳文件已經超過4兆!"); } else { fileSizeBool = false; } }}); |
(5)當點擊提交按鈕時對其進行文件進行驗證:
|
1
2
3
4
5
6
7
8
9
10
|
$("#uploadFileSub").submit(function () { $("input[type='text']").each(function (k, v) { if ($(v).length) { $(v).siblings("span").hide(); } }); if (fileTypeBool || fileSizeBool) { return false; }}); |
【注意】上述對于驗證不是太完整,但是基本的架子已經給出。
接下來我們來完整的演示整個過程。

上述我們一直是利用的純HTML代碼,當然也可以利用MVC的擴展方法來進行,如下(最終渲染的還是表單,本質上是一致的,就不做過多探討了)
|
1
2
3
4
5
6
|
@using (Html.BeginForm("UploadFile", "Home", FormMethod.Post, new { enctype = "multipart/form-data" })){ <input type="file" id="file" name="file" /> <input type="submit" value="提交" />} |
結語
這一節我們比較詳細的講述了在MVC中如何進行文件的上傳,但是我們還有一點未曾講到,則是利用流來將如我們上述的圖片轉換成字節來插入到數據庫中。
有關上傳可以參考這篇文章.NET對此利用流來上傳。
作者和原文連接:Recluse_Xpy http://www.cnblogs.com/CreateMyself/p/5414200.html
以上就是本文的全部內容,希望對大家的學習有所幫助。


