.NET的開發人員應該都知道這個大名鼎鼎的高質量b2c開源項目-nopCommerce,基于EntityFramework和MVC開發,擁有透明且結構良好的解決方案,同時結合了開源和商業軟件的最佳特性。官網地址:http://www.nopcommerce.com/,中文網:http://www.nopcn.com/。下載后前后端展示如下。如果你還未了解過該項目,建議從官網下載代碼后在本地運行查看效果。
筆者使用該框架開發過不少項目,總的來說,方便簡潔,集成了.NET開發許多常用的組件和功能。一直想將它分享出來,但忙于工作而沒有達成,最近也是有時間來寫這篇文章,本文將展示如何提取該源碼的精簡框架并附上源碼(基于nopCommerce3.9版本)。如果你想了解框架結構,通過該框架來開發項目,那么看一遍該文章是有價值的。前排提示:本框架源碼已上傳到GitHub:https://github.com/dreling8/Nop.Framework,有興趣的可以關注該項目,后續會將其它的一些通用模塊添加進去,如用戶管理(IWorkContext 工作上下文)、插件功能、任務模塊(taskservice)、日志、緩存、本地化等。歡迎star給星星,你的支持是我的動力!


一、了解項目結構
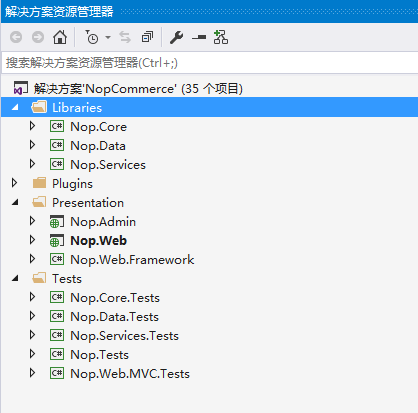
從項目結構圖中我們也可以看出Nop的層次劃分非常清晰,先看我畫的層次圖


1. 展現層(Presentation)
也可稱之為應用層,只關注前端的整合,不涉及任何領域邏輯實現。這一層只做展現,對我們框架來說是可有可無的,因此提取框架時會將該層刪除。
2. 業務服務層(Nop.Services)
整個系統的服務層,提供了對每個領域的接口和實現。這一層非常重要,提供了程序內對展現層的接口服務,不論展現層使用mvc,還是使用winform,異或是給app調用的webapi接口,都需要該層服務。但該層的服務主要是電商的一些服務,對我們框架無用,因此在這個框架中會刪除所有服務,只添加一個測試服務類和接口,應用到項目中你應該在該層添加接口和服務。
3. 數據層(Nop.Data)
nop在數據層的倉儲實現中使用了ef和sqlserver數據庫,如果你想擴展,也可以在該層使用其它的ORM映射庫和數據庫。這一層的大部分功能我們會在框架中將保留。
4. 基礎設施層(Nop.Core)
包括緩存的實現、配置、領域模型等等。在框架中會保留一部分功能,并將Domain領域模型移出該層做單獨項目,為什么要這樣做,因為通常情況下,Domain層的調整會比較多,所以我一般將Domain做單獨Project,當然你也可以不調整,但框架做了該調整。
二、刪除與業務相關的代碼
我們已經對Nop的整個代碼層次結構有了了解,基于以下兩點開始修改項目源碼:1.框架足夠精簡,沒有任何電商業務。2.核心功能保留。建議在開始前先copy一份源碼保留。
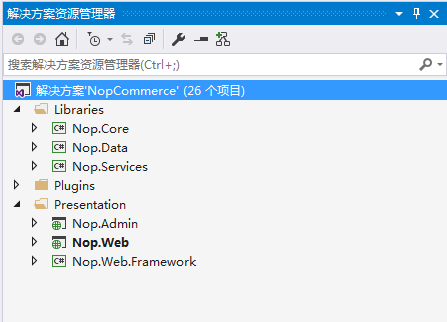
1. Test項目:Tests文件夾下面是測試項目,不是必需的,將它全部移除,開發具體業務,可以再單獨添加測試項目。由于是測試項目,刪除后整個項目還能跑起來。

2. Presentation展現層:這里的三個項目,分別是前臺,后端和兩個項目共用的一些模塊。和測試項目一樣,這里我們也全部移除。

3. Plugin項目:插件項目,同1、2一樣,插件也不是必需的,移除所有的插件項目。現在只剩下三個項目了(歡迎關注該項目的github,后續我會專門寫篇文章介紹如何添加插件)。

Nop.Services:業務服務層,這一層是程序集內對外接口層,需要保留。刪除所有相關的業務服務類,其中日志、幫助、任務等跟系統相關的都刪除,目的是更好的展示整個系統的結構。添加一個測試類,暫時什么都不寫。

Nop.Data:數據層項目。這層基本不做調整,只刪除EF的Mapping映射相關類。
Nop.Core:基礎設施層。刪除電商業務相關的Domain,新建項目Nop.Domain。
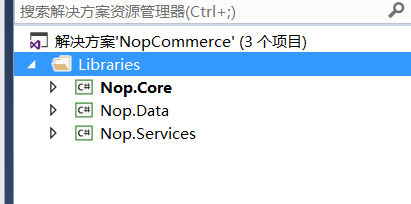
報錯了,IWorkContext(工作上下文,用于獲取用戶信息等數據)依賴Domain,刪除它。這個過程可能要刪除不少文件,直到項目不再報錯。完成后我們的項目結構如下,注意我們將Nop.Core中的實體基類移到了Nop.Domain中,到這一步,我們的基礎框架結構已經大致出來了。


三、添加數據庫、數據實體、映射、業務層代碼
1. 在本地Sqlserver中,新建數據庫MyProject,添加表Test。
|
1
2
3
4
5
6
7
8
9
10
11
12
13
14
15
16
17
18
19
20
21
22
23
24
|
USE [MyProject]GO /****** Object: Table [dbo].[Test] Script Date: 05/24/2017 23:51:21 ******/SET ANSI_NULLS ONGOSET QUOTED_IDENTIFIER ONGOCREATE TABLE [dbo].[Test]([Id] [int] NOT NULL,[Name] [nvarchar](50) NOT NULL,[Description] [nvarchar](200) NULL,[CreateDate] [datetime] NULL,CONSTRAINT [PK_Test] PRIMARY KEY CLUSTERED[Id] ASC)WITH (PAD_INDEX = OFF, STATISTICS_NORECOMPUTE = OFF, IGNORE_DUP_KEY = OFF, ALLOW_ROW_LOCKS = ON, ALLOW_PAGE_LOCKS = ON) ON [PRIMARY]) ON [PRIMARY] |
2. 添加實體類和映射。在Domain項目下面新建Test目錄,添加TestEntity。Data項目Mapping下新建Test目錄,添加EF映射類。
|
1
2
3
4
5
6
7
8
|
public class TestEntity: BaseEntity{ public virtual string Name { get; set; } public virtual string Description { get; set; } public virtual DateTime? CreateDate { get; set; }} |
3. 添加業務層方法。
在Nop.Services項目里,在我們之前添加的接口和類下面添加幾個常用的CURD方法,并實現它。這樣我們就已經實現的業務層的代碼了。
|
1
2
3
4
5
6
7
8
9
10
11
12
13
14
15
16
17
18
19
20
21
22
23
24
25
26
27
28
29
30
31
32
33
34
35
36
37
38
39
40
41
42
43
44
45
46
47
48
|
/// <summary>/// Test service interface/// </summary>public partial interface ITestService{/// <summary>/// Gets all tests/// </summary>/// <returns>Tests</returns>IList<TestEntity> GetAllTests(); /// <summary>/// Gets a test/// </summary>/// <param name="testId">The test identifier</param>/// <returns>Test</returns>TestEntity GetTestById(int testId);/// <summary>/// Inserts a test/// </summary>/// <param name="test">Test</param>void InsertTest(TestEntity test);/// <summary>/// Updates the test/// </summary>/// <param name="test">Test</param>void UpdateTest(TestEntity test);/// <summary>/// Deletes a test/// </summary>/// <param name="test">Test</param>void DeleteTest(TestEntity test);} |
|
1
2
3
4
5
6
7
8
9
10
11
12
13
14
15
16
17
18
19
20
21
22
23
24
25
26
27
28
29
30
31
32
33
34
35
36
37
38
39
40
41
42
43
44
45
46
47
48
49
50
51
52
53
54
55
56
57
58
59
60
61
62
63
64
65
66
67
68
69
70
71
72
73
74
75
76
77
78
79
80
81
82
83
84
85
86
87
88
89
90
91
92
93
94
95
96
97
98
99
100
101
102
103
104
105
106
|
/// <summary>/// Test service/// </summary>public partial class TestService : ITestService{#region Constants#endregion#region Fields private readonly IRepository<TestEntity> _testRepository;#endregion#region Ctorpublic TestService(IRepository<TestEntity> testRepository){this._testRepository = testRepository;}#endregion#region Methods /// <summary>/// Gets all tests/// </summary>/// <returns>Tests</returns>public virtual IList<TestEntity> GetAllTests(){return _testRepository.Table.Where(p => p.Name != null).ToList();}/// <summary>/// Gets a topic/// </summary>/// <param name="testId">The test identifier</param>/// <returns>Test</returns>public virtual TestEntity GetTestById(int testId){if (testId == 0)return null;return _testRepository.GetById(testId);} /// <summary>/// Inserts a test/// </summary>/// <param name="test">Test</param>public virtual void InsertTest(TestEntity test){if (test == null)throw new ArgumentNullException("test");_testRepository.Insert(test); }/// <summary>/// Updates the test/// </summary>/// <param name="test">Test</param>public virtual void UpdateTest(TestEntity test){if (test == null)throw new ArgumentNullException("test");_testRepository.Update(test);}/// <summary>/// Deletes a test/// </summary>/// <param name="test">Test</param>public virtual void DeleteTest(TestEntity test){if (test == null)throw new ArgumentNullException("test");_testRepository.Delete(test);}#endregion} |
四、添加Presentation項目
有了業務服務,現在可以添加表現層項目來測試了。為什么不直接寫測試項目?因為測試項目使用Mock模擬數據,不能完整展示整個功能。
1. 添加mvc模板項目,通過nuget引入Autofac和Autofac.Mvc5。
2. 添加容器注冊類DependencyRegistrar,實現IDependencyRegistrar接口,這一步非常關鍵,我們將要用的接口和實現類注入到容器中。
|
1
2
3
4
5
6
7
8
9
10
11
12
13
14
15
16
17
18
19
20
21
22
23
24
25
26
27
28
29
30
31
32
33
34
35
36
37
38
39
40
41
42
43
44
45
46
47
48
49
|
/// <summary>/// Dependency registrar/// </summary>public class DependencyRegistrar : IDependencyRegistrar{/// <summary>/// Register services and interfaces/// </summary>/// <param name="builder">Container builder</param>/// <param name="typeFinder">Type finder</param>/// <param name="config">Config</param>public virtual void Register(ContainerBuilder builder, ITypeFinder typeFinder, NopConfig config){//注入ObjectContextbuilder.Register<IDbContext>(c => new NopObjectContext("test")).InstancePerLifetimeScope();// 注入ef到倉儲builder.RegisterGeneric(typeof(EfRepository<>)).As(typeof(IRepository<>)).InstancePerLifetimeScope();// 注入Service及接口builder.RegisterAssemblyTypes(typeof(TestService).Assembly).AsImplementedInterfaces().InstancePerLifetimeScope();//注入controllersbuilder.RegisterControllers(typeFinder.GetAssemblies().ToArray());} /// <summary>/// Order of this dependency registrar implementation/// </summary>public int Order{get { return 2; }}} |
3. 配置文件中添加數據庫訪問節點
4. 應用啟動時添加初始化引擎上下文
啟動項目,這時NopEngine會報錯,因為我們沒有使用Nopconfig來配置項目,在RegisterDependencies方法中注釋NopConfig的注入,同時在Initialize過程中將相關代碼注釋。這樣就完成通過Autofac注入類到容器中。
|
1
2
3
4
5
6
7
8
9
10
11
12
13
14
15
16
17
18
|
public class MvcApplication : System.Web.HttpApplication{protected void Application_Start(){AreaRegistration.RegisterAllAreas();FilterConfig.RegisterGlobalFilters(GlobalFilters.Filters);RouteConfig.RegisterRoutes(RouteTable.Routes);BundleConfig.RegisterBundles(BundleTable.Bundles);//引擎上下文初始化EngineContext.Initialize(false);}} |
|
1
2
3
4
5
6
7
8
9
10
11
12
13
14
15
16
17
18
19
20
21
22
23
24
25
26
27
28
|
//RegisterDependencies方法中注釋NopConfig的注入//builder.RegisterInstance(config).As<NopConfig>().SingleInstance();public void Initialize(NopConfig config){//register dependenciesRegisterDependencies(config); //沒有使用config,暫時注釋//register mapper configurations//RegisterMapperConfiguration(config); //startup tasks 沒有啟用任務,注釋//if (!config.IgnoreStartupTasks)//{// RunStartupTasks();//} } |
5. 在controller添加測試代碼。將service添加到HomeController,在構造函數中初始化。系統啟動后會自動注入實例。通過斷點我們看到,數據成功添加到了數據庫。
|
1
2
3
4
5
6
7
8
9
10
11
12
13
14
15
16
17
18
19
20
21
22
23
24
25
26
27
28
29
30
31
32
33
|
public class HomeController : Controller{public ITestService _testService;public HomeController(ITestService testService){_testService = testService;}public ActionResult Index(){var entity = new TestEntity(){CreateDate = DateTime.Now,Description = "描述2",Name = "測試數據2"};_testService.InsertTest(entity);var tests = _testService.GetAllTests();return View();} |
五、擴展到Webapi、Winform、WPF

現在再添加一個winform項目,同樣的步驟添加相關的代碼。在Winform中我們也能使用業務的服務了。
1. 通過Nuget安裝autofac,entityframework, 添加項目Libraries下的引用。
2. 添加依賴注冊類,因為是winform項目,DependencyRegistrar這里需要做些調整,建議定義一個空接口IRegistrarForm,需要注入的Form實現IRegistrarForm。
|
1
2
3
4
5
6
7
8
9
10
11
12
13
14
15
16
17
18
19
20
21
22
23
24
25
26
27
28
29
30
31
32
33
34
35
36
37
38
39
40
41
42
43
44
45
46
47
48
49
50
51
52
53
54
55
56
57
58
59
60
61
62
63
64
65
|
/// <summary>/// Dependency registrar/// </summary>public class DependencyRegistrar : IDependencyRegistrar{/// <summary>/// Register services and interfaces/// </summary>/// <param name="builder">Container builder</param>/// <param name="typeFinder">Type finder</param>/// <param name="config">Config</param>public virtual void Register(ContainerBuilder builder, ITypeFinder typeFinder, NopConfig config){//注入ObjectContextbuilder.Register<IDbContext>(c => new NopObjectContext("test")).InstancePerLifetimeScope(); // 注入ef到倉儲builder.RegisterGeneric(typeof(EfRepository<>)).As(typeof(IRepository<>)).InstancePerLifetimeScope();// 注入Service及接口builder.RegisterAssemblyTypes(typeof(TestService).Assembly).AsImplementedInterfaces().InstancePerLifetimeScope();//注入controllers//builder.RegisterControllers(typeFinder.GetAssemblies().ToArray());//注入formsvar types = AppDomain.CurrentDomain.GetAssemblies().SelectMany(a => a.GetTypes().Where(t => t.GetInterfaces().Contains(typeof(IRegistrarForm)))).ToArray();foreach (var formtype in types){builder.RegisterAssemblyTypes(formtype.Assembly);} } /// <summary>/// Order of this dependency registrar implementation/// </summary>public int Order{get { return 2; }}} |
3. 在啟動時添加 EngineContext.Initialize(false),啟動項目,報錯了,因為winform不能執行,對方法做些調整,添加一個參數isForm表示是否是winform,默認為false。
|
1
2
3
4
5
6
7
8
9
10
11
12
13
14
15
16
17
18
19
20
21
22
23
24
25
26
27
28
29
30
31
32
|
/// <summary> /// Initializes a static instance of the Nop factory. /// </summary> /// <param name="forceRecreate">Creates a new factory instance even though the factory has been previously initialized.</param> /// <param name="isWinForm">是否客戶端程序</param> [MethodImpl(MethodImplOptions.Synchronized)] public static IEngine Initialize(bool forceRecreate,bool isWinForm = false) { if (Singleton<IEngine>.Instance == null || forceRecreate) { Singleton<IEngine>.Instance = new NopEngine(); NopConfig config = null; if (!isWinForm) { config = ConfigurationManager.GetSection("NopConfig") as NopConfig; } else { //如果使用winform,使用此代碼讀取配置初始化NopConfig var appSettings = ConfigurationManager.AppSettings; foreach (var key in appSettings.AllKeys) { } } Singleton<IEngine>.Instance.Initialize(config); } return Singleton<IEngine>.Instance; } |
|
1
2
3
4
5
6
7
8
9
10
11
12
13
14
15
16
17
18
19
20
21
22
23
24
|
static class Program{/// <summary>/// 應用程序的主入口點。/// </summary>[STAThread]static void Main(){Application.EnableVisualStyles();Application.SetCompatibleTextRenderingDefault(false);//Application.Run(new Form1());//引擎上下文初始化EngineContext.Initialize(false, true);Application.Run(EngineContext.Current.Resolve<Form1>());}} |
4. From1中測試,成功調用了業務層的方法,這里我們并沒有實例化ITestService,而是交給依賴注入自動實現。
|
1
2
3
4
5
6
7
8
9
10
11
12
13
14
15
16
17
18
19
20
21
22
23
24
25
26
27
28
29
|
public partial class Form1 : Form, IRegistrarForm{private ITestService _testService;public Form1(ITestService testService){InitializeComponent();_testService = testService;//如果不注入form可以使用EngineContext.Current.Resolve<ITestService>(); 得到實例} private void button1_Click(object sender, EventArgs e){var tests = _testService.GetAllTests();}} |
至此,基于Nop的精簡開發框架基本完成,如果你有興趣,建議在github關注該項目 :https://github.com/dreling8/Nop.Framework,歡迎star給星星,你的支持是我的動力!
以上就是本文的全部內容,希望對大家的學習有所幫助,也希望大家多多支持服務器之家。
原文鏈接:http://www.cnblogs.com/dreling/p/6906688.html


