數據庫數據導出為excel表格,也可以說是一個很常用的功能了。畢竟不是任何人都懂數據庫操作語句的。
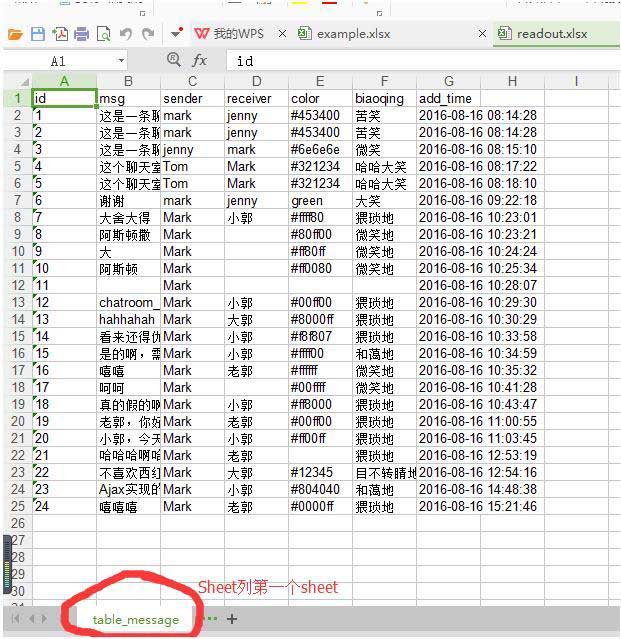
下面先來看看完成的效果吧。
數據源

導出結果

依賴
由于是Python實現的,所以需要有Python環境的支持
Python2.7.11
我的Python環境是2.7.11。雖然你用的可能是3.5版本,但是思想是一致的。
xlwt
pip install xlwt
MySQLdb
pip install MySQLdb
如果上述方式不成功的話,可以到sourceforge官網上去下載windows上的msi版本或者使用源碼自行編譯。
數據庫相關
本次試驗,數據庫相關的其實也就是如何使用Python操作數據庫而已,知識點也很少,下述為我們本次用到的一些簡單的語句。
連接
conn = MySQLdb.connect(host='localhost',user='root',passwd='mysql',db='test',charset='utf8')
這里值得我們一提的就是最后一個參數的使用,不然從數據庫中取出的數據就會使亂碼。關于亂碼問題,如果還有不明白的地方,不妨看下這篇文章 淺談編碼,解碼,亂碼的問題
獲取字段信息
|
1
|
fields = cursor.description |
至于cursor,是我們操作數據庫的核心。游標的特點就是一旦遍歷過該條數據,便不可返回。但是我們也可以手動的改變其位置。
cursor.scroll(0,mode='absolute')來重置游標的位置
獲取數據
獲取數據簡直更是輕而易舉,但是我們必須在心里明白,數據項是一個類似于二維數組的存在。我們獲取每一個cell項的時候應該注意。
|
1
|
results = cursor.fetchall() |
Excel基礎
同樣,這里講解的也是如何使用Python來操作excel數據。
workbook
工作薄的概念我們必須要明確,其是我們工作的基礎。與下文的sheet相對應,workbook是sheet賴以生存的載體。
|
1
|
workbook = xlwt.Workbook() |
sheet
我們所有的操作,都是在sheet上進行的。
sheet = workbook.add_sheet(‘table_message',cell_overwrite_ok=True)
對于workbook 和sheet,如果對此有點模糊。不妨這樣進行假設。
日常生活中記賬的時候,我們都會有一個賬本,這就是workbook。而我們記賬則是記錄在一張張的表格上面,這些表格就是我們看到的sheet。一個賬本上可以有很多個表格,也可以只是一個表格。這樣就很容易理解了吧。 :-)
案例
下面看一個小案例。
|
1
2
3
4
5
6
7
8
9
10
11
12
13
14
15
16
17
18
19
20
21
22
23
24
25
26
27
28
29
30
31
32
33
34
35
36
37
38
39
|
# coding:utf8import sysreload(sys)sys.setdefaultencoding('utf8')# __author__ = '郭 璞'# __date__ = '2016/8/20'# __Desc__ = 從數據庫中導出數據到excel數據表中import xlwtimport MySQLdbconn = MySQLdb.connect('localhost','root','mysql','test',charset='utf8')cursor = conn.cursor()count = cursor.execute('select * from message')print count# 重置游標的位置cursor.scroll(0,mode='absolute')# 搜取所有結果results = cursor.fetchall()# 獲取MYSQL里面的數據字段名稱fields = cursor.descriptionworkbook = xlwt.Workbook()sheet = workbook.add_sheet('table_message',cell_overwrite_ok=True)# 寫上字段信息for field in range(0,len(fields)): sheet.write(0,field,fields[field][0])# 獲取并寫入數據段信息row = 1col = 0for row in range(1,len(results)+1): for col in range(0,len(fields)): sheet.write(row,col,u'%s'%results[row-1][col])workbook.save(r'./readout.xlsx') |
封裝
為了使用上的方便,現將其封裝成一個容易調用的函數。
封裝之后
|
1
2
3
4
5
6
7
8
9
10
11
12
13
14
15
16
17
18
19
20
21
22
23
24
25
26
27
28
29
30
31
32
33
34
35
36
37
38
39
40
41
42
43
44
45
|
# coding:utf8import sysreload(sys)sys.setdefaultencoding('utf8')# __author__ = '郭 璞'# __date__ = '2016/8/20'# __Desc__ = 從數據庫中導出數據到excel數據表中import xlwtimport MySQLdbdef export(host,user,password,dbname,table_name,outputpath): conn = MySQLdb.connect(host,user,password,dbname,charset='utf8') cursor = conn.cursor() count = cursor.execute('select * from '+table_name) print count # 重置游標的位置 cursor.scroll(0,mode='absolute') # 搜取所有結果 results = cursor.fetchall() # 獲取MYSQL里面的數據字段名稱 fields = cursor.description workbook = xlwt.Workbook() sheet = workbook.add_sheet('table_'+table_name,cell_overwrite_ok=True) # 寫上字段信息 for field in range(0,len(fields)): sheet.write(0,field,fields[field][0]) # 獲取并寫入數據段信息 row = 1 col = 0 for row in range(1,len(results)+1): for col in range(0,len(fields)): sheet.write(row,col,u'%s'%results[row-1][col]) workbook.save(outputpath)# 結果測試if __name__ == "__main__": export('localhost','root','mysql','test','datetest',r'datetest.xlsx') |
測試結果
|
1
2
3
4
5
6
7
|
id name date1 dlut 2016-07-062 清華大學 2016-07-033 北京大學 2016-07-284 Mark 2016-08-205 Tom 2016-08-196 Jane 2016-08-21 |
總結
回顧一下,本次試驗用到了哪些知識點。
•Python簡易操作數據庫
•Python簡易操作Excel
•數據庫取出數據亂碼問題解決之添加charset=utf-8
•以二維數組的角度來處理獲取到的結果集。
以上這篇Python實現將數據庫一鍵導出為Excel表格的實例就是小編分享給大家的全部內容了,希望能給大家一個參考,也希望大家多多支持服務器之家。


