簡介
springmvc對json的前后臺傳輸做了很好封裝,避免了重復編碼的過程,下面來看看常用的@ResponseBody和@RequestBody注解
添加依賴
springmvc對json的處理依賴jackson
|
1
2
3
4
5
6
7
8
9
10
|
<dependency> <groupId>org.codehaus.jackson</groupId> <artifactId>jackson-core-asl</artifactId> <version>1.9.11</version></dependency><dependency> <groupId>org.codehaus.jackson</groupId> <artifactId>jackson-mapper-asl</artifactId> <version>1.9.11</version></dependency> |
xml配置
|
1
|
<mvc:annotation-driven />//不要忘了命名空間配置 |
@ResponseBody
如果傳輸的是單層json對象,我們后臺可以直接用 @RequestParam接收
|
1
2
3
4
5
6
7
8
9
10
11
|
$.ajax({ type : "post", dataType : "json", url : "/testRequestBody", data:{ name:"韋德", age:35 }, success : function(result) { }}); |
|
1
2
3
4
5
|
@RequestMapping("/testRequestBody")public String testRequestBody(@RequestParam Map<String, Object> map) { System.out.println(map);// {name=韋德, age=35} return "index";} |
如果傳輸的是多層嵌套json對象,這個時候會就會出現數據丟失問題
@ResponseBody很好的解決了這個問題,它會把前臺傳輸過來的json轉化為后臺對應的對象
|
1
2
3
4
5
6
7
8
9
10
11
12
13
|
$.ajax({ type : "post", dataType : "json", url : "/testRequestBody", contentType:"application/json", data:JSON.stringify({ name:"韋德", win:[2006,2012,2013], age:35 }), success : function(result) { }}); |
|
1
2
3
4
5
|
@RequestMapping("/testRequestBody")public String testRequestBody(@RequestBody Map<String, Object> map) { System.out.println(map);//{name=韋德, win=[2006, 2012, 2013], age=35} return "index";} |
需要注意的是前臺需要指定contentType為"application/json"
同時要把json對象轉化為String,否則后臺不能識別
@ResponseBody
ajax請求返回json格式,往常我們可以這樣做
|
1
2
3
4
5
6
7
8
9
10
11
12
13
14
15
16
|
private void writeJson(HttpServletResponse response, Object object) { String json = JSON.toJSONString(object); response.setCharacterEncoding("UTF-8"); response.setContentType("application/json; charset=utf-8"); PrintWriter out = null; try { out = response.getWriter(); out.write(json); } catch (IOException e) { e.printStackTrace(); } finally { if (out != null) { out.close(); } }} |
這個時候 @ResponseBody就派上用場了,只需要一個注解,全部搞定
|
1
2
3
4
5
6
7
8
|
$.ajax({ type : "post", dataType : "json", url : "/testResponseBody", success : function(result) { console.info(result); }}); |
|
1
2
3
4
5
6
7
8
|
@RequestMapping("/testResponseBody")@ResponseBodypublic Map<String, Object> testRequestBody() { Map<String, Object> result = new HashMap<String, Object>(); result.put("name", "韋德"); result.put("age", 35); return result;} |
前臺console輸出
|
1
2
3
4
|
{ "age": 35, "name": "韋德"} |
總結
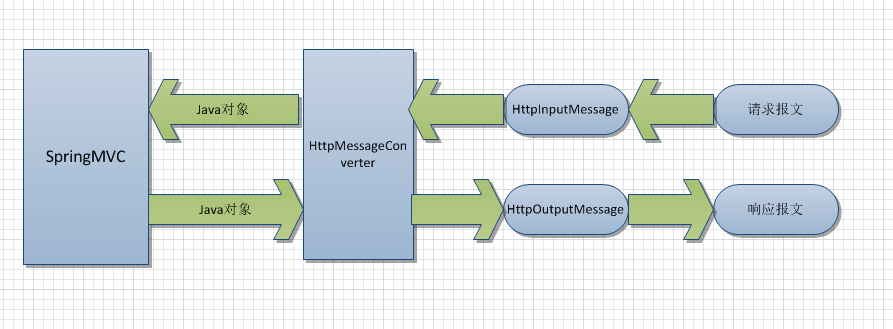
在網上看到很不錯的流程圖,作為總結吧

以上就是本文的全部內容,希望對大家的學習有所幫助,也希望大家多多支持服務器之家。
原文鏈接:http://www.cnblogs.com/zhaoguhong/p/6882776.html?utm_source=tuicool&utm_medium=referral


