前言
一直以來都是用springmvc+mybatis進行后端接口開發工作,最近閑來無事,根據現有功能需求,用springboot+mybatis部署一套簡單的web項目。
所用工具
- intellij idea 2018.1.4
- jdk 1.8
- apache-tomcat-8.0.50
所解決的問題
1、如何用idea創建springboot項目
2、如何進行 服務器、數據庫、mybatis、視圖解析器的配置
3、如何使用mybatis generator 自動生成代碼
4、如何使用multipart進行文件上傳
5、如何運用springboot的事務
6、如何打包進行tomcat部署
運用idea創建springboot項目
1、打開idea,file -> new -> project,選擇spring initializr,然后next。

2、修改ariifact,下面的name、package會自動修改;packaging有兩種模式,一種是jar,一種是war;因為springboot中自帶了tomcat,因此可以將項目打成jar,直接運行;而我現有項目是部署到tomcat上,因此我需要打成war包;然后next。

3、設置項目依賴,然后next ,進入下一頁 ,設置project name,點擊finish完成。


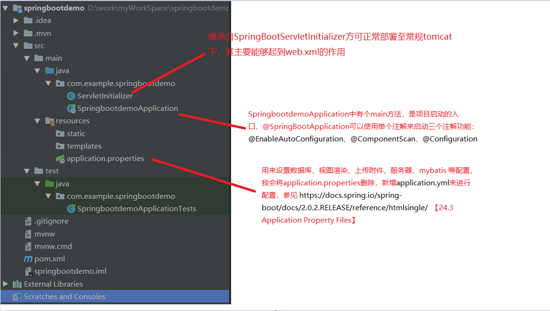
4、進入項目

pom.xml
|
1
2
3
4
5
6
7
8
9
10
11
12
13
14
15
16
17
18
19
20
21
22
23
24
25
26
27
28
29
30
31
32
33
34
35
36
37
38
39
40
41
42
43
44
45
46
47
48
49
50
51
52
53
54
55
56
57
58
59
60
61
62
63
64
65
66
67
68
69
70
71
72
|
<?xml version="1.0" encoding="utf-8"?><project xmlns="http://maven.apache.org/pom/4.0.0" xmlns:xsi="http://www.w3.org/2001/xmlschema-instance" xsi:schemalocation="http://maven.apache.org/pom/4.0.0 http://maven.apache.org/xsd/maven-4.0.0.xsd"> <modelversion>4.0.0</modelversion> <groupid>com.example</groupid> <artifactid>springbootdemo</artifactid> <version>0.0.1-snapshot</version> <packaging>war</packaging> <name>springbootdemo</name> <description>demo project for spring boot</description> <parent> <groupid>org.springframework.boot</groupid> <artifactid>spring-boot-starter-parent</artifactid> <version>2.0.2.release</version> <relativepath/> <!-- lookup parent from repository --> </parent> <properties> <project.build.sourceencoding>utf-8</project.build.sourceencoding> <project.reporting.outputencoding>utf-8</project.reporting.outputencoding> <java.version>1.8</java.version> </properties> <dependencies> <dependency> <groupid>org.springframework.boot</groupid> <artifactid>spring-boot-starter-jdbc</artifactid> </dependency> <dependency> <groupid>org.springframework.boot</groupid> <artifactid>spring-boot-starter-web</artifactid> </dependency> <dependency> <groupid>org.mybatis.spring.boot</groupid> <artifactid>mybatis-spring-boot-starter</artifactid> <version>1.3.2</version> </dependency> <dependency> <groupid>org.springframework.boot</groupid> <artifactid>spring-boot-devtools</artifactid> <scope>runtime</scope> </dependency> <dependency> <groupid>com.microsoft.sqlserver</groupid> <artifactid>mssql-jdbc</artifactid> <scope>runtime</scope> </dependency> <dependency> <groupid>org.springframework.boot</groupid> <artifactid>spring-boot-starter-tomcat</artifactid> <scope>provided</scope> </dependency> <dependency> <groupid>org.springframework.boot</groupid> <artifactid>spring-boot-starter-test</artifactid> <scope>test</scope> </dependency> </dependencies> <build> <plugins> <plugin> <groupid>org.springframework.boot</groupid> <artifactid>spring-boot-maven-plugin</artifactid> </plugin> </plugins> </build></project> |
無配置文件的springmvc
通過兩個例子:1、http請求訪問并渲染頁面 2、http請求返回json字符串
-配置數據源、視圖渲染
-添加視圖渲染pom依賴
-創建welcomecontroller、welcome.jsp
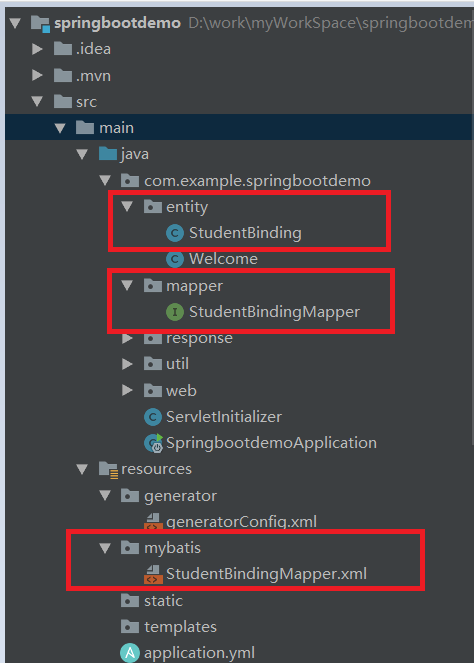
新增之后的項目結構

application.yml 配置數據源 和 視圖渲染
|
1
2
3
4
5
6
7
8
9
10
11
|
# 數據源、視圖配置spring: datasource: url: jdbc:sqlserver://xx:1433;databasename=xx username: xx password: xx driver-class-name: com.microsoft.sqlserver.jdbc.sqlserverdriver mvc: view: prefix: /web-inf/views/ suffix: .jsp |
pom.xml新增視圖渲染依賴
|
1
2
3
4
5
6
7
8
9
10
|
<!-- 使用 jsp 必要依賴 --> <dependency> <groupid>org.apache.tomcat.embed</groupid> <artifactid>tomcat-embed-jasper</artifactid> <scope>provided</scope> </dependency> <dependency> <groupid>javax.servlet</groupid> <artifactid>jstl</artifactid> </dependency> |
創建welcomecontroller
|
1
2
3
4
5
6
7
8
9
10
11
12
13
14
15
16
17
18
19
20
21
22
23
24
25
26
27
28
29
30
31
32
33
34
35
36
37
38
39
40
41
42
43
44
45
46
47
48
49
50
51
52
53
54
55
56
57
58
59
|
package com.example.springbootdemo.web;import com.example.springbootdemo.entity.welcome;import com.example.springbootdemo.response.response;import com.example.springbootdemo.response.responsecode;import org.springframework.stereotype.controller;import org.springframework.web.bind.annotation.requestmapping;import org.springframework.web.bind.annotation.responsebody;import org.springframework.web.servlet.modelandview;import java.util.arraylist;import java.util.list;@controller@requestmapping("/welcome")public class welcomecontroller { /** * 訪問welcome.jsp頁面 * @return */ @requestmapping("welcomeindex") public modelandview welcomeindex(){ modelandview mv = new modelandview(); mv.setviewname("welcome"); mv.addobject("name","xx"); return mv; } /** * 返回json字符串 * @return */ @requestmapping("getwelcomeinfo") @responsebody public response getwelcomeinfo(){ /** * 測試數據 */ list<welcome> welcomes = new arraylist<>(); welcome w1 = new welcome(); w1.setid("1"); w1.setname("xx1"); w1.setage(11); w1.setgender("女"); welcome w2 = new welcome(); w2.setid("2"); w2.setname("xx2"); w2.setage(22); w2.setgender("男"); welcomes.add(w1); welcomes.add(w2); response response = new response(); response.setdata(welcomes); response.setretcode(responsecode.success); response.setretdesc("success"); return response; }} |
創建welcome.jsp
|
1
2
3
4
5
6
7
8
9
|
<%@ page contenttype="text/html;charset=utf-8" language="java" %><html><head> <title>視圖渲染</title></head><body> 您好,${name}</body></html> |
啟動項目,并訪問
http://localhost:8080/welcome/getwelcomeinfo
http://localhost:8080/welcome/welcomeindex
使用mybatis generator自動生成代碼
用于為表創建 *mapper.xml、model、dao文件
在pom.xml 添加mybatis generator 自動生成代碼插件
|
1
2
3
4
5
6
7
8
9
10
11
12
13
14
15
16
17
18
19
|
<build> <plugins> <plugin> <groupid>org.springframework.boot</groupid> <artifactid>spring-boot-maven-plugin</artifactid> </plugin> <!-- mybatis generator 自動生成代碼插件 --> <plugin> <groupid>org.mybatis.generator</groupid> <artifactid>mybatis-generator-maven-plugin</artifactid> <version>1.3.2</version> <configuration> <configurationfile>${basedir}/src/main/resources/generator/generatorconfig.xml</configurationfile> <overwrite>true</overwrite> <verbose>true</verbose> </configuration> </plugin> </plugins> </build> |
在上面pom.xml配置的pugin路徑resources/generator 文件夾下添加generatorconfig.xml
|
1
2
3
4
5
6
7
8
9
10
11
12
13
14
15
16
17
18
19
20
21
22
23
24
25
26
27
28
29
30
31
32
33
34
35
36
|
<?xml version="1.0" encoding="utf-8"?><!doctype generatorconfiguration public "-//mybatis.org//dtd mybatis generator configuration 1.0//en" "http://mybatis.org/dtd/mybatis-generator-config_1_0.dtd"><generatorconfiguration> <!-- 數據庫驅動:選擇你的本地硬盤上面的數據庫驅動包--> <classpathentry location="c:\users\.m2\repository\com\microsoft\sqlserver\mssql-jdbc\6.2.2.jre8\mssql-jdbc-6.2.2.jre8.jar"/> <context id="db2tables" targetruntime="mybatis3"> <commentgenerator> <property name="suppressdate" value="true"/> <!-- 是否去除自動生成的注釋 true:是 : false:否 --> <property name="suppressallcomments" value="true"/> </commentgenerator> <!--數據庫鏈接url,用戶名、密碼 --> <jdbcconnection driverclass="com.microsoft.sqlserver.jdbc.sqlserverdriver" connectionurl="jdbc:sqlserver://xx:1433;databasename=xx" userid="xx" password="xx"> </jdbcconnection> <javatyperesolver> <property name="forcebigdecimals" value="false"/> </javatyperesolver> <!-- 生成模型的包名和位置--> <javamodelgenerator targetpackage="com.example.springbootdemo.entity" targetproject="src/main/java"> <property name="enablesubpackages" value="true"/> <property name="trimstrings" value="true"/> </javamodelgenerator> <!-- 生成映射文件的包名和位置--> <sqlmapgenerator targetpackage="mybatis" targetproject="src/main/resources"> <property name="enablesubpackages" value="true"/> </sqlmapgenerator> <!-- 生成dao的包名和位置--> <javaclientgenerator type="xmlmapper" targetpackage="com.example.springbootdemo.mapper" targetproject="src/main/java"> <property name="enablesubpackages" value="true"/> </javaclientgenerator> <!-- 要生成的表 tablename是數據庫中的表名或視圖名 domainobjectname是實體類名--> <table tablename="xx" domainobjectname="studentbinding" enablecountbyexample="false" enableupdatebyexample="false" enabledeletebyexample="false" enableselectbyexample="false" selectbyexamplequeryid="false"></table> </context></generatorconfiguration> |
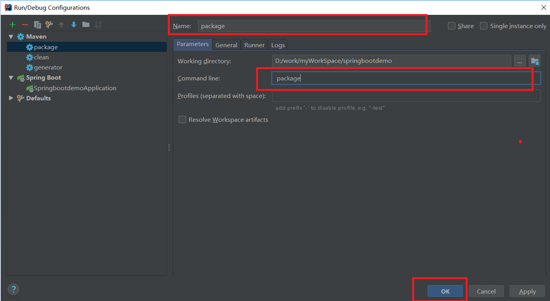
使用maven中的mybatis-generator:generate根據數據庫里面表生產相關的類
edit configurations -> 添加 -> maven


配置mybatis
在application.yml 中添加mybatis的配置
|
1
2
3
4
|
# mybatis配置mybatis: mapper-locations: classpath*:mybatis/*mapper.xml type-aliases-package: com.example.springbootdemo.entity |
在studentbindingmapper.java中添加 @repository("studentbindingmapper")注解才能使用@mapperscan掃描到
|
1
2
|
@repository("studentbindingmapper")public interface studentbindingmapper {} |
在springbootdemoapplication.java添加@mapperscan
|
1
2
3
4
5
6
7
8
9
10
11
12
13
|
package com.example.springbootdemo;import org.mybatis.spring.annotation.mapperscan;import org.springframework.boot.springapplication;import org.springframework.boot.autoconfigure.springbootapplication;@springbootapplication@mapperscan("com.example.springbootdemo.mapper")public class springbootdemoapplication { public static void main(string[] args) { springapplication.run(springbootdemoapplication.class, args); }} |
添加service、controller層
項目層級

添加studentbindingservice
|
1
2
3
4
5
6
7
8
9
10
11
12
13
14
|
package com.example.springbootdemo.service;import com.example.springbootdemo.entity.studentbinding;import java.util.list;public interface studentbindingservice { int deletebyprimarykey(long id); int insert(studentbinding record); int insertselective(studentbinding record); studentbinding selectbyprimarykey(long id); int updatebyprimarykeyselective(studentbinding record); int updatebyprimarykey(studentbinding record); void validtransaction(long id); list<studentbinding> getstudentbindbyquery(studentbinding record);} |
添加studentbindingserviceimpl
|
1
2
3
4
5
6
7
8
9
10
11
12
13
14
15
16
17
18
19
20
21
22
23
24
25
26
27
28
29
30
31
32
33
34
35
36
37
38
39
40
41
42
43
44
45
46
47
48
49
50
51
52
53
54
55
56
57
58
59
60
61
|
package com.example.springbootdemo.service.impl;import com.example.springbootdemo.entity.studentbinding;import com.example.springbootdemo.mapper.studentbindingmapper;import com.example.springbootdemo.service.studentbindingservice;import org.springframework.beans.factory.annotation.autowired;import org.springframework.stereotype.service;import org.springframework.transaction.annotation.transactional;import java.util.list;@service(value = "studentbindingservice")public class studentbindingserviceimpl implements studentbindingservice { @autowired private studentbindingmapper studentbindingmapper; @override public int deletebyprimarykey(long id) { return studentbindingmapper.deletebyprimarykey(id); } @override public int insert(studentbinding record) { return studentbindingmapper.insert(record); } @override public int insertselective(studentbinding record) { return studentbindingmapper.insertselective(record); } @override public studentbinding selectbyprimarykey(long id) { return studentbindingmapper.selectbyprimarykey(id); } @override public int updatebyprimarykeyselective(studentbinding record) { return studentbindingmapper.updatebyprimarykeyselective(record); } @override public int updatebyprimarykey(studentbinding record) { return studentbindingmapper.updatebyprimarykey(record); } @override @transactional public void validtransaction(long id){ // 刪除之后,插入該id的數據 studentbindingmapper.deletebyprimarykey(id); studentbinding record = new studentbinding(); record.setid(id); studentbindingmapper.insertselective(record); } @override public list<studentbinding> getstudentbindbyquery(studentbinding record) { return studentbindingmapper.getstudentbindbyquery(record); }} |
新增studentbindingcontroller
|
1
2
3
4
5
6
7
8
9
10
11
12
13
14
15
16
17
18
19
20
21
22
23
24
25
26
27
28
29
30
31
32
33
34
35
36
37
38
39
40
41
42
43
44
45
46
47
48
49
50
51
52
53
54
55
56
57
58
59
60
61
62
63
64
65
66
67
68
69
70
71
72
73
74
75
76
77
78
79
80
81
82
83
84
85
86
87
88
89
90
91
92
93
94
95
96
97
98
99
100
101
102
103
104
105
106
107
108
109
110
111
112
113
114
115
116
117
118
119
120
121
122
123
124
125
126
127
128
129
130
131
132
133
134
135
136
137
138
139
140
141
142
143
144
145
146
147
148
149
150
151
152
153
154
155
156
157
158
159
160
161
162
163
164
165
166
167
168
169
170
171
172
173
174
175
176
177
178
179
180
181
182
183
184
185
186
187
188
189
190
191
|
package com.example.springbootdemo.web;import com.example.springbootdemo.entity.studentbinding;import com.example.springbootdemo.response.response;import com.example.springbootdemo.response.responsecode;import com.example.springbootdemo.service.studentbindingservice;import org.springframework.beans.factory.annotation.autowired;import org.springframework.stereotype.controller;import org.springframework.web.bind.annotation.requestmapping;import org.springframework.web.bind.annotation.requestparam;import org.springframework.web.bind.annotation.responsebody;import org.springframework.web.multipart.multipartfile;import org.springframework.web.servlet.modelandview;import java.io.file;import java.io.ioexception;import java.util.list;@controller@requestmapping(value = "/studentbind")public class studentbindingcontroller { @autowired private studentbindingservice studentbindingservice; /** * 根據請求參數,刪除綁定學生信息 * @param id * @return */ @requestmapping("deletebyprimarykey") @responsebody public response deletebyprimarykey(long id){ response response = new response(); if(id==null){ response.setretcode(responsecode.paramarter_error); response.setretdesc("參數錯誤"); return response; } try{ studentbindingservice.deletebyprimarykey(id); response.setretcode(responsecode.success); response.setretdesc("刪除成功"); }catch (exception e){ e.printstacktrace(); response.setretcode(responsecode.failed); response.setretdesc("刪除異常"); } return response; } /** * 根據請求參數,添加綁定學生信息 * @param record * @return */ @requestmapping("insertselective") @responsebody public response insertselective(studentbinding record){ response response = new response(); if(record==null){ response.setretcode(responsecode.paramarter_error); response.setretdesc("參數錯誤"); return response; } try{ studentbindingservice.insertselective(record); response.setretcode(responsecode.success); response.setretdesc("添加成功"); }catch (exception e){ e.printstacktrace(); response.setretcode(responsecode.failed); response.setretdesc("添加異常"); } return response; } /** * 根據請求參數,查詢綁定學生信息 * @param id * @return */ @requestmapping("selectbyprimarykey") @responsebody public response selectbyprimarykey(long id){ response response = new response(); if(id==null){ response.setretcode(responsecode.paramarter_error); response.setretdesc("參數錯誤"); return response; } try{ studentbinding studentbinding = studentbindingservice.selectbyprimarykey(id); response.setdata(studentbinding); response.setretcode(responsecode.success); response.setretdesc("查詢成功"); }catch (exception e){ e.printstacktrace(); response.setretcode(responsecode.failed); response.setretdesc("查詢異常"); } return response; } /** * 驗證@transaction注解是否好用 * @param id * @return */ @requestmapping("validtransaction") @responsebody public response validtransaction(long id){ response response = new response(); if(id==null){ response.setretcode(responsecode.paramarter_error); response.setretdesc("參數錯誤"); return response; } try{ studentbindingservice.validtransaction(id); response.setretcode(responsecode.success); }catch (exception e){ e.printstacktrace(); response.setretcode(responsecode.failed); } return response; } /** * 渲染jsp頁面 * @return */ @requestmapping("welcomeindex") public modelandview welcomeindex(){ list<studentbinding> studentbindings = studentbindingservice.getstudentbindbyquery(new studentbinding());// model.addattribute("studentbindings",studentbindings); modelandview mv = new modelandview(); mv.setviewname("welcome"); mv.addobject("studentbindings",studentbindings); return mv; } /** * 跳轉到上傳文件頁面 * @return */ @requestmapping("multipartindex") public string multipartindex(){ return "multipart-index"; } /** * 上傳文件到指定目錄 * @param file * @return */ @requestmapping("/upload") @responsebody public response upload(@requestparam("file") multipartfile file){ response response = new response(); if (file.isempty()){ response.setretcode(responsecode.paramarter_error); response.setretdesc("參數錯誤"); return response; } try { string filepath = "d:\\ceshi\\upload\\"; file dir = new file(filepath); if(!dir.isdirectory()){ dir.mkdir(); } string fileoriginalname = file.getoriginalfilename(); file writefile = new file(filepath + fileoriginalname); //文件寫入磁盤 file.transferto(writefile); response.setretcode(responsecode.success); response.setretdesc("上傳成功"); } catch (ioexception e) { e.printstacktrace(); response.setretcode(responsecode.failed); response.setretdesc("上傳失敗"); } return response; }} |
重啟項目之后,就可以訪問各個接口
springboot配置事務
springboot配置事務有兩種方式
1、在springbootdemoapplication.java項目入口,添加@enabletransactionmanagement的注解用來開啟事務
2、在service實現類上添加@transactional注解,那么該類的所有方法都進行事務管理;也可以直接在service實現類的方法上直接添加@transactional注解,那么只對該方法進行事務管理,上面代碼中有對方法添加事務的例子
springboot打包進行tomcat部署
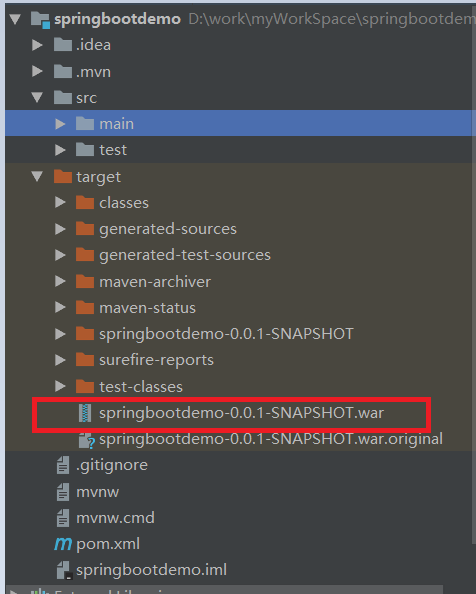
edit configuration -> maven -> 添加 ->啟動 -> 復制war包 -> tomcat webapp ->修改war包的名字 -> tomcat bin -> startup.bat


tomcat啟動之后,訪問 http://localhost:8080/springbootdemo/welcome/welcomeindex 進行驗證

以上就是本文的全部內容,希望對大家的學習有所幫助,也希望大家多多支持服務器之家。
原文鏈接:https://www.jianshu.com/p/666640396142


