本項目使用的環境:
- 開發工具:intellij idea 2017.1.3
- springboot: 1.5.6
- jdk:1.8.0_161
- maven:3.3.9
額外功能
- pagehelper 分頁插件
- mybatis generator 自動生成代碼插件
步驟:
1.創建一個springboot項目:

2.創建項目的文件結構以及jdk的版本

3.選擇項目所需要的依賴


然后點擊finish
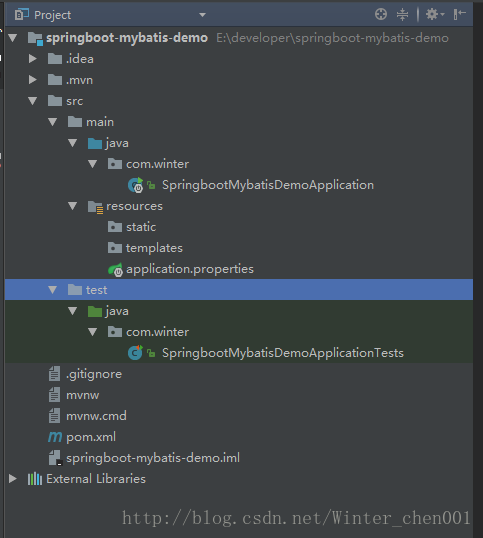
5.看一下文件的結構:

6.查看一下pom.xml:
|
1
2
3
4
5
6
7
8
9
10
11
12
13
14
15
16
17
18
19
20
21
22
23
24
25
26
27
28
29
30
31
32
33
34
35
36
37
38
39
40
41
42
43
44
45
46
47
48
49
50
51
52
53
54
55
56
57
58
59
60
61
62
63
64
65
66
67
68
69
70
71
72
73
74
75
76
77
78
79
80
81
82
83
84
85
86
87
88
89
90
91
92
93
94
95
96
97
98
99
100
101
102
103
104
105
|
<?xml version="1.0" encoding="utf-8"?><project xmlns="http://maven.apache.org/pom/4.0.0" xmlns:xsi="http://www.w3.org/2001/xmlschema-instance" xsi:schemalocation="http://maven.apache.org/pom/4.0.0 http://maven.apache.org/xsd/maven-4.0.0.xsd"> <modelversion>4.0.0</modelversion> <groupid>com.winter</groupid> <artifactid>springboot-mybatis-demo</artifactid> <version>0.0.1-snapshot</version> <packaging>jar</packaging> <name>springboot-mybatis-demo</name> <description>demo project for spring boot</description> <parent> <groupid>org.springframework.boot</groupid> <artifactid>spring-boot-starter-parent</artifactid> <version>1.5.6.release</version> <relativepath/> <!-- lookup parent from repository --> </parent> <properties> <project.build.sourceencoding>utf-8</project.build.sourceencoding> <project.reporting.outputencoding>utf-8</project.reporting.outputencoding> <java.version>1.7</java.version> </properties> <dependencies> <dependency> <groupid>org.mybatis.spring.boot</groupid> <artifactid>mybatis-spring-boot-starter</artifactid> <version>1.3.0</version> </dependency> <dependency> <groupid>org.springframework.boot</groupid> <artifactid>spring-boot-starter-thymeleaf</artifactid> </dependency> <dependency> <groupid>org.springframework.boot</groupid> <artifactid>spring-boot-starter-web</artifactid> </dependency> <dependency> <groupid>org.springframework.boot</groupid> <artifactid>spring-boot-starter-test</artifactid> <scope>test</scope> </dependency> <dependency> <groupid>mysql</groupid> <artifactid>mysql-connector-java</artifactid> <version>5.1.35</version> </dependency> <dependency> <groupid>com.fasterxml.jackson.core</groupid> <artifactid>jackson-core</artifactid> </dependency> <dependency> <groupid>com.fasterxml.jackson.core</groupid> <artifactid>jackson-databind</artifactid> </dependency> <dependency> <groupid>com.fasterxml.jackson.datatype</groupid> <artifactid>jackson-datatype-joda</artifactid> </dependency> <dependency> <groupid>com.fasterxml.jackson.module</groupid> <artifactid>jackson-module-parameter-names</artifactid> </dependency> <!-- 分頁插件 --> <dependency> <groupid>com.github.pagehelper</groupid> <artifactid>pagehelper-spring-boot-starter</artifactid> <version>1.1.2</version> </dependency> <!-- alibaba的druid數據庫連接池 --> <dependency> <groupid>com.alibaba</groupid> <artifactid>druid-spring-boot-starter</artifactid> <version>1.1.0</version> </dependency> </dependencies> <build> <plugins> <plugin> <groupid>org.springframework.boot</groupid> <artifactid>spring-boot-maven-plugin</artifactid> </plugin> <!-- mybatis generator 自動生成代碼插件 --> <plugin> <groupid>org.mybatis.generator</groupid> <artifactid>mybatis-generator-maven-plugin</artifactid> <version>1.3.2</version> <configuration> <configurationfile>${basedir}/src/main/resources/generator/generatorconfig.xml</configurationfile> <overwrite>true</overwrite> <verbose>true</verbose> </configuration> </plugin> </plugins> </build></project> |
7.項目不使用application.properties文件 而使用更加簡潔的application.yml文件:
將原有的resource文件夾下的application.properties文件刪除,創建一個新的application.yml配置文件,
文件的內容如下:
|
1
2
3
4
5
6
7
8
9
10
11
12
13
14
15
16
17
18
19
20
21
22
23
24
25
26
27
28
29
30
31
32
33
34
35
36
37
|
server: port: 8080spring: datasource: name: test url: jdbc:mysql://127.0.0.1:3306/depot username: root password: root # 使用druid數據源 type: com.alibaba.druid.pool.druiddatasource driver-class-name: com.mysql.jdbc.driver filters: stat maxactive: 20 initialsize: 1 maxwait: 60000 minidle: 1 timebetweenevictionrunsmillis: 60000 minevictableidletimemillis: 300000 validationquery: select 'x' testwhileidle: true testonborrow: false testonreturn: false poolpreparedstatements: true maxopenpreparedstatements: 20## 該配置節點為獨立的節點,有很多同學容易將這個配置放在spring的節點下,導致配置無法被識別mybatis: mapper-locations: classpath:mapping/*.xml #注意:一定要對應mapper映射xml文件的所在路徑 type-aliases-package: com.winter.model # 注意:對應實體類的路徑#pagehelper分頁插件pagehelper: helperdialect: mysql reasonable: true supportmethodsarguments: true params: count=countsql |
8.創建數據庫:
|
1
2
3
4
5
6
7
8
|
create database mytest;create table t_user( user_id int not null primary key auto_increment, user_name varchar(255) not null , password varchar(255) not null , phone varchar(255) not null) engine=innodb auto_increment=1000 default charset=utf8; |
9.使用mybatis generator 自動生成代碼:
- 配置pom.xml中generator 插件所對應的配置文件 ${basedir}/src/main/resources/generator/generatorconfig.xml
|
1
2
3
4
5
6
7
8
9
10
11
12
13
14
15
16
17
18
19
20
21
22
23
24
25
26
27
28
29
30
31
32
33
34
35
36
|
<?xml version="1.0" encoding="utf-8"?><!doctype generatorconfiguration public "-//mybatis.org//dtd mybatis generator configuration 1.0//en" "http://mybatis.org/dtd/mybatis-generator-config_1_0.dtd"><generatorconfiguration> <!-- 數據庫驅動:選擇你的本地硬盤上面的數據庫驅動包--> <classpathentry location="e:\developer\mybatis-generator-core-1.3.2\lib\mysql-connector-java-5.1.25-bin.jar"/> <context id="db2tables" targetruntime="mybatis3"> <commentgenerator> <property name="suppressdate" value="true"/> <!-- 是否去除自動生成的注釋 true:是 : false:否 --> <property name="suppressallcomments" value="true"/> </commentgenerator> <!--數據庫鏈接url,用戶名、密碼 --> <jdbcconnection driverclass="com.mysql.jdbc.driver" connectionurl="jdbc:mysql://127.0.0.1/mytest" userid="root" password="root"> </jdbcconnection> <javatyperesolver> <property name="forcebigdecimals" value="false"/> </javatyperesolver> <!-- 生成模型的包名和位置--> <javamodelgenerator targetpackage="com.winter.model" targetproject="src/main/java"> <property name="enablesubpackages" value="true"/> <property name="trimstrings" value="true"/> </javamodelgenerator> <!-- 生成映射文件的包名和位置--> <sqlmapgenerator targetpackage="mapping" targetproject="src/main/resources"> <property name="enablesubpackages" value="true"/> </sqlmapgenerator> <!-- 生成dao的包名和位置--> <javaclientgenerator type="xmlmapper" targetpackage="com.winter.mapper" targetproject="src/main/java"> <property name="enablesubpackages" value="true"/> </javaclientgenerator> <!-- 要生成的表 tablename是數據庫中的表名或視圖名 domainobjectname是實體類名--> <table tablename="t_user" domainobjectname="user" enablecountbyexample="false" enableupdatebyexample="false" enabledeletebyexample="false" enableselectbyexample="false" selectbyexamplequeryid="false"></table> </context></generatorconfiguration> |
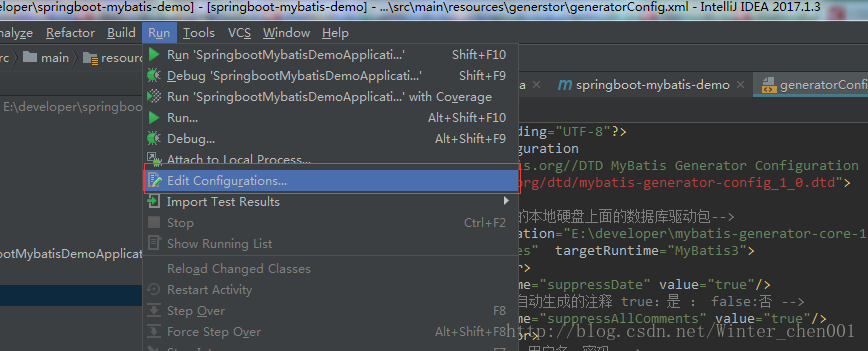
- 點擊run-edit configurations

- 添加配置

-
運行
注意!!!同一張表一定不要運行多次,因為mapper的映射文件中會生成多次的代碼,導致報錯,切記

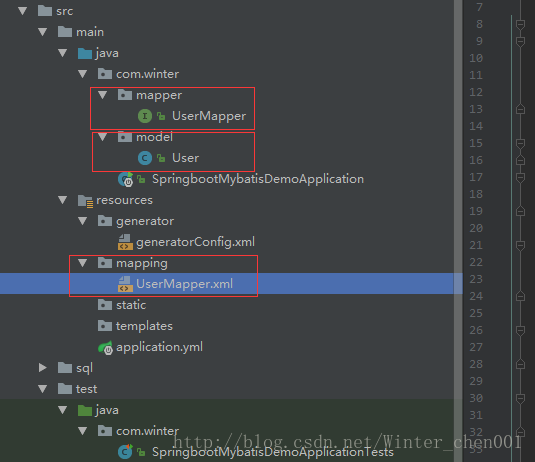
最后生成的文件以及結構:

10. 生成的文件
usermapper.java
|
1
2
3
4
5
6
7
8
9
10
11
12
13
14
15
16
17
18
19
|
package com.winter.mapper;import com.winter.model.user;public interface usermapper { int deletebyprimarykey(integer userid); int insert(user record); int insertselective(user record); user selectbyprimarykey(integer userid); int updatebyprimarykeyselective(user record); int updatebyprimarykey(user record); //這個方式我自己加的 list<user> selectalluser();} |
user.java
|
1
2
3
4
5
6
7
8
9
10
11
12
13
14
15
16
17
18
19
20
21
22
23
24
25
26
27
28
29
30
31
32
33
34
35
36
37
38
39
40
41
42
43
|
package com.winter.model;public class user { private integer userid; private string username; private string password; private string phone; public integer getuserid() { return userid; } public void setuserid(integer userid) { this.userid = userid; } public string getusername() { return username; } public void setusername(string username) { this.username = username == null ? null : username.trim(); } public string getpassword() { return password; } public void setpassword(string password) { this.password = password == null ? null : password.trim(); } public string getphone() { return phone; } public void setphone(string phone) { this.phone = phone == null ? null : phone.trim(); }} |
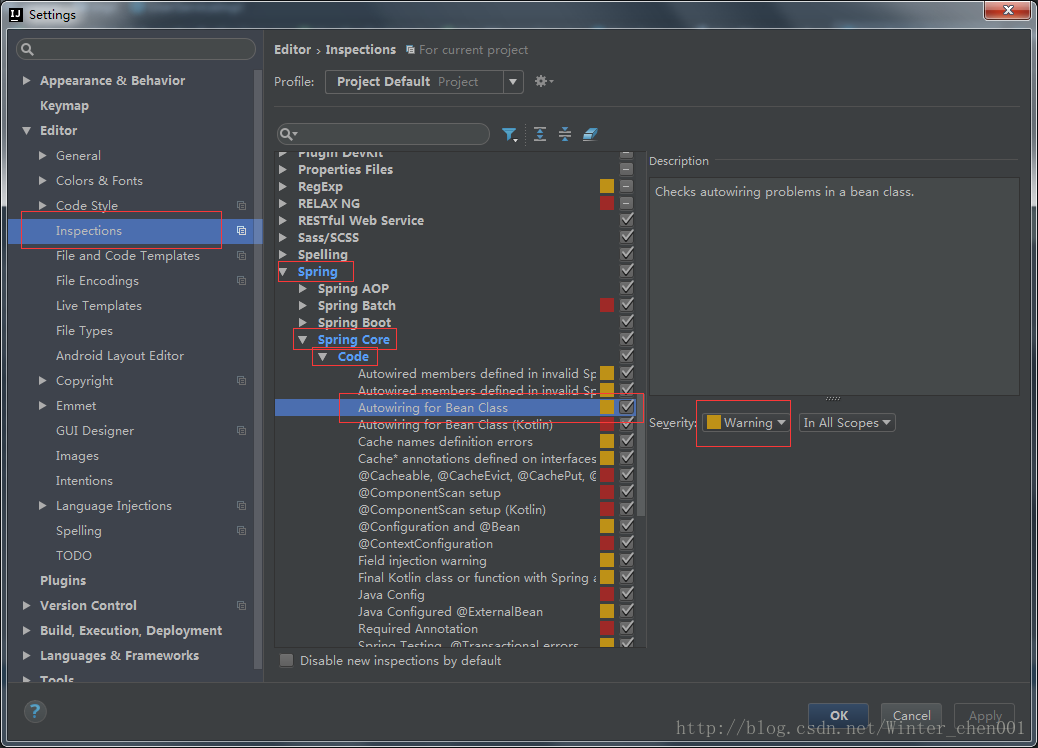
對于sql語句這種黃色的背景,真心是看不下去了(解決方案):

usermapper.xml
|
1
2
3
4
5
6
7
8
9
10
11
12
13
14
15
16
17
18
19
20
21
22
23
24
25
26
27
28
29
30
31
32
33
34
35
36
37
38
39
40
41
42
43
44
45
46
47
48
49
50
51
52
53
54
55
56
57
58
59
60
61
62
63
64
65
66
67
68
69
70
71
72
73
74
75
76
77
78
79
80
81
82
83
84
85
86
87
88
|
<?xml version="1.0" encoding="utf-8" ?><!doctype mapper public "-//mybatis.org//dtd mapper 3.0//en" "http://mybatis.org/dtd/mybatis-3-mapper.dtd" ><mapper namespace="com.winter.mapper.usermapper" > <resultmap id="baseresultmap" type="com.winter.model.user" > <id column="user_id" property="userid" jdbctype="integer" /> <result column="user_name" property="username" jdbctype="varchar" /> <result column="password" property="password" jdbctype="varchar" /> <result column="phone" property="phone" jdbctype="varchar" /> </resultmap> <sql id="base_column_list" > user_id, user_name, password, phone </sql> <select id="selectbyprimarykey" resultmap="baseresultmap" parametertype="java.lang.integer" > select <include refid="base_column_list" /> from t_user where user_id = #{userid,jdbctype=integer} </select> <!-- 這個方法是我自己加的 --> <select id="selectalluser" resultmap="baseresultmap"> select <include refid="base_column_list" /> from t_user </select> <delete id="deletebyprimarykey" parametertype="java.lang.integer" > delete from t_user where user_id = #{userid,jdbctype=integer} </delete> <insert id="insert" parametertype="com.winter.model.user" > insert into t_user (user_id, user_name, password, phone) values (#{userid,jdbctype=integer}, #{username,jdbctype=varchar}, #{password,jdbctype=varchar}, #{phone,jdbctype=varchar}) </insert> <insert id="insertselective" parametertype="com.winter.model.user" > insert into t_user <trim prefix="(" suffix=")" suffixoverrides="," > <if test="userid != null" > user_id, </if> <if test="username != null" > user_name, </if> <if test="password != null" > password, </if> <if test="phone != null" > phone, </if> </trim> <trim prefix="values (" suffix=")" suffixoverrides="," > <if test="userid != null" > #{userid,jdbctype=integer}, </if> <if test="username != null" > #{username,jdbctype=varchar}, </if> <if test="password != null" > #{password,jdbctype=varchar}, </if> <if test="phone != null" > #{phone,jdbctype=varchar}, </if> </trim> </insert> <update id="updatebyprimarykeyselective" parametertype="com.winter.model.user" > update t_user <set > <if test="username != null" > user_name = #{username,jdbctype=varchar}, </if> <if test="password != null" > password = #{password,jdbctype=varchar}, </if> <if test="phone != null" > phone = #{phone,jdbctype=varchar}, </if> </set> where user_id = #{userid,jdbctype=integer} </update> <update id="updatebyprimarykey" parametertype="com.winter.model.user" > update t_user set user_name = #{username,jdbctype=varchar}, password = #{password,jdbctype=varchar}, phone = #{phone,jdbctype=varchar} where user_id = #{userid,jdbctype=integer} </update></mapper> |
11.打開類springbootmybatisdemoapplication.java,這個是springboot的啟動類。我們需要添加點東西:
|
1
2
3
4
5
6
7
8
9
10
11
12
13
14
|
package com.winter;import org.mybatis.spring.annotation.mapperscan;import org.springframework.boot.springapplication;import org.springframework.boot.autoconfigure.springbootapplication;@springbootapplication@mapperscan("com.winter.mapper")//將項目中對應的mapper類的路徑加進來就可以了public class springbootmybatisdemoapplication { public static void main(string[] args) { springapplication.run(springbootmybatisdemoapplication.class, args); }} |
注意:@mapperscan("com.winter.mapper")這個注解非常的關鍵,這個對應了項目中mapper(dao)所對應的包路徑,很多同學就是這里忘了加導致異常的
12.到這里所有的搭建工作都完成了,接下來就是測試的工作,沒使用junit4進行測試:
首先看一下完成之后的文件的結構:

現在controller,service層的代碼都寫好:
usercontroller.java
|
1
2
3
4
5
6
7
8
9
10
11
12
13
14
15
16
17
18
19
20
21
22
23
24
25
26
27
28
29
30
31
32
33
|
package com.winter.controller;import com.winter.model.user;import com.winter.service.userservice;import org.springframework.beans.factory.annotation.autowired;import org.springframework.stereotype.controller;import org.springframework.web.bind.annotation.pathvariable;import org.springframework.web.bind.annotation.requestmapping;import org.springframework.web.bind.annotation.responsebody;/** * created by administrator on 2017/8/16. */@controller@requestmapping(value = "/user")public class usercontroller { @autowired private userservice userservice; @responsebody @requestmapping(value = "/add", produces = {"application/json;charset=utf-8"}) public int adduser(user user){ return userservice.adduser(user); } @responsebody @requestmapping(value = "/all/{pagenum}/{pagesize}", produces = {"application/json;charset=utf-8"}) public object findalluser(@pathvariable("pagenum") int pagenum, @pathvariable("pagesize") int pagesize){ return userservice.findalluser(pagenum,pagesize); }} |
userservice.java
|
1
2
3
4
5
6
7
8
9
10
11
12
13
14
15
|
package com.winter.service;import com.winter.model.user;import java.util.list;/** * created by administrator on 2017/8/16. */public interface userservice { int adduser(user user); list<user> findalluser(int pagenum, int pagesize);} |
userserviceimpl.java
|
1
2
3
4
5
6
7
8
9
10
11
12
13
14
15
16
17
18
19
20
21
22
23
24
25
26
27
28
29
30
31
32
33
34
35
36
37
38
39
|
package com.winter.service.impl;import com.github.pagehelper.pagehelper;import com.winter.mapper.usermapper;import com.winter.model.user;import com.winter.service.userservice;import org.springframework.beans.factory.annotation.autowired;import org.springframework.stereotype.service;import java.util.list;/** * created by administrator on 2017/8/16. */@service(value = "userservice")public class userserviceimpl implements userservice { @autowired private usermapper usermapper;//這里會報錯,但是并不會影響 @override public int adduser(user user) { return usermapper.insertselective(user); } /* * 這個方法中用到了我們開頭配置依賴的分頁插件pagehelper * 很簡單,只需要在service層傳入參數,然后將參數傳遞給一個插件的一個靜態方法即可; * pagenum 開始頁數 * pagesize 每頁顯示的數據條數 * */ @override public list<user> findalluser(int pagenum, int pagesize) { //將參數傳給這個方法就可以實現物理分頁了,非常簡單。 pagehelper.startpage(pagenum, pagesize); return usermapper.selectalluser(); }} |
如果強迫癥看不下去那個報錯:(解決方法)

測試我使用了idea一個很用心的功能。
可以發http請求的插件:


點擊左側的運行按鈕就可以發送請求了;
如果返回值正確 說明你已經搭建成功了!!
**如果出現mapper注入不了的情況,請檢查版本,當前博客的搭建方法只適合1.5.*版本的,如果你的版本是2.0以上的版本,請參照我的另一篇博客的mybatis的配置:springboot2.0整合mybatis **
源碼地址:https://github.com/winterchens/springboot-mybatis-demo
總結以上所述是小編給大家介紹的Spring boot Mybatis 整合(完整版),希望對大家有所幫助,如果大家有任何疑問請給我留言,小編會及時回復大家的。在此也非常感謝大家對服務器之家網站的支持!
原文鏈接:https://blog.csdn.net/winter_chen001/article/details/77249029


