之前一直在寫(xiě)有關(guān)scrapy爬蟲(chóng)的事情,今天我們看看使用scrapy如何把爬到的數(shù)據(jù)放在mysql數(shù)據(jù)庫(kù)中保存。
有關(guān)python操作mysql數(shù)據(jù)庫(kù)的內(nèi)容,網(wǎng)上已經(jīng)有很多內(nèi)容可以參考了,但都是在同步的操作mysql數(shù)據(jù)庫(kù)。在數(shù)據(jù)量不大的情況下,這種方法固然可以,但是一旦數(shù)據(jù)量增長(zhǎng)后,mysql就會(huì)出現(xiàn)崩潰的情況,因?yàn)榫W(wǎng)上爬蟲(chóng)的速度要遠(yuǎn)遠(yuǎn)高過(guò)往數(shù)據(jù)庫(kù)中插入數(shù)據(jù)的速度。為了避免這種情況發(fā)生,我們就需要使用異步的方法來(lái)存儲(chǔ)數(shù)據(jù),爬蟲(chóng)與數(shù)據(jù)存儲(chǔ)互不影響。
為了顯示方便,我們把程序設(shè)計(jì)的簡(jiǎn)單一點(diǎn),只是爬一頁(yè)的數(shù)據(jù)。我們今天選擇伯樂(lè)在線這個(gè)網(wǎng)站來(lái)爬取,只爬取第一頁(yè)的數(shù)據(jù)。
首先我們還是要啟動(dòng)一個(gè)爬蟲(chóng)項(xiàng)目,然后自己建了一個(gè)爬蟲(chóng)的文件jobbole.py。我們先來(lái)看看這個(gè)文件中的代碼
|
1
2
3
4
5
6
7
8
9
10
11
12
13
14
15
16
17
18
19
20
21
22
23
24
25
26
27
28
29
30
31
32
33
34
35
36
37
38
39
40
41
42
43
44
45
46
47
48
49
50
51
|
# -*- coding: utf-8 -*-import ioimport sysimport scrapyimport reimport datetimefrom scrapy.http import requestfrom urllib import parsefrom articlespider.items import jobbolearticleitem, articleitemloaderfrom scrapy.loader import itemloadersys.stdout = io.textiowrapper(sys.stdout.buffer,encoding='utf-8') class jobbolespider(scrapy.spider): """docstring for jobbolespider""" name = "jobbole" allowed_domain = ["blog.jobbole.com"] start_urls = ['http://blog.jobbole.com/all-posts/'] def parse(self, response): """ 1.獲取列表頁(yè)中的文章url """ # 解析列表匯中所有文章url并交給scrapy下載器并進(jìn)行解析 post_nodes = response.css("#archive .floated-thumb .post-thumb a") for post_node in post_nodes: image_url = post_node.css("img::attr(src)").extract_first("")# 這里取出每篇文章的封面圖,并作為meta傳入request post_url = post_node.css("::attr(href)").extract_first("") yield request(url = parse.urljoin(response.url, post_url), meta = {"front_image_url":image_url}, callback = self.parse_detail) def parse_detail(self, response): article_item = jobbolearticleitem() # 通過(guò)itemloader加載item # 通過(guò)add_css后的返回值都是list型,所有我們?cè)賗tems.py要進(jìn)行處理 item_loader = articleitemloader(item = jobbolearticleitem(), response = response) item_loader.add_css("title", ".entry-header h1::text") item_loader.add_value("url", response.url) # item_loader.add_value("url_object_id", get_md5(response.url)) item_loader.add_value("url_object_id", response.url) item_loader.add_css("create_date", "p.entry-meta-hide-on-mobile::text") item_loader.add_value("front_image_url", [front_image_url]) item_loader.add_css("praise_nums", ".vote-post-up h10::text") item_loader.add_css("comment_nums", "a[href='#article-comment'] span::text") item_loader.add_css("fav_nums", ".bookmark-btn::text") item_loader.add_css("tags", "p.entry-meta-hide-on-mobile a::text") item_loader.add_css("content", "div.entry") article_item = item_loader.load_item() print(article_item["tags"]) yield article_item pass |
這里我把代碼進(jìn)行了簡(jiǎn)化,首先對(duì)列表頁(yè)發(fā)出請(qǐng)求,這里只爬取一頁(yè)數(shù)據(jù),然后分析每一頁(yè)的url,并且交給scrapy對(duì)每一個(gè)url進(jìn)行請(qǐng)求,得到每篇文章的詳情頁(yè),把詳情頁(yè)的相關(guān)內(nèi)容放在mysql數(shù)據(jù)庫(kù)中。
這里使用itemloader來(lái)進(jìn)行頁(yè)面的解析,這樣解析有個(gè)最大的好處就是可以把解析規(guī)則存放在數(shù)據(jù)庫(kù)中,實(shí)現(xiàn)對(duì)解析規(guī)則的動(dòng)態(tài)加載。但是要注意一點(diǎn)是使用itemloader中css方式和xpath方式得到的數(shù)據(jù)都是list型,因此還需要在items.py中再對(duì)相對(duì)應(yīng)的數(shù)據(jù)進(jìn)行處理。
接下來(lái)我們就來(lái)看看items.py是如何處理list數(shù)據(jù)的。
|
1
2
3
4
5
6
7
8
9
10
11
12
13
14
15
16
17
18
19
20
21
22
23
24
25
26
27
28
29
30
31
32
33
34
35
36
37
38
39
40
41
42
43
44
45
46
47
48
49
50
51
52
53
54
55
56
57
58
59
60
61
62
63
64
65
66
67
68
69
70
71
72
73
74
75
76
77
78
79
80
81
82
83
84
|
# -*- coding: utf-8 -*- # define here the models for your scraped items## see documentation in:# https://doc.scrapy.org/en/latest/topics/items.htmlimport datetimeimport re import scrapyfrom scrapy.loader import itemloaderfrom scrapy.loader.processors import mapcompose, takefirst,joinfrom articlespider.utils.common import get_md5 def convert_date(value): try: create_date = datetime.datetime.strptime(create_date, "%y/%m/%d").date() except exception as e: create_date = datetime.datetime.now().date() return create_date def get_nums(value): match_re = re.match(".*?(\d+).*", value) if match_re: nums = int(match_re.group(1)) else: nums = 0 return nums def remove_comment_tags(value): # 去掉tags中的評(píng)論內(nèi)容 if "評(píng)論" in value: # 這里做了修改,如果返回"",則在list中仍然會(huì)占位,會(huì)變成類似于["程序員",,"解鎖"]這樣 # return "" return none else: return value def return_value(value): return class articleitemloader(itemloader): """docstring for ariticleitemloader""" # 自定義itemloader default_output_processor = takefirst() class articlespideritem(scrapy.item): # define the fields for your item here like: # name = scrapy.field() pass class jobbolearticleitem(scrapy.item): """docstring for articlespideritem""" title = scrapy.field() create_date = scrapy.field( input_processor = mapcompose(convert_date) ) url = scrapy.field() url_object_id = scrapy.field( output_processor = mapcompose(get_md5) ) # 這里注意front_image_url還是一個(gè)list,在進(jìn)行sql語(yǔ)句時(shí)還需要處理 front_image_url = scrapy.field( output_processor = mapcompose(return_value) ) front_image_path = scrapy.field() praise_nums = scrapy.field( input_processor = mapcompose(get_nums) ) comment_nums = scrapy.field( input_processor = mapcompose(get_nums) ) fav_nums = scrapy.field( input_processor = mapcompose(get_nums) ) # tags要做另行處理,因?yàn)閠ags我們需要的就是list tags = scrapy.field( input_processor = mapcompose(remove_comment_tags), output_processor = join(",") ) content = scrapy.field() |
首先我們看到定義了一個(gè)類articleitemloader,在這個(gè)類中只有一句話,就是對(duì)于每個(gè)items都默認(rèn)采用list中的第一個(gè)元素,這樣我們就可以把每個(gè)items中的第一個(gè)元素取出來(lái)。但是要注意,有些items我們是必須要用list型的,比如我們給imagepipeline的數(shù)據(jù)就要求必須是list型,這樣我們就需要對(duì)front_image_url單獨(dú)進(jìn)行處理。這里我們做了一個(gè)小技巧,對(duì)front_image_url什么都不錯(cuò),因?yàn)槲覀儌鬟^(guò)來(lái)的front_image_url就是list型
在items的field中有兩個(gè)參數(shù),一個(gè)是input_processor,另一個(gè)是output_processor,這兩個(gè)參數(shù)可以幫助我們對(duì)items的list中的每個(gè)元素進(jìn)行處理,比如有些需要用md5進(jìn)行加密,有些需要用正則表達(dá)式進(jìn)行篩選或者排序等等。
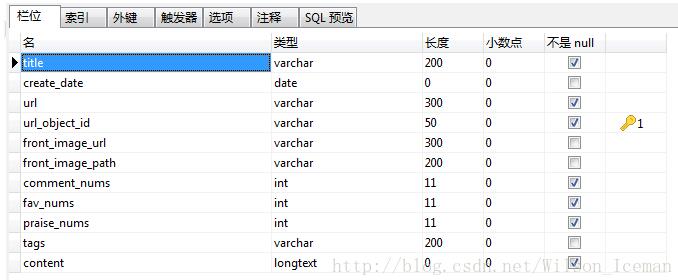
在進(jìn)行mysql的pipeline之前,我們需要設(shè)計(jì)數(shù)據(jù)庫(kù),下面是我自己設(shè)計(jì)的數(shù)據(jù)庫(kù)的字段,僅供參考

這里我把url_object_id作為該表的主鍵,由于它不會(huì)重復(fù),所以適合做主鍵。
下面我們來(lái)看看數(shù)據(jù)庫(kù)的pipeline。
|
1
2
3
4
5
6
7
8
9
10
11
12
13
14
15
16
17
18
19
20
21
22
23
24
25
26
27
28
29
30
31
32
33
34
35
36
37
38
39
40
41
42
43
44
45
46
47
48
49
50
51
52
53
54
55
56
|
# -*- coding: utf-8 -*- # define your item pipelines here## don't forget to add your pipeline to the item_pipelines setting# see: https://doc.scrapy.org/en/latest/topics/item-pipeline.htmlimport codecsimport jsonfrom twisted.enterprise import adbapiimport mysqldbimport mysqldb.cursors class mysqltwistedpipeline(object): """docstring for mysqltwistedpipeline""" #采用異步的機(jī)制寫(xiě)入mysql def __init__(self, dbpool): self.dbpool = dbpool @classmethod def from_settings(cls, settings): dbparms = dict( host = settings["mysql_host"], db = settings["mysql_dbname"], user = settings["mysql_user"], passwd = settings["mysql_password"], charset='utf8', cursorclass=mysqldb.cursors.dictcursor, use_unicode=true, ) dbpool = adbapi.connectionpool("mysqldb", **dbparms) return cls(dbpool) def process_item(self, item, spider): #使用twisted將mysql插入變成異步執(zhí)行 query = self.dbpool.runinteraction(self.do_insert, item) query.adderrback(self.handle_error, item, spider) #處理異常 return item def handle_error(self, failure, item, spider): # 處理異步插入的異常 print (failure) def do_insert(self, cursor, item): #執(zhí)行具體的插入 #根據(jù)不同的item 構(gòu)建不同的sql語(yǔ)句并插入到mysql中 # insert_sql, params = item.get_insert_sql() # print (insert_sql, params) # cursor.execute(insert_sql, params) insert_sql = """ insert into jobbole_article(title, url, create_date, fav_nums, url_object_id) values (%s, %s, %s, %s, %s) """ # 可以只使用execute,而不需要再使用commit函數(shù) cursor.execute(insert_sql, (item["title"], item["url"], item["create_date"], item["fav_nums"], item["url_object_id"])) |
在這里我們只是演示一下,我們只向數(shù)據(jù)庫(kù)中插入5個(gè)字段的數(shù)據(jù),分別是title,url,create_date,fav_nums,url_object_id。
當(dāng)然你也可以再加入其它的字段。
首先我們看看from_settings這個(gè)函數(shù),它可以從settings.py文件中取出我們想想要的數(shù)據(jù),這里我們把數(shù)據(jù)庫(kù)的host,dbname,username和password都放在settings.py中。實(shí)際的插入語(yǔ)句還是在process_item中進(jìn)行,我們自己定義了一個(gè)函數(shù)do_insert,然后把它傳給dbpool中用于插入真正的數(shù)據(jù)。
最后我們來(lái)看看settings.py中的代碼,這里就很簡(jiǎn)單了。
|
1
2
3
4
|
mysql_host = "localhost"mysql_dbname = "article_wilson"mysql_user = "root"mysql_password = "root" |
其實(shí)這里是和pipeline中的代碼是想對(duì)應(yīng)的,別忘了把在settings.py中把pipeline打開(kāi)。
|
1
2
3
4
5
6
7
8
9
10
|
item_pipelines = { # 'articlespider.pipelines.articlespiderpipeline': 300, # 'articlespider.pipelines.jsonwithencodingpipeline': 1 # # 'scrapy.pipelines.images.imagepipeline': 1, # 'articlespider.pipelines.jsonexporterpipleline': 1 # 'articlespider.pipelines.articleimagepipeline': 2 # 'articlespider.pipelines.mysqlpipeline': 1 'articlespider.pipelines.mysqltwistedpipeline': 1} |
好了,現(xiàn)在我們可以跑一程序吧。
scrapy crawl jobbole
下面是運(yùn)行結(jié)果的截圖

好了,以上就是今天的全部?jī)?nèi)容了。
以上就是本文的全部?jī)?nèi)容,希望對(duì)大家的學(xué)習(xí)有所幫助,也希望大家多多支持服務(wù)器之家。
原文鏈接:https://blog.csdn.net/Wilson_Iceman/article/details/79270235


