Java文件上傳實例并解決跨域問題
目在Web應用系統開發中,文件上傳和下載功能是非常常用的功能,今天來講一下JavaWeb中的文件上傳功能的實現。
了解MultipartFile接口
我們實現文件的上傳用到了Spring-web框架中的 MultipartFile接口,MultipartFile接口的源碼注釋中說“MultipartFile接口是 在大部分請求中接收的上載文件的表示形式。”
A representation of an uploaded file received in a multipart request.
The file contents are either stored in memory or temporarily on disk. In either case, the user is responsible for copying file contents to a session-level or persistent store as and if desired. The temporary storage will be cleared at the end of request processing.
常用方法如下表
| Method Summary | ||
|---|---|---|
byte[] |
獲取文件的字節數組 |
getBytes()Return the contents of the file as an array of bytes. |
String |
獲取文件的類型 |
getContentType()Return the content type of the file. |
InputStream |
獲取文件的輸入流 |
getInputStream()Return an InputStream to read the contents of the file from. |
String |
獲取文件名 |
getName()Return the name of the parameter in the multipart form. |
String |
獲取原始文件名(防止篡改文件類型) |
getOriginalFilename()Return the original filename in the client's filesystem. |
long |
獲取文件的大小,以字節的形式) |
getSize()Return the size of the file in bytes. |
boolean |
判斷文件是否為空 |
isEmpty()Return whether the uploaded file is empty, that is, either no file has been chosen in the multipart form or the chosen file has no content. |
void |
將接收到的文件傳輸到給定的目標文件。 |
transferTo(File dest)Transfer the received file to the given destination file. |
文件上傳業務代碼
Controller類
|
1
2
3
4
5
6
7
8
9
10
11
12
13
14
15
16
17
18
19
20
21
22
|
/** * @Author: 小小張自由 * @Date: 2021/7/6 - 20:56 * @Description: 文件上傳 * @version: 1.0 */@Controller@RequestMapping("upload")public class UploadController { @Autowired private UploadService uploadService; @PostMapping("image") public ResponseEntity<String> uploadImage(@RequestParam("file") MultipartFile file){ String url= this.uploadService.uploadImage(file); if (StringUtils.isBlank(url)){ return ResponseEntity.badRequest().build(); } return ResponseEntity.status(HttpStatus.CREATED).body(url); }} |
Service類
寫了具體的業務邏輯
|
1
2
3
4
5
6
7
8
9
10
11
12
13
14
15
16
17
18
19
20
21
22
23
24
25
26
27
28
29
30
31
32
33
34
35
36
37
38
39
40
41
42
43
44
45
46
47
48
49
50
51
52
53
|
/** * @Author: 小小張自由 * @Date: 2021/7/6 - 21:01 * @Description: 文件上傳 * @version: 1.0 */@Servicepublic class UploadService { //用于判斷文件的類型,暫時只判斷了“image/gif","image/jpeg” private static final List<String> CONTENT_TYPES= Arrays.asList("image/gif","image/jpeg"); private static final Logger LOGGER= LoggerFactory.getLogger(UploadService.class); /** * 業務邏輯代碼 * @param file 文件的存儲的url * @return */ public String uploadImage(MultipartFile file) { String originalFilename = file.getOriginalFilename(); //校驗文件類型 //方法一:截取字符串 String afterLast = StringUtils.substringAfterLast(".", originalFilename); //方法二:使用getContentType方法 String contentType = file.getContentType(); if (!CONTENT_TYPES.contains(contentType)){ LOGGER.info("文件類型不合法:"+originalFilename); return null; } //校驗文件內容 try { //獲取文件流 BufferedImage bufferedImage = ImageIO.read(file.getInputStream()); if (bufferedImage==null){ LOGGER.info("文件內容不合法:{}",originalFilename); return null; } //保存到服務器 E:\Leyou\image //將接收到的文件傳輸到給定的目標文件。 file.transferTo(new File("E:\\Leyou\\Image\\"+originalFilename)); //返回URL,進行回顯 //可以使用Nginx-圖片服務器 return "http://image.leyou.com/"+originalFilename; } catch (Exception e) { LOGGER.info("服務器內部錯誤:"+originalFilename); e.printStackTrace(); } return null; }} |
修改nginx配置
將文件存儲到文件服務器中
修改Nginx的配置文件nginx.conf,監聽80端口,設置root的值為:E盤
- 圖片不能保存在服務器內部,這樣會對服務器產生額外的加載負擔
一般靜態資源都應該使用獨立域名,這樣訪問靜態資源時不會攜帶一些不必要的cookie,減小請求的數據量
|
1
2
3
4
5
6
7
8
9
10
11
12
|
server { listen 80; server_name image.leyou.com; proxy_set_header X-Forwarded-Host $host; proxy_set_header X-Forwarded-Server $host; proxy_set_header X-Forwarded-For $proxy_add_x_forwarded_for; location / { root E:\\Leyou\\image; } } |
如何繞過網關
每次上傳文件都會經過網關,必然會給網關帶來很大的壓力,那我們如何繞過網關呢?
1.在網關中配置白名單
在網關中配置白名單,這樣也會走網關,只是壓力少了一點點
|
1
2
3
4
5
6
7
8
9
10
11
12
13
14
15
16
17
18
19
20
21
22
23
24
25
26
27
28
29
30
31
32
33
|
@Slf4jpublic class AuthorizeFilter implements GlobalFilter, Ordered { //白名單:存放放行的URL private List<String> allowPaths; @Override public Mono<Void> filter(ServerWebExchange exchange, GatewayFilterChain chain) { //獲取請求的url路徑 String path = request.getURI().getPath(); boolean flag=isAllowPath(path); if (flag) { log.info("請求在白名單中,leyou.filter: {}",path); //放行 return chain.filter(exchange); } else { //寫其他的業務邏輯 ~~~~ } } private boolean isAllowPath(String path) { //判斷是否允許放行 if (allowPaths.contains(path)){ return true; } return false; } |
2.在nginx做轉發
在nginx做轉發,當請求文件上傳時,直接轉到相應的服務
本實例使用了方法二,需要增加配置
|
1
2
3
4
5
6
7
8
9
10
11
12
13
14
15
16
17
18
19
20
21
22
|
server { listen 80; server_name api.leyou.com; proxy_set_header X-Forwarded-Host $host; proxy_set_header X-Forwarded-Server $host; proxy_set_header X-Forwarded-For $proxy_add_x_forwarded_for; # 新增加的配置,用于文件上傳 location /api/upload { proxy_pass http://127.0.0.1:8082; proxy_connect_timeout 600; proxy_read_timeout 600; rewrite "^/api/(.*)$" /$1 break; } # 網關的配置 location / { proxy_pass http://127.0.0.1:10010; proxy_connect_timeout 600; proxy_read_timeout 600; }} |
當這樣配置之后,文件上傳就不會過網關,減少了網關的壓力。但是有引來了一個新問題那就是跨域。
解決上傳文件出現跨域問題
由于Nginx將文件上傳的請求直接轉發到了具體服務中,不再走gateway,所以gateway中的跨域配置,不再生效了。 需要在文件上傳這個服務中單獨配置跨域。
寫配置類CorsFilter
|
1
2
3
4
5
6
7
8
9
10
11
12
13
14
15
16
17
18
19
20
21
22
23
24
25
26
27
28
|
/** * @Author: 小小張自由 * @Date: 2021/6/15 - 11:12 * @Description: 解決 跨域問題 * @version: 1.0 */@Configurationpublic class LeyouCorsConfiguration { @Bean public CorsFilter corsFilter(){ //初始化配置對象 CorsConfiguration configuration = new CorsConfiguration(); //允許跨域訪問的域名 configuration.addAllowedOrigin("*"); // configuration.setAllowCredentials(true); //運行攜帶cookie configuration.addAllowedMethod("*"); //代表所有請求方法 configuration.addAllowedHeader("*"); //允許攜帶任何頭信息 //初始化cors配置源對象 UrlBasedCorsConfigurationSource configurationSource=new UrlBasedCorsConfigurationSource(); configurationSource.registerCorsConfiguration("/**",configuration); //返回CorSfilter實例,參數 return new CorsFilter(configurationSource); } } |
到此應該就可以上傳了,但是還是報跨域,我已經配置好了啊,為什么還是報跨域呢?
在nginx配置中配置請求實體大小
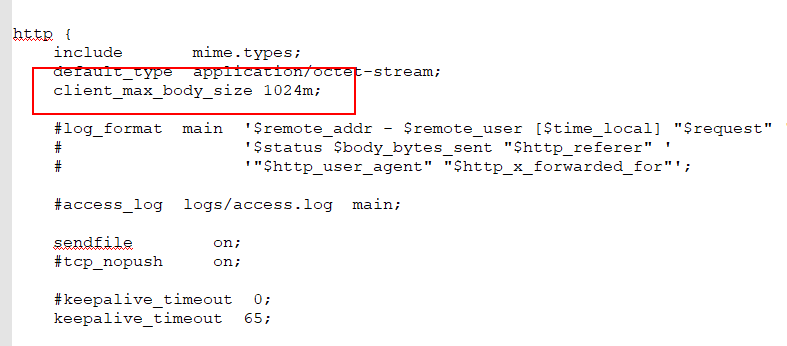
我就想是不是Nginx的問題,然后我就一行一行的讀配置,最后發現
nginx配置中沒有配置請求實體大小

加上這行配置就好了
|
1
|
client_max_body_size 1024m; |
到此這篇關于Java實例講解文件上傳與跨域問題的文章就介紹到這了,更多相關Java文件上傳跨域內容請搜索服務器之家以前的文章或繼續瀏覽下面的相關文章希望大家以后多多支持服務器之家!
原文鏈接:https://blog.csdn.net/promsing/article/details/120089365


