目前web項目中,很多情況都是可以讓同一個賬戶信息在不同的登錄入口登錄這次,這樣子就不那么美好了。
推薦閱讀:
現在有兩種解決方案:
1、將用戶的登錄信息用一個標志位的字段保存起來,每次登錄成功就標記1,注銷登錄就標記為0,當標記為1的時候不允許別人登錄。
2、將用戶的登錄信息保存在application內置作用域內, 然后利用session監聽器監聽每一個登錄用戶的登錄情況。
很顯然,第一種方式 每次登錄 都需要操作數據庫,多了一些不必要的性能開銷,而且在登錄狀態下 萬一突然電腦關閉了,那就永遠都不能登錄了,可用性比較低。
但是第二種方式就不一樣了,可操作性強,很方便維護所有在線用戶的信息。
接下來 主要介紹第二種方式的具體實現:
1、在處理登錄的login方法中,先查詢數據庫驗證下該用戶是否存在,如果存在 判斷該登錄賬戶是否已經鎖定了, 然后從application內置作用域對象中取出所有的登錄信息,查看該username賬戶是否已經登錄,如果登錄了,就友好提示下,反之表示可以登錄,將該登錄信息以鍵值對的方式保存在application中。
代碼如下:
|
1
2
3
4
5
6
7
8
9
10
11
12
13
14
15
16
17
18
19
20
21
22
23
24
25
26
27
28
29
30
31
32
33
34
35
36
37
38
39
40
41
42
43
44
45
46
47
48
49
50
51
52
53
|
//沒有使用零配置前 每個訪問的方法都要加上@Action ,否則404 @Action(value="login", results={ @Result(name="index", location="index.jsp"), }) public String login() throws Exception { try{ User result = userService.login(user.getFuUserName(), user.getFuPassword()); if(result!=null){ if(result.getFuStatus()!=null && result.getFuStatus()==0){ super.setRequestAttr(Constant.MESSAGE, "抱歉,該用戶已被鎖定!"); return "error"; } Map<String, String> loginUserMap = (Map<String, String>) super.getApplicationAttr(Constant.LOGIN_USER_MAP); boolean isExist = false; String sessionId = super.getSessionId(false); if(loginUserMap==null){ loginUserMap = new HashMap<String, String>(); } for (String username : loginUserMap.keySet()) { //判斷是否已經保存該登錄用戶的信息 或者 如果是同一個用戶進行重復登錄那么允許登錄 if(!username.equals(result.getFuUserName()) || loginUserMap.containsValue(sessionId)){ continue; } isExist = true; break; } if(isExist){ super.setRequestAttr(Constant.MESSAGE, "抱歉,該用戶已登錄!"); return "error"; }else { loginUserMap.put(result.getFuUserName(), sessionId); } //登錄成功 super.setSessionAttr(Constant.LOGIN_USER, result); super.setApplicationAttr(Constant.LOGIN_USER_MAP, loginUserMap); logger.info(result.getFuUserName() + " 登錄成功!"); //如果 session中fromUrl有值,就跳轉到該頁面 String fromUrl = (String)super.getSessionAttr(Constant.FROM_URL); if(fromUrl!=null){ super.setSessionAttr(Constant.FROM_URL, null); super.getResponse().sendRedirect(fromUrl.toString()); return null; } return "index"; } } catch (Exception e) { e.printStackTrace(); logger.info("登錄失敗: "+e.getMessage()); } super.setRequestAttr("message", "用戶名或密碼錯誤"); return "error"; } |
2、登錄入口處理完之后,考慮到會話結束的話,那么對應的登錄用戶也應該相應的注銷登錄。我們可以寫一個Session監聽器,監聽sessioon銷毀的時候,我們將登錄的用戶注銷掉,也就是從application中移除。表示該用戶已經下線了。
代碼如下:
|
1
2
3
4
5
6
7
8
9
10
11
12
13
14
15
16
17
18
19
20
21
22
|
package com.facelook.util; import java.util.Map; import javax.servlet.http.HttpSessionEvent; import javax.servlet.http.HttpSessionListener; import org.apache.log4j.Logger; import com.facelook.entity.User; public class SessionListener implements HttpSessionListener{ private Logger logger = Logger.getLogger(this.getClass()); @Overridepublic void sessionCreated(HttpSessionEvent event) { } @Overridepublic void sessionDestroyed(HttpSessionEvent event) { //在session銷毀的時候 把loginUserMap中保存的鍵值對清除 User user = (User)event.getSession().getAttribute("loginUser"); if(user!=null){ Map<String, String> loginUserMap = (Map<String, String>)event.getSession().getServletContext().getAttribute("loginUserMap"); loginUserMap.remove(user.getFuUserName()); event.getSession().getServletContext().setAttribute("loginUserMap",loginUserMap); } } } |
web.xml中配置如下:
|
1
2
3
4
|
<!-- session listener --> <listener> <listener-class>com.facelook.util.SessionListener</listener-class> </listener> |
3、另外,還有一個問題,如果說登錄的用戶突然關閉了瀏覽器或者頁面而沒有點擊退出按鈕。那么可以利用beforeunload 事件,在瀏覽器刷新或者關閉的時候觸發。
|
1
2
3
4
5
6
7
8
9
10
|
//在刷新或關閉時調用的事件 $(window).bind('beforeunload',function(){ $.ajax({ url:"${ctx}/system/user/user!logout.action", type:"post", success:function(){ alert("您已退出登錄"); } }); ); |
但是如果一些客觀原因,比如電腦突然關機,自動重啟,等等,這些就沒法避免了,所以只能等待服務器端的session會話重置之后才可以再登錄。
除非 做一個 統計所有在線人員的模塊,管理員在里面進行在線人員的登錄登出的狀態管理,把那些有問題的登錄用戶直接銷毀掉。
接下來簡單介紹下在線人員模塊的管理:
1、首先需要一個session監聽器來監聽所有的回話create的情況,這時候每次創建一個session就可以count+1 ,然后銷毀的時候count-1 ,另外還需要一個ServletContext的監聽器來監聽web應用的生命周期,獲取servletContext對象,然后將在線人員總數統計出來存放進去;
具體代碼如下:
|
1
2
3
4
5
6
7
8
9
10
11
12
13
14
15
16
17
18
19
20
21
22
23
24
25
26
27
28
29
30
31
32
33
34
35
36
37
38
39
40
41
42
43
44
45
46
47
48
49
|
package com.facelook.util; import java.util.Map; import javax.servlet.ServletContext; import javax.servlet.ServletContextEvent; import javax.servlet.ServletContextListener; import javax.servlet.http.HttpSessionEvent; import javax.servlet.http.HttpSessionListener; import org.apache.log4j.Logger; import com.facelook.entity.User; public class SessionListener implements HttpSessionListener,ServletContextListener{ private int count; private ServletContext servletContext = null; public SessionListener() { count = 0; } private Logger logger = Logger.getLogger(this.getClass()); @Overridepublic void sessionCreated(HttpSessionEvent event) { count++; setContext(event); logger.info("***************the http session is created...***************"); } @Overridepublic void sessionDestroyed(HttpSessionEvent event) { //在session銷毀的時候 把loginUserMap中保存的鍵值對清除 User user = (User)event.getSession().getAttribute("loginUser"); if(user!=null){ Map<String, String> loginUserMap = (Map<String, String>)event.getSession().getServletContext().getAttribute("loginUserMap"); loginUserMap.remove(user.getFuUserName()); event.getSession().getServletContext().setAttribute("loginUserMap",loginUserMap); } count--; setContext(event); logger.info("***************the http session is destroyed...***************"); } public void setContext(HttpSessionEvent httpSessionEvent){ httpSessionEvent.getSession().getServletContext().setAttribute("online", count); } @Overridepublic void contextDestroyed(ServletContextEvent servletcontextevent) { this.servletContext = null; logger.info("***************the servlet context is destroyed...***************"); } @Overridepublic void contextInitialized(ServletContextEvent servletcontextevent) { this.servletContext = servletcontextevent.getServletContext(); logger.info("***************the servlet context is initialized...***************"); } } |
2、在UserAction中創建管理在線用戶的模塊的方法,并且支持強制退出的功能;
|
1
2
3
4
5
6
7
8
9
10
11
12
13
14
15
16
17
18
19
20
21
22
23
24
25
26
27
28
29
30
31
32
33
34
35
36
37
38
39
40
41
42
43
44
|
/** * 退出登錄 * @return * @throws ServletException * @throws IOException */public String logout() throws ServletException, IOException{ try { Map<String, String> loginUserMap = (Map<String, String>) super.getApplicationAttr(Constant.LOGIN_USER_MAP); User user = (User) super.getSessionAttr(Constant.LOGIN_USER); super.removeAttribute(Constant.LOGIN_USER_MAP); loginUserMap.remove(user.getFuUserName()); super.setApplicationAttr(Constant.LOGIN_USER_MAP,loginUserMap); logger.info("退出登錄成功!"); } catch (Exception e) { e.printStackTrace(); logger.error("退出登錄失敗: "+e.getMessage()); } return INPUT; } /** * 在線用戶管理 * @return */public String loginManager(){ return SUCCESS; } /** * 強制退出其他用戶 * @return */public String logoutOther(){ try { String username = ServletActionContext.getRequest().getParameter("username"); Map<String, String> loginUserMap = (Map<String, String>) super.getApplicationAttr(Constant.LOGIN_USER_MAP); if(username!=null && loginUserMap.containsKey(username)){ loginUserMap.remove(username); super.setApplicationAttr(Constant.LOGIN_USER_MAP, loginUserMap); } } catch (Exception e) { e.printStackTrace(); logger.info("強制退出失敗: "+e.getMessage()); } return null; } |
3、在管理頁面加載在線用戶的列表;
對應的方法定義完畢之后,然后再在對應的管理頁面添加在線列表,具體如下:
|
1
2
3
4
5
6
7
8
9
10
11
12
13
14
15
16
17
18
19
20
21
22
23
24
25
26
27
28
29
30
31
32
33
34
35
36
37
38
39
40
41
42
43
44
45
46
47
48
49
50
51
52
53
54
55
56
57
58
59
60
61
62
63
64
65
66
67
68
69
70
71
|
<%@page import="java.util.Map"%> <%@page import="java.util.Map.Entry"%> <%@ page language="java" pageEncoding="UTF-8" %> <%@ include file="/common/taglib.jsp" %> <!DOCTYPE html PUBLIC "-//W3C//DTD XHTML 1.0 Transitional//EN" "http://www.w3.org/TR/xhtml1/DTD/xhtml1-transitional.dtd"> <html xmlns="http://www.w3.org/1999/xhtml"> <head> <meta http-equiv="Content-Type" content="text/html; charset=utf-8" /> <title>歡迎來到Facelook</title> <%@ include file="/common/resource.jsp" %> <script type="text/javascript"> <!-- //在刷新或關閉時調用的事件 $(window).bind('beforeunload',function(){ $.ajax({ url:"${ctx}/system/user/user!logout.action", type:"post", success:function(){ alert("您已退出登錄"); } }); }); function logout(username){ if(username=="${sessionScope.loginUser.fuUserName}"){ alert("不允許退出自己賬號!"); return; } $.ajax({ url:"${ctx}/system/user/user!logoutOther.action?username="+username, type:"post", success:function(){ $("#tr"+username).hide(); var count = parseInt($("#count").html()); $("#count").html(count-1); alert("退出成功!"); } }); } //--> </script> </head> <body> <%@ include file="/common/header.jsp" %> <div id="main" class="wrap"> <%@ include file="/common/lefter.jsp" %> <div class="righter"> <div class="main"> <h2>登錄列表</h2> <% Map<String,String> map = (Map<String,String>)application.getAttribute("loginUserMap"); out.println("目前共有<font id='count'>"+map.size()+"</font>個用戶在線!!"); %> <table border="1" width="400"> <%for(Entry<String,String> m : map.entrySet()){%> <tr id="tr<%=m.getKey()%>"> <td> <%=m.getKey()%> </td> <td width="80"> <a href="javascript:logout('<%=m.getKey()%>')">強制退出</a> </td> </tr> <%}%> </table> </div> </div> </div> <%@ include file="/common/footer.jsp" %> <%@ include file="/common/message.jsp" %> </body> </html> |
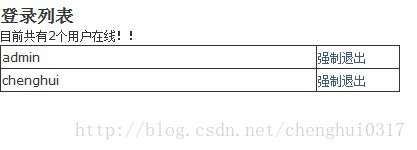
好了啟動部署項目,然后啟動服務,進入在線用戶管理模塊,簡單效果如下圖:

需要注意的是:當前登錄用戶 不允許強制退出自己的登錄信息。
這樣子,基本上可以實現防止多用戶登錄的案例了!
以上所述是小編給大家介紹的Java Web開發防止多用戶重復登錄的完美解決方案,希望對大家有所幫助,如果大家有任何疑問請給我留言,小編會及時回復大家的。在此也非常感謝大家對服務器之家網站的支持!
原文鏈接:http://blog.csdn.net/chenghui0317/article/details/9373345


