1,利用spring-data-redis整合
項目使用的pom.xml:
|
1
2
3
4
5
6
7
8
9
10
11
12
13
14
15
16
17
18
19
20
21
22
23
24
25
26
27
28
29
30
31
32
33
34
35
36
37
38
39
40
41
42
43
44
45
46
47
48
49
50
51
52
53
54
55
56
57
58
59
60
61
62
63
64
65
66
67
68
|
<project xmlns="http://maven.apache.org/POM/4.0.0" xmlns:xsi="http://www.w3.org/2001/XMLSchema-instance" xsi:schemaLocation="http://maven.apache.org/POM/4.0.0 http://maven.apache.org/xsd/maven-4.0.0.xsd"> <modelVersion>4.0.0</modelVersion> <groupId>com.x.redis</groupId> <artifactId>Spring_redis</artifactId> <version>1.0-SNAPSHOT</version> <packaging>jar</packaging> <name>Spring_redis</name> <url>http://maven.apache.org</url> <properties> <project.build.sourceEncoding>UTF-8</project.build.sourceEncoding> </properties> <dependencies> <dependency> <groupId>org.springframework.data</groupId> <artifactId>spring-data-redis</artifactId> <version>1.0.2.RELEASE</version> </dependency> <dependency> <groupId>org.springframework</groupId> <artifactId>spring-core</artifactId> <version>3.1.2.RELEASE</version> </dependency> <dependency> <groupId>redis.clients</groupId> <artifactId>jedis</artifactId> <version>2.1.0</version> </dependency> <dependency> <groupId>junit</groupId> <artifactId>junit</artifactId> <version>4.8.2</version> <scope>test</scope> </dependency> <dependency> <groupId>org.slf4j</groupId> <artifactId>slf4j-api</artifactId> <version>1.6.1</version> </dependency> <!-- 將現有的jakarta commons logging的調用轉換成lsf4j的調用。 --> <dependency> <groupId>org.slf4j</groupId> <artifactId>jcl-over-slf4j</artifactId> <version>1.6.1</version> </dependency> <!-- Hack:確保commons-logging的jar包不被引入,否則將和jcl-over-slf4j沖突 --> <dependency> <groupId>commons-logging</groupId> <artifactId>commons-logging</artifactId> <version>1.1.1</version> <scope>provided</scope> </dependency> <!-- slf4j的實現:logback,用來取代log4j。更快、更強! --> <dependency> <groupId>ch.qos.logback</groupId> <artifactId>logback-classic</artifactId> <version>0.9.24</version> <scope>runtime</scope> </dependency> </dependencies></project> |
除了log部分,只有一個spring core 和 spring-data-redis了
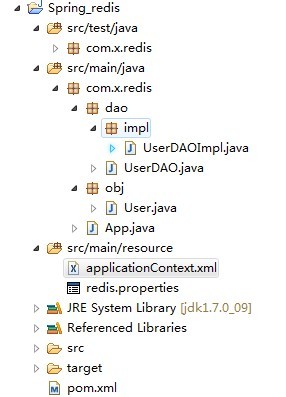
項目文件目錄結構:

applicationContext.xml:
1,context:property-placeholder 標簽用來導入properties文件。從而替換${redis.maxIdle}這樣的變量。
2,context:component-scan 是為了在com.x.redis.dao報下的類能夠實用spring的注解注入的方式。
3,事實上我們只需要把JedisPoolConfig配數來就好了,接下來就是spring的封裝了。所以直接看UserDAOImpl的實現就明白了。
|
1
2
3
4
5
6
7
8
9
10
11
12
13
14
15
16
17
18
19
20
21
22
23
24
25
26
27
28
29
|
<?xml version="1.0" encoding="UTF-8"?> <beans xmlns="http://www.springframework.org/schema/beans" xmlns:xsi="http://www.w3.org/2001/XMLSchema-instance" xmlns:p="http://www.springframework.org/schema/p" xmlns:context="http://www.springframework.org/schema/context" xmlns:jee="http://www.springframework.org/schema/jee" xmlns:tx="http://www.springframework.org/schema/tx" xmlns:aop="http://www.springframework.org/schema/aop" xsi:schemaLocation=" http://www.springframework.org/schema/beans http://www.springframework.org/schema/beans/spring-beans.xsd http://www.springframework.org/schema/context http://www.springframework.org/schema/context/spring-context.xsd"> <context:property-placeholder location="classpath:redis.properties" /> <context:component-scan base-package="com.x.redis.dao"> </context:component-scan> <bean id="poolConfig" class="redis.clients.jedis.JedisPoolConfig"> <property name="maxIdle" value="${redis.maxIdle}" /> <property name="maxActive" value="${redis.maxActive}" /> <property name="maxWait" value="${redis.maxWait}" /> <property name="testOnBorrow" value="${redis.testOnBorrow}" /> </bean> <bean id="connectionFactory" class="org.springframework.data.redis.connection.jedis.JedisConnectionFactory" p:host-name="${redis.host}" p:port="${redis.port}" p:password="${redis.pass}" p:pool-config-ref="poolConfig"/> <bean id="redisTemplate" class="org.springframework.data.redis.core.StringRedisTemplate"> <property name="connectionFactory" ref="connectionFactory" /> </bean> <bean id="userDAO" class="com.x.redis.dao.impl.UserDAOImpl" /> </beans> |
redis.properties:
|
1
2
3
4
5
6
7
8
9
10
11
12
|
# Redis settings#redis.host=192.168.20.101#redis.port=6380#redis.pass=foobaredredis.host=127.0.0.1redis.port=6379redis.pass= redis.maxIdle=300redis.maxActive=600redis.maxWait=1000redis.testOnBorrow=true |
UserDAOImpl:
1,spring對dao層的封裝很多用了類似于下面代碼的模板方式。
2,RedisTemplate就是spring對redis的一個封裝而已。
|
1
2
3
4
5
6
7
8
9
10
11
12
13
14
15
16
17
18
19
20
21
22
23
24
25
26
27
28
29
30
31
32
33
34
35
36
37
38
|
public class UserDAOImpl implements UserDAO { @Autowired protected RedisTemplate<Serializable, Serializable> redisTemplate; public void saveUser(final User user) { redisTemplate.execute(new RedisCallback<Object>() { @Override public Object doInRedis(RedisConnection connection) throws DataAccessException { connection.set(redisTemplate.getStringSerializer().serialize("user.uid." + user.getId()), redisTemplate.getStringSerializer().serialize(user.getName())); return null; } }); } @Override public User getUser(final long id) { return redisTemplate.execute(new RedisCallback<User>() { @Override public User doInRedis(RedisConnection connection) throws DataAccessException { byte[] key = redisTemplate.getStringSerializer().serialize("user.uid." + id); if (connection.exists(key)) { byte[] value = connection.get(key); String name = redisTemplate.getStringSerializer().deserialize(value); User user = new User(); user.setName(name); user.setId(id); return user; } return null; } }); } } |
其他:
User:
|
1
2
3
4
5
6
7
8
9
10
11
12
13
14
15
16
17
18
19
20
21
|
public class User { private long id; private String name; public long getId() { return id; } public void setId(long id) { this.id = id; } public String getName() { return name; } public void setName(String name) { this.name = name; }} |
測試代碼:
|
1
2
3
4
5
6
7
8
9
10
|
public static void main(String[] args) { ApplicationContext ac = new ClassPathXmlApplicationContext("classpath:/applicationContext.xml"); UserDAO userDAO = (UserDAO)ac.getBean("userDAO"); User user1 = new User(); user1.setId(1); user1.setName("obama"); userDAO.saveUser(user1); User user2 = userDAO.getUser(1); System.out.println(user2.getName()); } |
2,不利用spring-data-redis整合
個人覺得這樣整合靈活度更大,能夠更加明了的完成任務。
pom.xml:
|
1
2
3
4
5
6
7
8
9
10
11
12
13
14
15
16
17
18
19
20
21
22
23
24
25
26
27
28
29
30
31
32
33
34
35
36
37
38
39
40
41
42
43
44
45
46
47
48
49
50
51
52
53
54
55
56
57
58
59
60
61
62
63
64
65
66
67
68
69
70
|
<project xmlns="http://maven.apache.org/POM/4.0.0" xmlns:xsi="http://www.w3.org/2001/XMLSchema-instance" xsi:schemaLocation="http://maven.apache.org/POM/4.0.0 http://maven.apache.org/xsd/maven-4.0.0.xsd"> <modelVersion>4.0.0</modelVersion> <groupId>com.d.work</groupId> <artifactId>Redis_Templete</artifactId> <version>1.0-SNAPSHOT</version> <packaging>jar</packaging> <name>Redis_Templete</name> <url>http://maven.apache.org</url> <properties> <project.build.sourceEncoding>UTF-8</project.build.sourceEncoding> </properties> <dependencies> <dependency> <groupId>junit</groupId> <artifactId>junit</artifactId> <version>3.8.1</version> <scope>test</scope> </dependency> <dependency> <groupId>redis.clients</groupId> <artifactId>jedis</artifactId> <version>2.1.0</version> </dependency> <dependency> <groupId>org.springframework</groupId> <artifactId>spring-core</artifactId> <version>3.1.2.RELEASE</version> </dependency> <dependency> <groupId>org.springframework</groupId> <artifactId>spring-beans</artifactId> <version>3.1.2.RELEASE</version> </dependency> <dependency> <groupId>org.springframework</groupId> <artifactId>spring-context</artifactId> <version>3.1.2.RELEASE</version> </dependency> <dependency> <groupId>org.slf4j</groupId> <artifactId>slf4j-api</artifactId> <version>1.6.1</version> </dependency> <!-- 將現有的jakarta commons logging的調用轉換成lsf4j的調用。 --> <dependency> <groupId>org.slf4j</groupId> <artifactId>jcl-over-slf4j</artifactId> <version>1.6.1</version> </dependency> <!-- Hack:確保commons-logging的jar包不被引入,否則將和jcl-over-slf4j沖突 --> <dependency> <groupId>commons-logging</groupId> <artifactId>commons-logging</artifactId> <version>1.1.1</version> <scope>provided</scope> </dependency> <!-- slf4j的實現:logback,用來取代log4j。更快、更強! --> <dependency> <groupId>ch.qos.logback</groupId> <artifactId>logback-classic</artifactId> <version>0.9.24</version> <scope>runtime</scope> </dependency> </dependencies></project> |
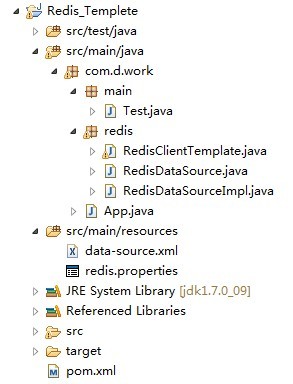
目錄結構:

data-source.xml
1,context:property-placeholder 和 context:component-scan 前面解釋過啦。
2,配置了一個ShardedJedisPool,在jdeis里 還有個JedisPool。這兩個的區別:
一個是分片形式,可以連接有主備的redis服務端,一個是單個的。詳細后續學習
3,因為不使用spring-data-redis的封裝,所以自己要自己封裝一個
|
1
2
3
4
5
6
7
8
9
10
11
12
13
14
15
16
17
18
19
20
21
22
23
24
25
26
27
28
29
30
31
32
33
34
35
36
37
38
|
<?xml version="1.0" encoding="UTF-8"?> <beans xmlns="http://www.springframework.org/schema/beans" xmlns:xsi="http://www.w3.org/2001/XMLSchema-instance" xmlns:p="http://www.springframework.org/schema/p" xmlns:context="http://www.springframework.org/schema/context" xmlns:jee="http://www.springframework.org/schema/jee" xmlns:tx="http://www.springframework.org/schema/tx" xmlns:aop="http://www.springframework.org/schema/aop" xsi:schemaLocation=" http://www.springframework.org/schema/beans http://www.springframework.org/schema/beans/spring-beans.xsd http://www.springframework.org/schema/context http://www.springframework.org/schema/context/spring-context.xsd"> <context:property-placeholder location="classpath:redis.properties" /> <context:component-scan base-package="com.d.work.main"> </context:component-scan> <context:component-scan base-package="com.d.work.redis"> </context:component-scan> <bean id="jedisPoolConfig" class="redis.clients.jedis.JedisPoolConfig"> <property name="maxActive" value="50" /> <property name="maxIdle" value="8" /> <property name="maxWait" value="1000" /> <property name="testOnBorrow" value="true"/> <property name="testOnReturn" value="true"/> <!-- <property name="testWhileIdle" value="true"/> --> </bean> <bean id="shardedJedisPool" class="redis.clients.jedis.ShardedJedisPool" scope="singleton"> <constructor-arg index="0" ref="jedisPoolConfig" /> <constructor-arg index="1"> <list> <bean class="redis.clients.jedis.JedisShardInfo"> <constructor-arg name="host" value="${redis.host}" /> <constructor-arg name="port" value="${redis.port}" /> <constructor-arg name="timeout" value="${redis.timeout}" /> <constructor-arg name="weight" value="1" /> </bean> </list> </constructor-arg> </bean></beans> |
RedisDataSource:定義三個方法
|
1
2
3
4
5
|
public interface RedisDataSource { public abstract ShardedJedis getRedisClient(); public void returnResource(ShardedJedis shardedJedis); public void returnResource(ShardedJedis shardedJedis,boolean broken);} |
實現redisDataSource:
1, 注入配置好的ShardedJedisPool,這三個方法的作用:
- getRedisClient() : 取得redis的客戶端,可以執行命令了。
- returnResource(ShardedJedis shardedJedis) : 將資源返還給pool
- returnResource(ShardedJedis shardedJedis, boolean broken) : 出現異常后,將資源返還給pool (其實不需要第二個方法)
|
1
2
3
4
5
6
7
8
9
10
11
12
13
14
15
16
17
18
19
20
21
22
23
24
25
26
27
28
29
30
|
@Repository("redisDataSource")public class RedisDataSourceImpl implements RedisDataSource { private static final Logger log = LoggerFactory.getLogger(RedisDataSourceImpl.class); @Autowired private ShardedJedisPool shardedJedisPool; public ShardedJedis getRedisClient() { try { ShardedJedis shardJedis = shardedJedisPool.getResource(); return shardJedis; } catch (Exception e) { log.error("getRedisClent error", e); } return null; } public void returnResource(ShardedJedis shardedJedis) { shardedJedisPool.returnResource(shardedJedis); } public void returnResource(ShardedJedis shardedJedis, boolean broken) { if (broken) { shardedJedisPool.returnBrokenResource(shardedJedis); } else { shardedJedisPool.returnResource(shardedJedis); } }} |
第二層的封裝:RedisClientTemplate,例子實現了放值和取值。最后代碼提供了全部命令的實現。
代碼就是映射性質的又一次調用jedis的方法而已,用了個broken來做標示符,決定返還資源的方式。
這一層的目的主要也是讓再上層的調用不需要關心pool中鏈接的取得和返還問題了。
|
1
2
3
4
5
6
7
8
9
10
11
12
13
14
15
16
17
18
19
20
21
22
23
24
25
26
27
28
29
30
31
32
33
34
35
36
37
38
39
40
41
42
43
44
45
46
47
48
49
50
51
52
53
54
55
56
57
58
59
60
61
62
63
64
65
|
@Repository("redisClientTemplate")public class RedisClientTemplate { private static final Logger log = LoggerFactory.getLogger(RedisClientTemplate.class); @Autowired private RedisDataSource redisDataSource; public void disconnect() { ShardedJedis shardedJedis = redisDataSource.getRedisClient(); shardedJedis.disconnect(); } /** * 設置單個值 * * @param key * @param value * @return */ public String set(String key, String value) { String result = null; ShardedJedis shardedJedis = redisDataSource.getRedisClient(); if (shardedJedis == null) { return result; } boolean broken = false; try { result = shardedJedis.set(key, value); } catch (Exception e) { log.error(e.getMessage(), e); broken = true; } finally { redisDataSource.returnResource(shardedJedis, broken); } return result; } /** * 獲取單個值 * * @param key * @return */ public String get(String key) { String result = null; ShardedJedis shardedJedis = redisDataSource.getRedisClient(); if (shardedJedis == null) { return result; } boolean broken = false; try { result = shardedJedis.get(key); } catch (Exception e) { log.error(e.getMessage(), e); broken = true; } finally { redisDataSource.returnResource(shardedJedis, broken); } return result; }} |
測試代碼:
|
1
2
3
4
5
6
|
public static void main(String[] args) { ApplicationContext ac = new ClassPathXmlApplicationContext("classpath:/data-source.xml"); RedisClientTemplate redisClient = (RedisClientTemplate)ac.getBean("redisClientTemplate"); redisClient.set("a", "abc"); System.out.println(redisClient.get("a"));} |
附上RedisClientTemplate全部實現:
RedisClientTemplate代碼太多,附上下載地址:RedisClientTemplate.rar
以上就是本文的全部內容,希望對大家的學習有所幫助,也希望大家多多支持服務器之家。
原文鏈接:http://www.cnblogs.com/tankaixiong/p/3660075.html


