ssl協議位于tcp/ip協議與各種應用協議之間,為數據通信提供安全支持。
ssl協議分為兩層:
- ssl記錄協議,它建立在可靠傳輸協議之上,為高層協議提供數據封裝、壓縮、加密等基本功能支持。
- ssl握手協議,它建立在ssl記錄協議之上,用于實際數據傳輸開始前,通信雙方進行身份認證、協商加密算法、交換加密密鑰等
基于b/s的web應用,是通過https來實現ssl的。https是http的安全版,即在http下加入ssl層,https的安全基礎是ssl;
我們開始在spring boot中使用ssl設置;
1.生成證書
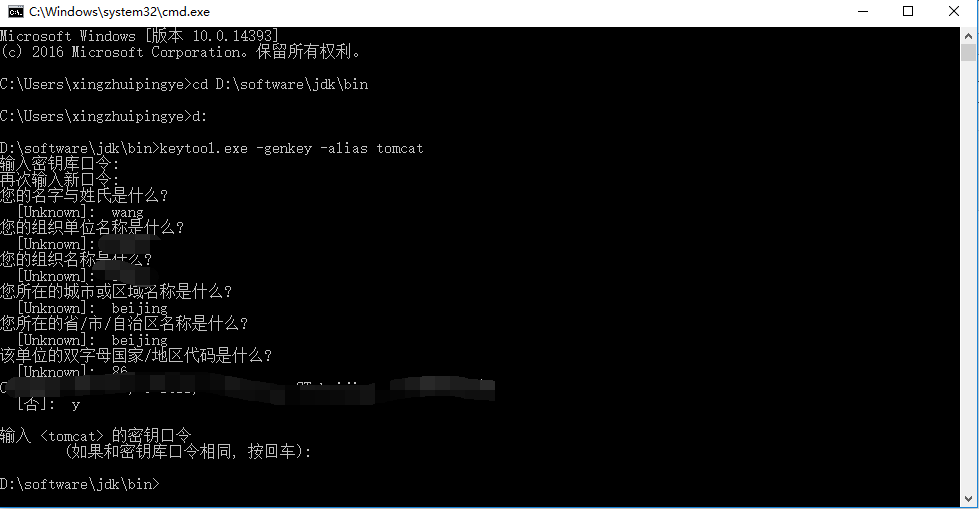
每一個jdk或者jre中都有一個工具叫keytool,它是一個證書管理工具,可以用來生成自簽名的證書;打開cmd,進入jdk/bin路徑,敲入命令
|
1
|
keytool -genkey -alias tomcat |

在用戶路徑下生成 .keystore文件 ,這就是我們要使用的證書文件。

2.spring boot配置ssl
將.keystore文件復制到項目根目錄,然后配置application.properties中做ssl配置
|
1
2
3
4
5
6
7
|
server.ssl.key-store=.keystoreserver.ssl.key-store-password=密碼server.ssl.keystoretype = jksserver.ssl.keyalias=tomcat |
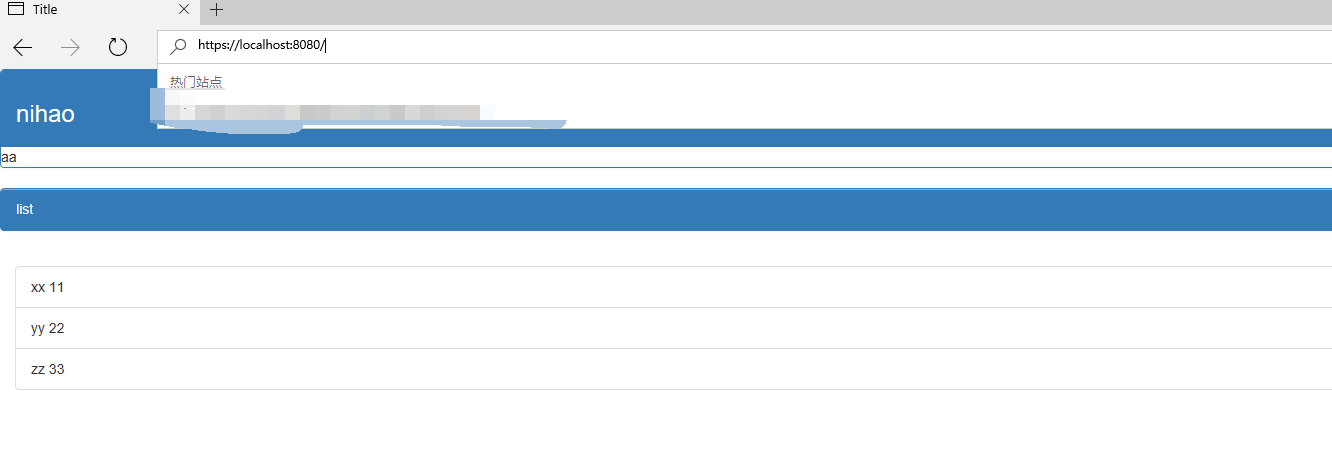
啟動項目

訪問地址 https://localhost:8080


3、http轉https
要實現這個功能,我們需要配置tomcatembeddedservletcontainerfactory,并且添加tomcat的connector來實現。
|
1
2
3
4
5
6
7
8
9
10
11
12
13
14
15
16
17
18
19
20
21
22
23
24
25
26
27
28
29
30
31
32
33
34
35
36
37
38
39
40
41
42
43
44
45
46
47
48
49
50
51
52
53
54
55
56
57
58
59
60
61
62
63
64
65
66
67
68
69
70
71
72
73
74
75
76
77
78
79
80
81
82
83
84
85
86
87
88
89
90
91
92
93
94
95
96
97
98
99
100
101
102
103
104
105
106
107
108
109
110
111
112
113
114
115
116
117
118
119
120
121
122
123
124
125
126
127
128
129
130
131
132
133
134
135
136
137
138
139
140
141
142
143
144
145
146
147
148
149
150
151
152
153
154
155
|
package com.example;import org.apache.catalina.context;import org.apache.catalina.connector.connector;import org.apache.tomcat.util.descriptor.web.securitycollection;import org.apache.tomcat.util.descriptor.web.securityconstraint;import org.springframework.boot.springapplication;import org.springframework.boot.autoconfigure.springbootapplication;import org.springframework.boot.context.embedded.configurableembeddedservletcontainer;import org.springframework.boot.context.embedded.embeddedservletcontainercustomizer;import org.springframework.boot.context.embedded.embeddedservletcontainerfactory;import org.springframework.boot.context.embedded.tomcat.tomcatembeddedservletcontainerfactory;import org.springframework.boot.web.servlet.errorpage;import org.springframework.context.annotation.bean;import org.springframework.http.httpstatus;import org.springframework.stereotype.component;import org.springframework.stereotype.controller;import org.springframework.ui.model;import org.springframework.web.bind.annotation.requestmapping;import org.springframework.web.bind.annotation.restcontroller;import org.springframework.web.servlet.config.annotation.enablewebmvc; import java.util.arraylist;import java.util.list;import java.util.concurrent.timeunit; /** * created by xingzhuipingye on 2017/5/7. */@controller@springbootapplication public class applicationmy { @requestmapping("/") public string index(model model){ person single = new person("aa",11); list<person> list = new arraylist<>(); person p1 = new person("xx",11); person p2 = new person("yy",22); person p3 = new person("zz",33); list.add(p1); list.add(p2); list.add(p3); model.addattribute("singleperson",single); model.addattribute("people",list); return "index"; } public static void main(string[] args){ springapplication.run(applicationmy.class); } @bean public embeddedservletcontainerfactory servletcontainer(){ tomcatembeddedservletcontainerfactory tomcat = new tomcatembeddedservletcontainerfactory(){ @override protected void postprocesscontext(context context) { securityconstraint securityconstraint = new securityconstraint(); securityconstraint.setuserconstraint("confidential"); securitycollection collection = new securitycollection(); collection.addpattern("/*"); securityconstraint.addcollection(collection); context.addconstraint(securityconstraint); } }; tomcat.addadditionaltomcatconnectors(httpconnector()); return tomcat; } @bean public connector httpconnector(){ connector connector = new connector("org.apache.coyote.http11.http11nioprotocol"); connector.setscheme("http"); connector.setport(8080); connector.setsecure(false); connector.setredirectport(8088); return connector; } } |
注:我在application.properties 中修改了端口為8088
此時我們訪問http://localhost:8080 就會跳轉到 https://localhost:8088
以上就是本文的全部內容,希望對大家的學習有所幫助,也希望大家多多支持服務器之家。
原文鏈接:http://www.cnblogs.com/xingzhuipingye/p/6822878.html


