本文主要介紹spring中@profile的使用方法以及在什么情況下使用。
首先說一下為什么要使用這個@profile注解。@profile注解是spring提供的一個用來標明當前運行環境的注解。我們正常開發的過程中經常遇到的問題是,開發環境是一套環境,qa測試是一套環境,線上部署又是一套環境。這樣從開發到測試再到部署,會對程序中的配置修改多次,尤其是從qa到上線這個環節,讓qa的也不敢保證改了哪個配置之后能不能在線上運行。
為了解決上面的問題,我們一般會使用一種方法,就是配置文件,然后通過不同的環境讀取不同的配置文件,從而在不同的場景中跑我們的程序。
那么,spring中的@profile注解的作用就體現在這里。在spring使用di來依賴注入的時候,能夠根據當前制定的運行環境來注入相應的bean。最常見的就是使用不同的datasource了。
下面詳細的介紹一下,如何通過spring的@profile注解實現上面的功能。
首先是新建maven工程
mvn archetype:generate -darchetypecatalog=internal
下面是pom文件:
|
1
2
3
4
5
6
7
8
9
10
11
12
13
14
15
16
17
18
19
20
21
22
23
24
25
26
27
28
29
30
31
32
33
34
35
36
37
38
39
40
41
42
43
44
45
46
47
48
49
50
51
52
53
54
55
56
57
58
59
60
61
62
|
<properties> <project.build.sourceencoding>utf-8</project.build.sourceencoding> <springframework.version>4.3.7.release</springframework.version> </properties> <dependencies> <dependency> <groupid>junit</groupid> <artifactid>junit</artifactid> <version>4.12</version> <scope>test</scope> </dependency> <!-- https://mvnrepository.com/artifact/org.springframework/spring-context --> <dependency> <groupid>org.springframework</groupid> <artifactid>spring-context</artifactid> <version>${springframework.version}</version> </dependency> <!-- https://mvnrepository.com/artifact/org.springframework/spring-test --> <dependency> <groupid>org.springframework</groupid> <artifactid>spring-test</artifactid> <version>${springframework.version}</version> </dependency> </dependencies> <build> <plugins> <plugin> <groupid>org.apache.maven.plugins</groupid> <artifactid>maven-compiler-plugin</artifactid> <configuration> <source>1.8</source> <target>1.8</target> <encoding>utf-8</encoding> </configuration> </plugin> <plugin> <artifactid>maven-assembly-plugin</artifactid> <version>3.0.0</version> <configuration> <archive> <manifest> <mainclass>com.xueyou.demo</mainclass> </manifest> </archive> <descriptorrefs> <descriptorref>jar-with-dependencies</descriptorref> </descriptorrefs> </configuration> <executions> <execution> <id>make-assembly</id> <!-- this is used for inheritance merges --> <phase>package</phase> <!-- bind to the packaging phase --> <goals> <goal>single</goal> </goals> </execution> </executions> </plugin> </plugins> </build> |
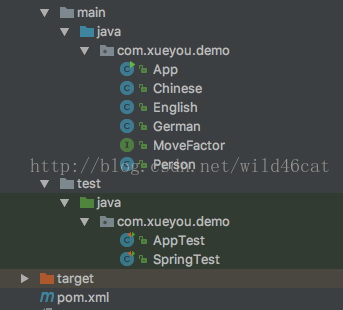
整體看一下工程中的類和接口:

首先是person類中有一個speak的方法,這個方法是movefactor這個借口提供的。chinese、english和german都實現了這個接口。但是這三個類的@profile中的值是不同的。通過springtest中分配不同的activeprofile就能夠實現調用不同的speak方法。
下面看代碼:
movefactor.interface
|
1
2
3
4
5
6
|
package com.xueyou.demo; public interface movefactor { void speak(); } |
person.java
|
1
2
3
4
5
6
7
8
9
10
11
12
13
14
15
|
package com.xueyou.demo; import org.springframework.beans.factory.annotation.autowired; import org.springframework.stereotype.component; @componentpublic class person { @autowired private movefactor movefactor; public void speak(){ movefactor.speak(); } } |
chinese.java
|
1
2
3
4
5
6
7
8
9
10
11
12
13
14
15
16
|
package com.xueyou.demo; import org.springframework.context.annotation.configuration; import org.springframework.context.annotation.profile; import org.springframework.stereotype.component; @configuration@profile(value = "dev") @componentpublic class chinese implements movefactor { @override public void speak() { system.out.println("我是中國人"); } } |
english.java
|
1
2
3
4
5
6
7
8
9
10
11
12
13
|
package com.xueyou.demo; import org.springframework.context.annotation.profile; import org.springframework.stereotype.component; @component@profile("qa") public class english implements movefactor{ @override public void speak() { system.out.println("i am an english"); } } |
german.java
|
1
2
3
4
5
6
7
8
9
10
11
12
13
14
|
package com.xueyou.demo; import org.springframework.context.annotation.profile; import org.springframework.stereotype.component; @component@profile("prod") public class german implements movefactor{ @override public void speak() { system.out.println("i am a german"); } } |
使用springtest進行測試
|
1
2
3
4
5
6
7
8
9
10
11
12
13
14
15
16
17
18
19
20
21
22
23
24
|
package com.xueyou.demo; import org.junit.test; import org.junit.runner.runwith; import org.springframework.beans.factory.annotation.autowired; import org.springframework.test.context.activeprofiles; import org.springframework.test.context.contextconfiguration; import org.springframework.test.context.junit4.springjunit4classrunner; @runwith(springjunit4classrunner.class) @contextconfiguration(classes = app.class) @activeprofiles("dev") public class springtest { @autowired person p; @test public void testprofile(){ p.speak(); } } |
運行結果:

當修改@activeprofile中的值時,輸出的內容也會隨之改變。
如果使用的是main函數進行真正的開發、測試和上線時,我們需要設置一下運行參數:

-d 后面加上需要設置的spring的屬性,就能夠在main函數中使用了。
app.java
|
1
2
3
4
5
6
7
8
9
10
11
12
13
14
15
16
17
18
19
|
package com.xueyou.demo; import org.springframework.context.configurableapplicationcontext; import org.springframework.context.annotation.annotationconfigapplicationcontext; import org.springframework.context.annotation.componentscan; import org.springframework.context.annotation.configuration; /** * hello world! // */@configuration@componentscan(basepackages = {"com.xueyou.demo"}) public class app { public static void main(string[] args) { configurableapplicationcontext context = new annotationconfigapplicationcontext(com.xueyou.demo.app.class); person p = context.getbean(person.class); p.speak(); } } |
運行結果:

如果需要得到當前的activeprofile可以通過configurableapplicationcontext的實例來的到。

最后提一下,如果是在web的后臺項目中如何進行設置。這個時候我們通過xml的方式進行設置:
|
1
2
3
4
|
<context-param> <param-name>spring.profiles.active</param-name> <param-value>doubleupmint</param-value> </context-param> |
以上就是本文的全部內容,希望對大家的學習有所幫助,也希望大家多多支持服務器之家。
原文鏈接:http://blog.csdn.net/wild46cat/article/details/71189858


