前言:我使用vue編寫的h5公眾號,實現點擊小程序入口,打開小程序,微信官方文檔:https://developers.weixin.qq.com/doc/offiaccount/OA_Web_Apps/Wechat_Open_Tag.html 要求:微信版本要求為:7.0.12及以上。 系統版本要求為:iOS 10.3及以上、Android 5.0及以上。 跳轉小程序主要的標簽是 wx-open-launch-weapp 第一步在vue項目下public文件夾下的index.html頁面,引入微信配置文件,我直接在body標簽引入
|
1
2
3
4
5
6
7
8
9
|
<body> <noscript> <strong>We're sorry but default doesn't work properly without JavaScript enabled. Please enable it to continue.</strong> </noscript> <div id="app"></div> <!-- built files will be auto injected --> <!-- 引入微信配置文件 --> <script src="https://res.wx.qq.com/open/js/jweixin-1.6.0.js"></script> </body> |
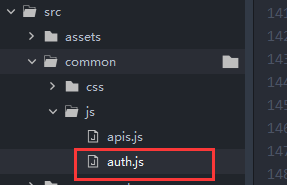
第二步建一個js文件用來存放接下來要 配置的微信配置信息,需要用到微信功能的就可以在那個頁面引入就行, 定位地圖啥的,都可以,我建的是這樣的

然后在這個js文件里面寫如下代碼:
|
1
2
3
4
5
6
7
8
9
10
11
12
13
14
15
16
17
18
19
20
21
22
23
24
25
26
27
28
29
30
31
32
33
34
35
36
37
38
39
|
//獲取微信配置信息--跳轉小程序、獲取定位信息export function getWxApplets(href){ var that = this; this.$loading();//加載中 //調用微信方法跳轉小程序 this.$axios({//這里是我封裝的axios請求,代碼就不貼了,你知道這是請求方法就行 url:'這里是后端配置微信信息的接口url,這個沒辦法幫,找后端看文檔琢磨', data:{ param: href,//當前頁 }, callback(res){ that.$loading.close(); //配置參數 wx.config({ debug: false, appId: res.data.appId, timestamp: res.data.timestamp, nonceStr: res.data.nonceStr, signature: res.data.signature, jsApiList: ['wx-open-launch-weapp','getLocation','openLocation'],//跳轉小程序、獲取定位信息、導航 openTagList: ['wx-open-launch-weapp']//打開的標簽名 }); wx.ready(function(){ //微信獲取地理位置并拉取用戶列表(用戶允許獲取用戶的經緯度) wx.getLocation({ type: 'gcj02', success: function (res) { console.log("--------------獲取經緯度",res) if(res.errMsg == "getLocation:ok"){ //緩存經緯度信息 that.$stor.Set("latitude",res.latitude); that.$stor.Set("longitude",res.longitude); } } }) }) } })} |
第三步注意:需要在main.js里面注冊這個標簽,如下
|
1
2
3
4
5
|
import {post,getWxApplets} from './common/js/auth.js';//引入工具文件 Vue.prototype.$axios = post;//post方法 請求----這個請求的封裝不貼了Vue.prototype.$getWxApplets = getWxApplets;//獲取微信配置信息Vue.config.ignoredElements = ['wx-open-launch-weapp'];//注冊wx-open-launch-weapp組件 |
第四步頁面顯示標簽,點擊跳轉小程序,我寫 了兩種顯示方式,都可行,如下: 先調用方法
|
1
2
3
4
5
6
|
created(){ var that = this; var href = window.location.href;//當前頁 //調用微信配置方法 this.$getWxApplets(href);} |
第一種顯示方式,直接在頁面上寫:
|
1
2
3
4
5
6
7
8
9
10
11
12
13
14
15
16
17
18
19
20
21
22
23
24
25
26
27
|
<ul> <li v-for="(item,index) in shopInfo" :key="item.id"> <!-- 點擊打開外部鏈接 --> <div class="img" v-if="item.jumpType != 2"> <img :src="item.image" alt="" @click="linkJump(item)"/> </div> <div class="img" v-else> <img :src="item.image" alt=""/> <!-- 點擊打開小程序 這里跳轉小程序是定位圖片上,所以用了個div包裹用于定位,wx-open-launch-weapp這個標簽只作用里面的東西,里面的css不影響外面的操作,這個標簽外面的css也不會作用在這個標簽里面--> <div class="wepp-btn"> <wx-open-launch-weapp id="launch-btn" :username="item.appletsId" :path='item.link'> <script type="text/wxtag-template"> <style> .btn { width: 300px; height: 140px; } </style> <div class="btn"></div> </script> </wx-open-launch-weapp> </div> </div> <p class="p1">{{item.name}}</p> <p class="p2">{{item.briefIntroduction}}</p> </li></ul> |
第二種顯示方式,使用的是v-html,js顯示: html:
|
1
2
3
4
5
6
7
8
9
10
11
12
13
14
15
16
17
18
19
20
|
<ul> <li v-for="(item,index) in quickList" :key="item.id"> <!-- 跳轉外部鏈接--> <div v-if="item.jumpType != 2" class="icon" :style="{backgroundImage:'url(' + item.image + ')'}" style="background-repeat: no-repeat;background-size:cover;background-position: center center;" @click="linkJump(item)"> </div> <!-- 跳轉小程序 --> <div v-else class="icon" :style="{backgroundImage:'url(' + item.image + ')'}" style="background-repeat: no-repeat;background-size:cover;background-position: center center;"> <!-- 點擊打開小程序 --> <div class="wepp-btn" v-html="item.webApp"></div> </div> <p>{{item.name}}</p> </li></ul> |
js:
|
1
2
3
4
5
6
7
8
9
10
11
12
13
14
15
16
17
18
19
20
21
22
23
24
25
26
|
//請求菜單列表--快捷入口var that = this;that.$axios({ url:'api/find/quickEntry', callback(res){ if(res.code == 1){ for(var i in res.data){ if(res.data[i].jumpType == 2){ //使用了反引號來將標簽轉成字符串,字段顯示直接用${} res.data[i].webApp =`<wx-open-launch-weapp id="launch-btn" username="${res.data[i].appletsId}" path="${res.data[i].link}"> <template> <style> .btn { width: 90px; height: 90px; } </style> <div class="btn"></div> </template> </wx-open-launch-weapp>`; } } that.quickList = res.data; } }}) |
最后由于微信版本問題就寫了個簡單的判斷,我測試過有的微信版本過低,跳轉小程序會沒有任何動靜,控制臺會報一個黃色的代碼錯誤說這個wx-open-launch-weapp,也不知道是啥,還以為是ios不兼容,補充:
|
1
2
3
4
5
6
7
8
9
10
11
12
|
mounted() { //是否登錄 if(this.ifLogin){ //獲取微信版本號 var wechatInfo = navigator.userAgent.match(/MicroMessenger\/([\d\.]+)/i); //判斷版本號是否匹配 if(parseFloat(wechatInfo[1].split(".").slice(0,3).join("")) < parseFloat("7.0.12".split(".").join(""))){ this.$toast.center('跳轉小程序僅支持微信7.0.12及以上版本'); } } }, |
還缺了啥我就不知道了,都是摸爬滾打,上面 有官方文檔,再仔細看看吧!!
到此這篇關于使用vue編寫h5公眾號跳轉小程序的文章就介紹到這了,更多相關vue跳轉小程序內容請搜索服務器之家以前的文章或繼續瀏覽下面的相關文章希望大家以后多多支持服務器之家!
原文鏈接:https://blog.csdn.net/qq_38337245/article/details/110120608


