Bean的作用域

singleton作用域
當(dāng)將bean的scope設(shè)置為singleton時(shí),Spring IoC容器僅生成和管理一個(gè)Bean實(shí)例(單例)。使用id或name獲取Bean實(shí)例時(shí),IoC容器將返回共享的Bean實(shí)例。
由于singleton是scope(范圍)的默認(rèn)方式,因此有兩種方式將bean的scope設(shè)置為singleton。配置文件示例代碼如下:
<bean id="constructorInstance" class="instance.BeanClass"/>
或
<bean id="constructorInstance" class="instance.BeanClass" scope="singleton"/>
測試singleton作用域,代碼如下:
//初始化Spring容器ApplicationContext,加載配置文件
ApplicationContext appCon = new ClassPathXmlApplicationContext("applicationContext.xml");
//測試構(gòu)造方法實(shí)例化Bean
BeanClass b1 = (BeanClass)appCon.getBean("constructorInstance");
System.out.println(b1);
BeanClass b2 = (BeanClass)appCon.getBean("constructorInstance");
System.out.println(b2);
prototype作用域
當(dāng)bean的scope設(shè)置為prototype(原型)時(shí),Spring IoC容器將為每次請求創(chuàng)建一個(gè)新的實(shí)例。如果將3.3.1中bean的配置修改如下:
<bean id="constructorInstance" class="instance.BeanClass" scope="prototype"/>
Bean的生命周期
Bean的生命周期整個(gè)過程如下:
1.根據(jù)Bean的配置情況,實(shí)例化一個(gè)Bean。
2.根據(jù)Spring上下文對實(shí)例化的Bean進(jìn)行依賴注入,即對Bean的屬性進(jìn)行初始化。
3.如果Bean實(shí)現(xiàn)了BeanNameAware接口,將調(diào)用它實(shí)現(xiàn)的setBeanName(String beanId)方法,此處參數(shù)傳遞的是Spring配置文件中Bean的ID。
4.如果Bean實(shí)現(xiàn)了BeanFactoryAware接口,將調(diào)用它實(shí)現(xiàn)的setBeanFactory()方法,此處參數(shù)傳遞的是當(dāng)前Spring工廠實(shí)例的引用。
5.如果Bean實(shí)現(xiàn)了ApplicationContextAware接口,將調(diào)用它實(shí)現(xiàn)的setApplicationContext(ApplicationContext)方法,此處參數(shù)傳遞的是Spring上下文實(shí)例的引用。
6.如果Bean關(guān)聯(lián)了BeanPostProcessor接口,將調(diào)用預(yù)初始化方法postProcessBeforeInitialization(Object obj, String s)對Bean進(jìn)行操作。
7.如果Bean實(shí)現(xiàn)了InitializingBean接口,將調(diào)用afterPropertiesSet()方法。
8.如果Bean在Spring配置文件中配置了init-method屬性,將自動調(diào)用其配置的初始化方法。
9.如果Bean關(guān)聯(lián)了BeanPostProcessor接口,將調(diào)用postProcessAfterInitialization(Object obj, String s)方法,由于是在Bean初始化結(jié)束時(shí)調(diào)用After方法,也可用于內(nèi)存或緩存技術(shù)。
以上工作(1至9)完成以后就可以使用該Bean,由于該Bean的作用域是singleton,所以調(diào)用的是同一個(gè)Bean實(shí)例。
10.當(dāng)Bean不再需要時(shí),將經(jīng)過銷毀階段,如果Bean實(shí)現(xiàn)了DisposableBean接口,將調(diào)用其實(shí)現(xiàn)的destroy方法將Spring中的Bean銷毀。
11.如果在配置文件中通過destroy-method屬性指定了Bean的銷毀方法,將調(diào)用其配置的銷毀方法進(jìn)行銷毀。
1.創(chuàng)建Bean的實(shí)現(xiàn)類
package life;
public class BeanLife {
	public void initMyself() {
		System.out.println(this.getClass().getName() + "執(zhí)行自定義的初始化方法");
	}
	public void destroyMyself() {
		System.out.println(this.getClass().getName() +"執(zhí)行自定義的銷毀方法");
	}
}
2.配置Bean
在Spring配置文件中,使用實(shí)現(xiàn)類BeanLife配置一個(gè)id為beanLife的Bean。具體代碼如下:
<!-- 配置bean,使用init-method屬性指定初始化方法,使用 destroy-method屬性指定銷毀方法-->
<bean id="beanLife" class="life.BeanLife" init-method="initMyself" destroy-method="destroyMyself"/>
3.測試生命周期
在ch3應(yīng)用的test包中,創(chuàng)建測試類TestLife,具體代碼如下:
//初始化Spring容器,加載配置文件
//為了方便演示銷毀方法的執(zhí)行,這里使用ClassPathXmlApplicationContext
//實(shí)現(xiàn)類聲明容器
ClassPathXmlApplicationContext ctx =
new ClassPathXmlApplicationContext("applicationContext.xml");
System.out.println("獲得對象前");
BeanLife blife = (BeanLife)ctx.getBean("beanLife");
System.out.println("獲得對象后" + blife);
ctx.close();//關(guān)閉容器,銷毀Bean對象
Bean的裝配方式
Bean的裝配可以理解為將Bean依賴注入到Spring容器中,Bean的裝配方式即Bean依賴注入的方式。Spring容器支持基于XML配置的裝配、基于注解的裝配以及自動裝配等多種裝配方式。本節(jié)將主要講解基于XML配置的裝配和基于注解的裝配。
基于XML配置的裝配

package assemble;
import java.util.List;
import java.util.Map;
import java.util.Set;
public class ComplexUser {
	private String uname;
	private List<String> hobbyList;
	private Map<String,String> residenceMap;//Map存儲鍵值對
	private Set<String> aliasSet;
	private String[] array;
	//使用構(gòu)造方法注入,需要提供帶參數(shù)的構(gòu)造方法
	public ComplexUser(String uname, List<String> hobbyList, Map<String, String> residenceMap, Set<String> aliasSet,
			String[] array) {
		super();
		this.uname = uname;
		this.hobbyList = hobbyList;
		this.residenceMap = residenceMap;
		this.aliasSet = aliasSet;
		this.array = array;
	}
	//使用setter方法注入,提供默認(rèn)無參數(shù)的構(gòu)造方法,并為注入的屬性提供setter方法
	public ComplexUser() {
		super();
	}
	public void setUname(String uname) {
		this.uname = uname;
	}
	public void setHobbyList(List<String> hobbyList) {
		this.hobbyList = hobbyList;
	}
	public void setResidenceMap(Map<String, String> residenceMap) {
		this.residenceMap = residenceMap;
	}
	public void setAliasSet(Set<String> aliasSet) {
		this.aliasSet = aliasSet;
	}
	public void setArray(String[] array) {
		this.array = array;
	}
	@Override
	public String toString() {
		return "uname="+uname+";hobbyList="+hobbyList+";residenceMap="+residenceMap+";alisaSet="+aliasSet+";array="+array;
	}

}
<!-- 使用構(gòu)造方法注入方式裝配ComplexUser實(shí)例user1 -->
 		<bean id="user1" class="assemble.ComplexUser" >
 			<constructor-arg index="0" value="chenheng1" />
 			<constructor-arg index="1">
 				<list>
 					<value>唱歌</value>
 					<value>跳舞</value>
 					<value>籃球</value>
 				</list>
 			</constructor-arg>
 			<constructor-arg index="2">
 				<map>
 					<entry key="dalian" value="大連" />
 					<entry key="beijing" value="北京" />
 					<entry key="shanghai" value="上海" />
 				</map>
 			</constructor-arg>
 			<constructor-arg index="3">
 				<set>
 					<value>陳恒100</value>
 					<value>陳恒101</value>
 					<value>陳恒102</value>
 				</set>
 			</constructor-arg>
 			<constructor-arg index="4">
 				<array>
 					<value>aaaaa</value>
 					<value>bbbbb</value>
 				</array>
 			</constructor-arg>
 		</bean>
		<!-- 使用setter方法注入方式裝配ComplexUser實(shí)例user2 -->
		<bean id="user2" class="assemble.ComplexUser" >
			<property name="uname" value="chenheng2"></property>
			<property name="hobbyList">
				<list>
					<value>看書</value>
					<value>學(xué)習(xí)Spring</value>
				</list>
			</property>
			<property name="residenceMap">
				<map>
					<entry key="shenzhen" value="深圳"></entry>
					<entry key="guangzhou" value="廣州"></entry>
					<entry key="tianjin" value="天津"></entry>
				</map>
			</property>
			<property name="aliasSet">
				<set>
					<value>陳恒103</value>
					<value>陳恒104</value>
					<value>陳恒105</value>
				</set>
			</property>
			<property name="array">
				<array>
					<value>ccccc</value>
					<value>ddddd</value>
				</array>
			</property>
		</bean>
package test;
import org.springframework.context.ApplicationContext;
import org.springframework.context.support.ClassPathXmlApplicationContext;
import assemble.ComplexUser;
public class TestAssemble {
	public static void main(String[] args) {
		ClassPathXmlApplicationContext appCon=new ClassPathXmlApplicationContext("applicationContext.xml");
		ComplexUser u1=(ComplexUser) appCon.getBean("user1");
		//構(gòu)造方法裝配測試
		System.out.println(u1);
		//setter方法裝配測試
		ComplexUser u2=(ComplexUser) appCon.getBean("user2");
		System.out.println(u2);
		appCon.close();
	}
}
基于注解的裝配
1.@Component
該注解是一個(gè)泛化的概念,僅僅表示一個(gè)組件對象(Bean),可以作用在任何層次上。
(1)創(chuàng)建Bean的實(shí)現(xiàn)類
package annotation;
import org.springframework.beans.factory.annotation.Value;
import org.springframework.stereotype.Component;
@Component()
/**相當(dāng)于@Component("annotationUser")或@Component(value = "annotationUser"),annotationUser為Bean的id,默認(rèn)為首字母小寫的類名**/
public class AnnotationUser {
	@Value("chenheng")//只注入了簡單的值,復(fù)雜值的注入目前使用該方式還解決不了
	private String uname;
	public String getUname() {
		return uname;
	}
	public void setUname(String uname) {
		this.uname = uname;
	}
	@Override
	public String toString() {
		return "uname="+uname;
	}
}
(2)配置注解
現(xiàn)在有了Bean的實(shí)現(xiàn)類,但還不能進(jìn)行測試,因?yàn)镾pring容器并不知道去哪里掃描Bean對象。需要在配置文件中配置注解,注解配置方式如下:
<?xml version="1.0" encoding="UTF-8"?>
<beans   xmlns="http://www.springframework.org/schema/beans"
       xmlns:xsi="http://www.w3.org/2001/XMLSchema-instance"
       xmlns:context="http://www.springframework.org/schema/context"
       xsi:schemaLocation="http://www.springframework.org/schema/beans
       http://www.springframework.org/schema/beans/spring-beans.xsd
       http://www.springframework.org/schema/context
       http://www.springframework.org/schema/context/spring-context.xsd">
       <!-- 使用context命名空間,通過Spring掃描指定包下所有Bean的實(shí)現(xiàn)類,進(jìn)行注解解析 -->
       <context:component-scan base-package="annotation" />
</beans>
(3)測試Bean實(shí)例
package test;

import org.springframework.context.ApplicationContext;
import org.springframework.context.support.ClassPathXmlApplicationContext;
import annotation.AnnotationUser;
public class TestAnnoation {
	public static void main(String[] args) {
		ApplicationContext appcon=new ClassPathXmlApplicationContext("annotationContext.xml");
		AnnotationUser au=(AnnotationUser) appcon.getBean("annotationUser");
		System.out.println(au.getUname());
	}
}
2.@Repository
該注解用于將數(shù)據(jù)訪問層(DAO)的類標(biāo)識為Bean,即注解數(shù)據(jù)訪問層Bean,其功能與@Component()相同。
3.@Service
該注解用于標(biāo)注一個(gè)業(yè)務(wù)邏輯組件類(Service層),其功能與@Component()相同。
4.@Controller
該注解用于標(biāo)注一個(gè)控制器組件類(Spring MVC的Controller),其功能與@Component()相同。
5.@Autowired
該注解可以對類成員變量、方法及構(gòu)造方法進(jìn)行標(biāo)注,完成自動裝配的工作。 通過 @Autowired的使用來消除setter 和getter方法。默認(rèn)按照Bean的類型進(jìn)行裝配。
6.@Resource
該注解與@Autowired功能一樣。區(qū)別在于,該注解默認(rèn)是按照名稱來裝配注入的,只有當(dāng)找不到與名稱匹配的Bean才會按照類型來裝配注入;而@Autowired默認(rèn)按照Bean的類型進(jìn)行裝配,如果想按照名稱來裝配注入,則需要結(jié)合@Qualifier注解一起使用。
@Resource注解有兩個(gè)屬性:name和type。name屬性指定Bean實(shí)例名稱,即按照名稱來裝配注入;type屬性指定Bean類型,即按照Bean的類型進(jìn)行裝配。
7.@Qualifier
該注解與@Autowired注解配合使用。當(dāng)@Autowired注解需要按照名稱來裝配注入,則需要結(jié)合該注解一起使用,Bean的實(shí)例名稱由@Qualifier注解的參數(shù)指定。
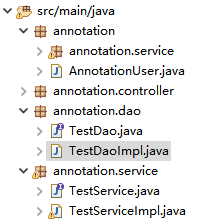
上面幾個(gè)注解中,雖然@Repository、@Service和 @Controller等注解的功能與@Component()相同,但為了使標(biāo)注類的用途更加清晰(層次化),在實(shí)際開發(fā)中推薦使用@Repository標(biāo)注數(shù)據(jù)訪問層(DAO層)、使用@Service標(biāo)注業(yè)務(wù)邏輯層(Service層)以及使用@Controller標(biāo)注控制器層(控制層)。

package annotation.dao;
import org.springframework.stereotype.Repository;
@Repository("testDao")
/**相當(dāng)于@Repository,但如果在service層使用@Resource(name="testDao")的話,testDdao不能省略**/
public class TestDaoImpl implements TestDao {
	@Override
	public void save() {
		// TODO Auto-generated method stub
		System.out.println("testDao save");
	}
}
package annotation.service;
import org.springframework.beans.factory.annotation.Autowired;
import org.springframework.stereotype.Service;
import annotation.dao.TestDao;
import jakarta.annotation.Resource;
@Service("testService")
public class TestServiceImpl implements TestService {
	@Autowired
	/**相當(dāng)于@Autowired.@Autowired默認(rèn)按照Bean類型裝配**/
	private TestDao testDao;
	@Override
	public void save() {
		// TODO Auto-generated method stub
		testDao.save();
		System.out.println("testService save");
	}
}
package annotation.controller;
import org.springframework.beans.factory.annotation.Autowired;
import org.springframework.stereotype.Controller;
import annotation.service.TestService;
@Controller("testController")
public class TestControllerImpl {
	@Autowired
	private TestService testService;
	public void save() {
		// TODO Auto-generated method stub
		testService.save();
		System.out.println("testController save");
	}
}
<?xml version="1.0" encoding="UTF-8"?>
<beans   xmlns="http://www.springframework.org/schema/beans"
       xmlns:xsi="http://www.w3.org/2001/XMLSchema-instance"
       xmlns:context="http://www.springframework.org/schema/context"
       xsi:schemaLocation="http://www.springframework.org/schema/beans
       http://www.springframework.org/schema/beans/spring-beans.xsd
       http://www.springframework.org/schema/context
       http://www.springframework.org/schema/context/spring-context.xsd">
       <!-- 使用context命名空間,通過Spring掃描指定包下所有Bean的實(shí)現(xiàn)類,進(jìn)行注解解析 -->
       <context:component-scan base-package="annotation" />
</beans>
package test;
import org.springframework.context.ApplicationContext;
import org.springframework.context.support.ClassPathXmlApplicationContext;
import annotation.controller.TestControllerImpl;
public class TestMoreAnnotation {
	public static void main(String[] args) {
		ApplicationContext appcon=new ClassPathXmlApplicationContext("annotationContext.xml");
		TestControllerImpl testc=(TestControllerImpl) appcon.getBean("testController");
		testc.save();
	}
}
總結(jié)
本篇文章就到這里了,希望能夠給你帶來幫助,也希望您能夠多多關(guān)注服務(wù)器之家的更多內(nèi)容!
原文鏈接:https://blog.csdn.net/qq_34266854/article/details/121002293


