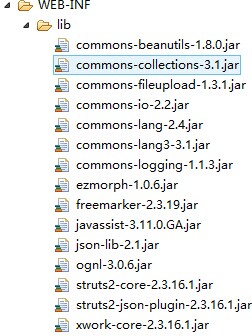
本文主要探討普通數據如何快速轉換為Json數據,一共討論2種方法:
首相準備頁面和實體類:
頁面:
|
1
2
3
4
5
6
7
8
9
10
11
12
13
14
|
<body> <div id="topLoginDiv"> 用戶名: <input name="user.name" id="loginName" /> 密碼: <input name="user.password" id="loginPassword" /> <label class="ui-green"> <input type="button" name="loginButton" value="登錄" onclick="doLogin();" /> </label> </div> <div id="demo" ></div></body> |
實體類:
|
1
2
3
4
5
6
7
8
9
10
|
package bean;public class User {private int id;private String userName;private String password;......省略Get和Set方法} |
方法一:使用JSON轉換包進行JSON數據的轉換
第一步,引入相關相關包

第二步:頁面提交及回調函數處理結果。
|
1
2
3
4
5
6
7
8
9
10
11
12
13
14
15
16
|
<script type="text/javascript">function doLogin(){var name = $('#loginName').val();var password = $('#loginPassword').val();var data1 ={'user.userName':name,'user.password':password};$.getJSON('user_login.action',data1,function(data){//此處須用$.getJSON來處理JSON數據if(data.flag){$('#topLoginDiv').html("");$('#demo').html("當前用戶:"+data.user.userName+" "+data.msg);}else{$('#demo').html(data.msg);}});}</script> |
第三步:Struts2跳轉到Action中進行JSON的轉換《關鍵步驟》
|
1
2
3
4
5
6
7
8
9
10
11
12
13
14
15
16
17
18
19
20
21
22
23
24
25
26
27
28
29
30
31
32
33
|
private User user=new User();private boolean flag;private String msg;......省略Get和Set方法public String login() throws IOException{if(user.getUserName().equals("admin")&&user.getPassword().equals("123456")){msg="登陸成功";flag=true;}else{msg="登錄失敗,用戶名或密碼錯誤!";flag=false;}Map<String,Object> list = new HashMap<String,Object>();//此處的Map不用get和Set方法list.put("flag", flag);list.put("msg",msg);if(flag){list.put("user",user);}ServletActionContext.getResponse().setCharacterEncoding("UTF-8");ServletActionContext.getResponse().getWriter().print(JSONObject.fromObject(list));return null;//此處返回值為NULL,不需要再回到ACTION配置中進行處理} |
方法二:使用Struts2配置Action進行JSON數據的轉換
第一步:引入包
此種方法只需要在使用Struts2所需包的基礎上引入下面這一個包即可:
第二步:頁面提交及回調函數處理結果。參考方法一中的第二步。
第三步:配置Action
|
1
2
3
4
5
6
7
8
9
10
11
12
13
14
15
16
|
<package name="json_default" namespace="/" extends="json-default">//注意此處的extends配置 <action name="user_*" class="Action.userAction" method="{1}"> <result type="json">//此處指明類型 <!-- 參數root指定要序列化得根對象 --> <!-- 默認將序列化當前Action中所有有返回值的getter方法的值 --> <param name="root">list</param> <!-- 參數includeProperties指定要序列化根對象中的哪些屬性,多個屬性以逗號隔開--> <param name="includeProperties">msg,flag,user,user.userName</param> <!-- 參數excludeProperties指定要從根對象中排除的屬性,排除屬性將不被序列化--> <param name="excludeProperties">user.password</param> <!-- 參數excludeNullProperties指定是否序列化值為空的屬性--> <param name="excludeNullProperties">true</param> </result> </action></package> |
第四步:Struts2跳轉到Action中進行JSON的轉換《關鍵步驟》
|
1
2
3
4
5
6
7
8
9
10
11
12
13
14
15
16
17
18
19
20
21
22
23
24
25
26
27
28
29
30
31
|
private User user=new User();private boolean flag;private String msg;private Map<String,Object> list=null;//需要為MAP準備get和Set方法..................省略Get和Set方法public String login() throws IOException{if(user.getUserName().equals("admin")&&user.getPassword().equals("123456")){msg="登陸成功";flag=true;}else{msg="登錄失敗,用戶名或密碼錯誤!";flag=false;}list= new HashMap<String,Object>();list.put("flag", flag);list.put("msg",msg);if(flag){list.put("user",user);}return "success";//返回值為success確保能跳進Action配置文件進行數據轉換 |
以上這篇Json在Struts中的轉換與傳遞方法就是小編分享給大家的全部內容了,希望能給大家一個參考,也希望大家多多支持服務器之家。


