1.首先我們要知道什么是Hibernate
Hibernate是一個輕量級的ORMapping對象。主要用來實現Java和數據庫表之間的映射,除此之外還提供數據查詢和數據獲取的方法,
可以大幅度減少開發時人工使用SQL和JDBC處理數據的時間,解放編程人員95%的任務。
2.什么是ORM Object-Relational-Mapping對象關系映射
ORM:是通過java對象映射到數據庫表,通過操作Java對象可以完成對數據表的操作。(假如你用的是Dbutils那么還需要在Java類中寫sql語句,而orm就不用)
Hibernate是一個完全的ORM框架只需要對對象的操作即可生成底層的SQL。
接下來直接進入主題:
先看看使用hibernate的基本流程!下面是簡單的流程圖

1.創建項目:
用myeclipse創建一個web project
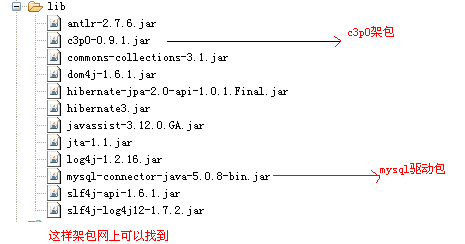
2.導入hibernate相關的架包到項目

第三步: 配置hibernate
在src目錄下新建一個xml文件,名稱為hibernate.cfg.xml(當然,你也可以不叫這個名稱,不過在代碼中要作相應的修改),拷貝如下內容:
|
1
2
3
4
5
6
7
8
9
10
11
12
13
14
15
16
17
18
19
20
21
22
23
24
25
26
27
28
29
30
31
32
33
34
|
<?xml version="1.0" encoding="UTF-8"?> <!DOCTYPE hibernate-configuration PUBLIC "-//Hibernate/Hibernate Configuration DTD 3.0//EN" "http://www.hibernate.org/dtd/hibernate-configuration-3.0.dtd"> <hibernate-configuration> <!-- 配置會話工廠 hibernate 核心 管理數據庫連接池 --> <session-factory> <!-- 1.配置數據庫連接參數 --> <!-- 1.1配置jdbc四個基本連接參數 --> <property name="hibernate.connection.username">root</property> <property name="hibernate.connection.password">root</property> <property name="hibernate.connection.url">jdbc:mysql:///hibernateexec</property> <property name="hibernate.connection.driver_class">com.mysql.jdbc.Driver</property> <!-- 1.2配置 hibernate使用的方言 --> <property name="hibernate.dialect">org.hibernate.dialect.MySQLDialect</property> <!-- 2.配置其他相關屬性 --> <!-- 2.1自動建表 --> <property name="hibernate.hbm2ddl.auto">update</property> <!-- 2.2在日志中輸出sql --> <property name="hibernate.show_sql">true</property> <!-- 2.3格式化sql --> <property name="hibernate.format_sql">true</property> <!-- 開啟事務 --> <property name="hibernate.connection.autocommit">true</property> <!-- 配置c3p0數據庫連接池 --> <property name="hibernate.connection.provider_class">org.hibernate.connection.C3P0ConnectionProvider</property> <property name="hibernate.c3p0.min_size">5</property> <property name="hibernate.c3p0.max_size">50</property> <property name="hibernate.c3p0.timeout">120</property> <property name="hibernate.c3p0.idle_test_period">3000</property> <!-- 3.加載映射文件 --> <mapping resource="com/study/model/Customer.hbm.xml"/> </session-factory> </hibernate-configuration> |
這里提醒一點:customer表你可以不用去手動創建,但是數據庫hibernateexec是要你手動創建的
第四步.創建實體和映射文件
|
1
2
3
4
5
6
7
8
9
10
11
|
public class Customer { private int id; private String name; private int age; private String city; private String addr;}/* * 提供set和get方法 */Customer 實體 |
映射文件和實體對象在同一個包下:
|
1
2
3
4
5
6
7
8
9
10
11
12
13
14
15
16
17
18
19
20
21
22
23
24
25
26
27
28
29
30
31
32
33
34
35
36
37
38
39
40
41
42
|
<?xml version="1.0" encoding="UTF-8"?> <!DOCTYPE hibernate-mapping PUBLIC "-//Hibernate/Hibernate Mapping DTD 3.0//EN" "http://www.hibernate.org/dtd/hibernate-mapping-3.0.dtd"> <hibernate-mapping> <!-- 完成實體類 和數據表的映射 --> <!-- 1.類與表的映射 --> <!-- name 要映射的完整類名 table 映射到數據庫的表名 catalog 映射到數據庫的名字 --> <class name="com.study.model.Customer" table="customer" catalog="hibernateexec"> <!-- 2.類中屬性 和表中 數據列的映射 --> <!-- 2.1主鍵 --> <!-- name 屬性名(類中) column 列名(表中) type 數據類型 --> <id name="id" column="id" type="int"> <!-- 配置主鍵生成策略 主鍵自動增長--> <generator class="identity"></generator> </id> <!-- 2.2 普通屬性 --> <!-- name 屬性名(類中) column 列名(表中) type 數據類型(也可以直接寫String) --> <property name="name" column="name" type="java.lang.String"></property> <property name="age" column="age" type="int"></property> <!-- 也可以分開寫 --> <property name="city"> <column name="city" sql-type="varchar(20)"></column> </property> <!-- 如果什么都不寫,那就默認類的屬性名和數據庫中的列名一致都為addr,類型為varchar --> <property name="addr"></property> </class> </hibernate-mapping>Customer.hbm.xml |
第五步:創建SessionFactory對象
第六步:獲取Session對象進行相關操作
第五步和第六步我和在一起,第六步我們發現不論增刪改查前面四步都是一樣的,我們其實可以提取到一個工具類,再來調用這樣加快效率。
|
1
2
3
4
5
6
7
8
9
10
11
12
13
14
15
16
17
18
19
20
21
22
23
24
25
26
27
28
29
30
31
32
33
34
35
36
37
38
39
40
41
42
43
44
45
46
47
48
49
50
51
52
53
54
55
56
57
58
59
60
61
62
63
64
65
66
67
68
69
70
71
72
73
74
75
76
77
78
79
80
81
82
83
84
85
86
87
88
89
90
91
92
93
94
95
96
97
98
99
100
101
102
103
104
105
106
107
108
109
110
111
112
113
|
import java.util.List; import org.hibernate.Query; import org.hibernate.SQLQuery; import org.hibernate.Session; import org.hibernate.SessionFactory; import org.hibernate.Transaction; import org.hibernate.cfg.Configuration; import org.junit.Test; import com.study.model.Customer; public class HibernateTest { /* * 保存數據 */ @Test public void testInsert() { // 實例化配置對象 加載映射文件 加載 hibernate.cfg.xml Configuration configuration = new Configuration().configure(); // 創建會話工廠 SessionFactory sessionFactory = configuration.buildSessionFactory(); // 創建會話 Session session = sessionFactory.openSession(); // 開啟事務 Transaction transaction = session.beginTransaction(); // 編寫自己的邏輯代碼 Customer customer = new Customer(); customer.setName("小黃"); customer.setAge(40); customer.setCity("北京"); // 直接保存 session.save(customer); // 提交事務 transaction.commit(); session.close(); sessionFactory.close(); } //查詢所有的 @Test public void testFindAllByHQL(){ // 實例化配置對象 加載映射文件 加載 hibernate.cfg.xml Configuration configuration = new Configuration().configure(); // 創建會話工廠 SessionFactory sessionFactory = configuration.buildSessionFactory(); // 創建會話 Session session = sessionFactory.openSession(); // 開啟事務 Transaction transaction = session.beginTransaction(); //編寫HQL語句(面向類和屬性的查詢 String hql =" from Customer";//這里是Customer不是表名 是類名 查詢Customer Query query =session.createQuery(hql); List<Customer> customers=query.list(); System.out.println(customers); // 提交事務 transaction.commit(); session.close(); sessionFactory.close(); } // 刪除 @Test public void testDelete() { // 實例化配置對象 加載映射文件 加載 hibernate.cfg.xml Configuration configuration = new Configuration().configure(); // 創建會話工廠 SessionFactory sessionFactory = configuration.buildSessionFactory(); // 創建會話 Session session = sessionFactory.openSession(); // 開啟事務 Transaction transaction = session.beginTransaction(); Customer customer =new Customer(); customer.setId(2); session.delete(customer); // 提交事務 transaction.commit(); session.close(); sessionFactory.close(); } // 修改 @Test public void testUpdate() { // 實例化配置對象 加載映射文件 加載 hibernate.cfg.xml Configuration configuration = new Configuration().configure(); // 創建會話工廠 SessionFactory sessionFactory = configuration.buildSessionFactory(); // 創建會話 Session session = sessionFactory.openSession(); // 開啟事務 Transaction transaction = session.beginTransaction(); Customer customer = (Customer) session.get(Customer.class, 2); customer.setCity("杭州"); session.update(customer); // 提交事務 transaction.commit(); session.close(); sessionFactory.close(); } // 查詢 根據id查詢 @Test public void testFindById() { // 實例化配置對象 加載映射文件 加載 hibernate.cfg.xml Configuration configuration = new Configuration().configure(); // 創建會話工廠 SessionFactory sessionFactory = configuration.buildSessionFactory(); // 創建會話 Session session = sessionFactory.openSession(); // 開啟事務 Transaction transaction = session.beginTransaction(); Customer customer = (Customer) session.get(Customer.class, 1); System.out.println(customer); // 提交事務 transaction.commit(); session.close(); sessionFactory.close(); } } |
運行效果:當你運行第一個增加用戶的時候,運行結束數據庫會自動創建customer表格,和往表格里添加數據。

這樣就通過hibernate進行基礎的增刪改查了。
以上就是本文的全部內容,希望本文的內容對大家的學習或者工作能帶來一定的幫助,同時也希望多多支持服務器之家!
原文鏈接:http://www.cnblogs.com/qdhxhz/p/6478317.html


