當前開發項目涉及到富文本框,了解了不少富文本編輯器之后,最終決定使用度娘的ueditor。原因:功能強大,并且自帶適配java后端的圖片和視頻上傳。
項目地址
不多說,上一下該項目的地址: http://ueditor.baidu.com/website/
簡書不支持markdown其他站點的外鏈很遺憾
整合過程
后端改造
因為項目使用的springboot框架,而ueditor對于java后端的支持僅僅是給了一個jsp文件。因此,需要對該文件進行一下處理,修改為面向springboot的統一controller。
|
1
2
3
4
5
6
7
8
9
10
11
12
13
14
15
16
17
18
19
20
|
@controller@transactional@requestmapping("/static/common/ueditor/jsp")public class jspcontroller { @requestmapping("/controller") @responsebody public void getconfiginfo(httpservletrequest request,httpservletresponse response){ response.setcontenttype("application/json"); string rootpath = request.getsession().getservletcontext() .getrealpath("/"); try { string exec = new actionenter(request, rootpath).exec(); printwriter writer = response.getwriter(); writer.write(exec); writer.flush(); writer.close(); } catch (ioexception | jsonexception e) { e.printstacktrace(); } } |
如上所述,該項目即支持來自/static/common/ueditor/jsp/controller的上傳請求了。
前端請求
在前端添加ueditor支持。即:將整個uediotr包進行項目引入,并且在使用該控件的地方進行js的導入。
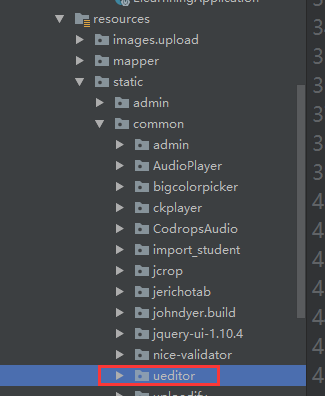
項目引入,我的對應代碼結構如下:

頁面引入,引入對應代碼如下:
|
1
2
|
<script type="text/javascript" charset="utf-8" th:src="@{/static/common/ueditor/ueditor.config.js}"></script> <script type="text/javascript" charset="utf-8" th:src="@{/static/common/ueditor/ueditor.all.js}"></script> |
實例化ueditor編輯器即可,下面是我的初始化參數,僅做參考。
|
1
2
3
4
5
6
7
8
9
10
11
12
13
14
15
16
17
18
19
20
21
22
23
24
25
26
27
28
29
30
31
32
33
34
35
36
37
38
|
//實例化編輯器 var ue = ue.geteditor(''+id,{ toolbars: [ [ 'fontfamily', //字體 'fontsize', //字號 'undo', //撤銷 'redo', //重做 '|', 'emotion', //表情 'forecolor', //字體顏色 'backcolor', //背景色 'bold', //加粗 'underline', //下劃線 'strikethrough', //刪除線 '|', 'justifyleft', //居左對齊 'justifyright', //居右對齊 'justifycenter', //居中對齊 '|', 'link', //超鏈接 'unlink', //取消鏈接 'simpleupload', //單圖上傳 'insertimage', //多圖上傳 //'music', //音樂 //'insertvideo', //視頻 'removeformat', //清除格式 'formatmatch', //格式刷 'source', //源代碼 ] ], enableautosave:false, autoheightenabled: true, autofloatenabled: true, initialframewidth:width, initialframeheight:height, scaleenabled:true//滾動條 }); |
此時,訪問我們的頁面就會看到富文本框了。
不過,此時會提示我們后臺配置文件出錯,無法實現上傳功能
實現上傳功能
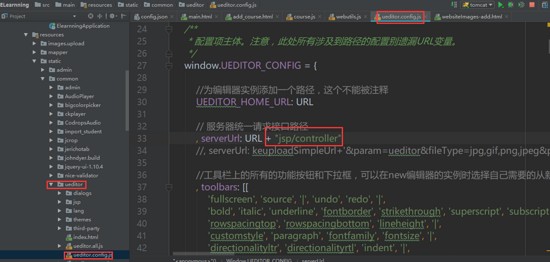
修改config.js文件,對應的全局請求路徑。該請求是為了獲取config.json對應的配置數據。可以在controller里面直接返回配置信息或者在controller里面進行json文件的讀取。我這里使用的是讀取配置文件的方式,使用ueditor自帶的方法,文章開頭已經實現,這里貼一下需要修改的請求:

完成以上配置之后,再次加載ueditor的頁面,其中上傳圖片的按鈕即可完成圖片的上傳了。
注意:如果開始調試模式,加入斷點,測試加載json串的時候。會出現超時錯誤。暫時沒從配置文件里面找到配置字段。所有,這里需要注意,假如一切配置均無問題,但是依然返回后臺配置錯誤的話,可以把斷點全部取消掉試一試。
注意:上傳需要加入上傳組件,此處使用fileuoload
|
1
2
3
4
5
|
<dependency> <groupid>commons-fileupload</groupid> <artifactid>commons-fileupload</artifactid> <version>1.3</version> </dependency> |
使用servlet實現上傳
|
1
2
3
4
5
6
7
8
9
10
11
12
13
14
15
16
17
18
19
20
21
22
23
24
25
26
27
28
29
30
|
/** * 嘗試使用servlet來實現ueditor * * @author onywang * @create 2018-02-05 2:40 **/@webservlet(name = "ueditorservlet", urlpatterns = "/static/common/ueditor/ueditor")public class ueditorcontrollerservlet extends httpservlet { @override protected void dopost(httpservletrequest request, httpservletresponse response) throws servletexception, ioexception { request.setcharacterencoding( "utf-8" ); response.setheader("content-type" , "text/html"); printwriter out = response.getwriter(); servletcontext application=this.getservletcontext(); string rootpath = application.getrealpath( "/" ); string action = request.getparameter("action"); string result = new actionenter( request, rootpath+"web-inf/classes" ).exec(); if( action!=null && (action.equals("listfile") || action.equals("listimage") ) ){ rootpath = rootpath.replace("\\", "/"); result = result.replaceall(rootpath, "/"); } out.write( result ); } @override protected void doget(httpservletrequest req, httpservletresponse resp) throws servletexception, ioexception { dopost(req, resp); } |
采用servlet的方式,新建一個注解式的servlet即可。
需要在main方法里面加入@servletcomponentscan注解。
修改ueditor默認訪問路徑。
注意:springboot下面,所有的資源文件都是放在classes下面的,所有,對于路徑的處理一定要加倍小心。放在增加路徑web-inf/classes
以上就是本文的全部內容,希望對大家的學習有所幫助,也希望大家多多支持服務器之家。
原文鏈接:https://www.jianshu.com/p/241b2a401e32


