c#中wpf listview綁定數據的實例詳解
wpf中listview用來顯示數據十分方便, 我們可以將它分成幾個列,每一個列用來顯示一條數據,但是又是在一方之中。

那么怎樣實現這樣的效果的呢,這就要用綁定了。
我們先來看一看他的xmal代碼
|
1
2
3
4
5
6
7
8
9
10
11
12
13
14
15
16
17
|
<listview name="receivelist" grid.row="0"> <listview.view> <gridview> <gridview.columns> <gridviewcolumn header="發件人" width="200" displaymemberbinding="{binding path=senderuser}" /> <gridviewcolumn header="主題" width="350" displaymemberbinding="{binding path=topic}" /> <gridviewcolumn header="附件" displaymemberbinding="{binding path=ffile}" width="200" /> <gridviewcolumn header="時間" width="150" displaymemberbinding="{binding path=time}"/> </gridview.columns> </gridview> </listview.view> </listview> |
上面的代碼中每一個gridviewcolumn都有一個綁定{bind path=作為綁定源的類中的成員屬性}
下面來看一下綁定的類
|
1
2
3
4
5
6
7
8
9
10
11
12
13
14
15
16
17
18
19
20
21
22
23
24
25
26
27
28
29
30
31
32
33
34
35
36
37
38
39
40
41
42
43
44
45
46
47
48
49
50
51
52
53
54
55
56
57
58
59
60
61
62
63
64
65
66
67
68
69
70
71
72
73
74
75
76
77
78
79
80
81
82
83
84
85
86
87
88
89
90
|
using system; using system.collections.generic; using system.componentmodel; using system.linq; using system.text; using system.threading.tasks; namespace emailclient { class maillist : inotifypropertychanged { public string senduser; public string topic; public string file; public string time; public event propertychangedeventhandler propertychanged; public string senderuser { get { return senduser; } set { senduser = value; if (this.propertychanged != null)//激發事件,參數為age屬性 { this.propertychanged.invoke(this, new propertychangedeventargs("age")); } } } public string topic { get { return topic; } set { topic = value; if (this.propertychanged != null)//激發事件,參數為age屬性 { this.propertychanged.invoke(this, new propertychangedeventargs("age")); } } } public string ffile { get { return file; } set { file = value; if (this.propertychanged != null)//激發事件,參數為age屬性 { this.propertychanged.invoke(this, new propertychangedeventargs("age")); } } } public string time { get { return time; } set { time = value; if (this.propertychanged != null)//激發事件,參數為age屬性 { this.propertychanged.invoke(this, new propertychangedeventargs("age")); } } } public maillist() { } public maillist(string senduser,string topic,string file,string time) { this.senduser = senduser; this.topic = topic; this.file = file; this.time = time; } } } |
現在我們可以看到我們剛才綁定的屬性就在這個類中,那么該怎樣應用呢
下面來看一下我的應用代碼
|
1
|
private list<maillist> maillist; |
|
1
|
maillist = new list<maillist>(); |
以上的代碼是聲明一個list來保存我們插入的數據的,由于我的源代碼是從服務器中得到的郵件列表。
|
1
|
maillist.add(new maillist("xxxxxx", "xxxxxxxx", "xxxxxx", "xxxxxx")); |
|
1
|
receivelist.itemssource = maillist; |
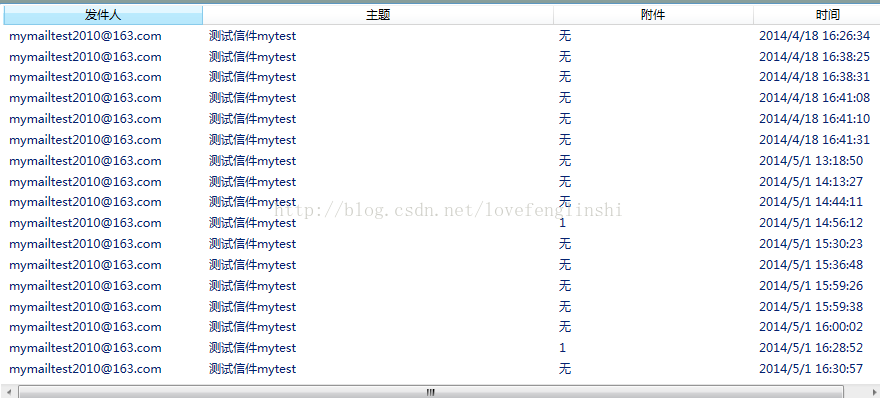
如果這樣寫那么那么上面的途中得到的就是xxxxxx了。
那么綁定就是這樣了。
如有疑問請留言或者到本站社區交流討論,感謝閱讀,希望能幫助到大家,謝謝大家對本站的支持!
原文鏈接:http://blog.csdn.net/lovefenglinshi/article/details/24887783


