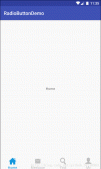
底部導航欄,在我們App項目中是非常常用!而且實現它的方式很多,今天我們就來使用RadioButton+Fragment實現底部導航欄!
下面就讓我們動手吧,首先我們打開RadioButtonDemo這個項目,首先修改activity_main.xml文件如下:
|
1
2
3
4
5
6
7
8
9
10
11
12
13
14
15
16
17
18
19
20
21
22
23
24
25
26
27
28
29
30
31
32
33
34
35
36
37
38
39
40
41
42
43
44
45
46
47
48
49
50
51
52
53
54
55
56
57
58
59
60
61
62
63
64
65
66
67
68
69
|
<?xml version="1.0" encoding="utf-8"?><LinearLayout xmlns:android="http://schemas.android.com/apk/res/android" xmlns:app="http://schemas.android.com/apk/res-auto" xmlns:tools="http://schemas.android.com/tools" android:layout_width="match_parent" android:layout_height="match_parent" android:orientation="vertical" tools:context="com.example.jackhu.radiobuttondemo.MainActivity"> <FrameLayout android:id="@+id/mFragment" android:layout_width="match_parent" android:layout_height="0dp" android:layout_weight="1"></FrameLayout> <RadioGroup android:layout_marginBottom="2dp" android:id="@+id/mRadioGroup" android:orientation="horizontal" android:layout_width="match_parent" android:layout_height="48dp"> <RadioButton android:drawableTop="@drawable/rbhome" android:button="@null" android:checked="true" android:textColor="@color/colorRadioButtonP" android:id="@+id/mRb_home" android:gravity="center" android:layout_width="0dp" android:text="Home" android:layout_weight="1" android:layout_height="match_parent" /> <RadioButton android:drawableTop="@drawable/rb_message" android:button="@null" android:textColor="@color/colorRadioButtonN" android:id="@+id/mRb_message" android:gravity="center" android:layout_width="0dp" android:text="Message" android:layout_weight="1" android:layout_height="match_parent" /> <RadioButton android:drawableTop="@drawable/rbfind" android:button="@null" android:textColor="@color/colorRadioButtonN" android:id="@+id/mRb_find" android:gravity="center" android:layout_width="0dp" android:text="Find" android:layout_weight="1" android:layout_height="match_parent" /> <RadioButton android:drawableTop="@drawable/rbmy" android:button="@null" android:textColor="@color/colorRadioButtonN" android:id="@+id/mRb_my" android:gravity="center" android:layout_width="0dp" android:text="My" android:layout_weight="1" android:layout_height="match_parent" /> </RadioGroup></LinearLayout> |
這里我們在布局文件Fragment控件:用于顯示界面的切換。
RadioGroup控件包含了4個RadioButton:用于顯示按鈕。我們給第一個按鈕check為true默認選中。其中android:button=”@null” 取消圓點。
drawableTop屬性:
|
1
2
3
4
5
|
<?xml version="1.0" encoding="utf-8"?><selector xmlns:android="http://schemas.android.com/apk/res/android"> <item android:state_checked="true" android:drawable="@drawable/home_p"/> <item android:drawable="@drawable/home_n"/></selector> |
顯示選擇和未選中的狀態的圖標
創建Fragment,加載Fragment布局文件,類代碼如下:
|
1
2
3
4
5
6
7
8
9
10
11
12
13
14
15
16
17
18
19
20
21
22
23
24
25
26
27
28
29
30
31
32
33
34
35
|
package com.example.jackhu.radiobuttondemo.fragment;import android.os.Bundle;import android.support.v4.app.Fragment;import android.view.LayoutInflater;import android.view.View;import android.view.ViewGroup;import com.example.jackhu.radiobuttondemo.R;/** * A simple {@link Fragment} subclass. */public class HomeFragment extends Fragment { public HomeFragment() { // Required empty public constructor } //單例模式 public static HomeFragment newInstance(){ HomeFragment homeFragment=new HomeFragment(); return homeFragment; } @Override public View onCreateView(LayoutInflater inflater, ViewGroup container, Bundle savedInstanceState) { // Inflate the layout for this fragment return inflater.inflate(R.layout.fragment_home, container, false); }} |
接下來我們來修改MainActivity.class中的代碼,在這里實現點擊按鈕切換Fragment的具體功能,代碼如下:
|
1
2
3
4
5
6
7
8
9
10
11
12
13
14
15
16
17
18
19
20
21
22
23
24
25
26
27
28
29
30
31
32
33
34
35
36
37
38
39
40
41
42
43
44
45
46
47
48
49
50
51
52
53
54
55
56
57
58
59
60
61
62
63
64
65
66
67
68
69
70
71
72
73
74
75
76
77
78
79
80
81
82
83
84
85
86
87
88
89
90
91
92
93
94
95
96
97
98
99
100
101
102
103
104
105
106
107
108
109
110
111
112
113
114
115
116
117
118
119
120
121
122
123
124
125
126
127
128
129
130
131
132
133
134
135
136
|
package com.example.jackhu.radiobuttondemo;import android.support.annotation.IdRes;import android.support.v4.app.Fragment;import android.support.v4.app.FragmentManager;import android.support.v4.app.FragmentTransaction;import android.support.v4.content.ContextCompat;import android.support.v7.app.AppCompatActivity;import android.os.Bundle;import android.widget.RadioButton;import android.widget.RadioGroup;import android.widget.Toast;import com.example.jackhu.radiobuttondemo.fragment.FindFragment;import com.example.jackhu.radiobuttondemo.fragment.HomeFragment;import com.example.jackhu.radiobuttondemo.fragment.MessageFragment;import com.example.jackhu.radiobuttondemo.fragment.MyFragment;import java.util.ArrayList;import java.util.List;public class MainActivity extends AppCompatActivity implements RadioGroup.OnCheckedChangeListener { private RadioGroup mRadioGroup; private List<Fragment> fragments = new ArrayList<>(); private Fragment fragment; private FragmentManager fm; private FragmentTransaction transaction; private RadioButton rb_Home,rb_Message,rb_Find,rb_My; @Override protected void onCreate(Bundle savedInstanceState) { super.onCreate(savedInstanceState); setContentView(R.layout.activity_main); initView(); //初始化組件 mRadioGroup.setOnCheckedChangeListener(this); //點擊事件 fragments = getFragments(); //添加布局 //添加默認布局 normalFragment(); } //默認布局 private void normalFragment() { fm=getSupportFragmentManager(); transaction=fm.beginTransaction(); fragment=fragments.get(0); transaction.replace(R.id.mFragment,fragment); transaction.commit(); } private void initView() { mRadioGroup = (RadioGroup) findViewById(R.id.mRadioGroup); rb_Home= (RadioButton) findViewById(R.id.mRb_home); rb_Message= (RadioButton) findViewById(R.id.mRb_message); rb_Find= (RadioButton) findViewById(R.id.mRb_find); rb_My= (RadioButton) findViewById(R.id.mRb_my); } @Override public void onCheckedChanged(RadioGroup group, @IdRes int checkedId) { fm=getSupportFragmentManager(); transaction=fm.beginTransaction(); switch (checkedId){ case R.id.mRb_home: fragment=fragments.get(0); transaction.replace(R.id.mFragment,fragment); Toast.makeText(this, "Home", Toast.LENGTH_SHORT).show(); break; case R.id.mRb_message: fragment=fragments.get(1); transaction.replace(R.id.mFragment,fragment); Toast.makeText(this, "Message", Toast.LENGTH_SHORT).show(); break; case R.id.mRb_find: fragment=fragments.get(2); transaction.replace(R.id.mFragment,fragment); Toast.makeText(this, "Find", Toast.LENGTH_SHORT).show(); break; case R.id.mRb_my: fragment=fragments.get(3); transaction.replace(R.id.mFragment,fragment); Toast.makeText(this, "My", Toast.LENGTH_SHORT).show(); break; } setTabState(); transaction.commit(); } //設置選中和未選擇的狀態 private void setTabState() { setHomeState(); setMessageState(); setFindState(); setMyState(); } private void setMyState() { if (rb_My.isChecked()){ rb_My.setTextColor(ContextCompat.getColor(this,R.color.colorRadioButtonP)); }else{ rb_My.setTextColor(ContextCompat.getColor(this,R.color.colorRadioButtonN)); } } private void setFindState() { if (rb_Find.isChecked()){ rb_Find.setTextColor(ContextCompat.getColor(this,R.color.colorRadioButtonP)); }else{ rb_Find.setTextColor(ContextCompat.getColor(this,R.color.colorRadioButtonN)); } } private void setMessageState() { if (rb_Message.isChecked()){ rb_Message.setTextColor(ContextCompat.getColor(this,R.color.colorRadioButtonP)); }else{ rb_Message.setTextColor(ContextCompat.getColor(this,R.color.colorRadioButtonN)); } } private void setHomeState() { if (rb_Home.isChecked()){ rb_Home.setTextColor(ContextCompat.getColor(this,R.color.colorRadioButtonP)); }else{ rb_Home.setTextColor(ContextCompat.getColor(this,R.color.colorRadioButtonN)); } } public List<Fragment> getFragments() { fragments.add(new HomeFragment()); fragments.add(new MessageFragment()); fragments.add(new FindFragment()); fragments.add(new MyFragment()); return fragments; }} |
好了,這樣的話,所有的代碼就已經完成了,可以運行一下看看完整的效果了最終效果圖:

以上就是本文的全部內容,希望對大家的學習有所幫助,也希望大家多多支持服務器之家。
原文鏈接:https://blog.csdn.net/github_37216983/article/details/68628540


